

They go by different names: plate flowers, sun catchers, garden art flowers and dish flowers. Whatever you call them, they have grown over the years to become some of the most loved garden art.
I certainly fell in love with them when I first started seeing dish flowers on Pinterest. If you’d like to try making one yourself, then read on! This TUTORIAL is packed with those “little details” that will not only help your craft project be successful but give you ideas for a more beautiful dish flower.
When I first started making my own dish flowers, I did a ton of research. You see, I was planning on selling my garden art, so they absolutely had to be made to a high standard. I learned a bit of history behind these things; plus different materials and construction methods. In doing so, I picked up a lot a neat tips from other makers that helped tremendously. All of which I happily pass on to you here.
A word of encouragement
If you’ve tried to make one in the past and it didn’t work out, or you just weren’t overly excited with it, don’t give up! I hope you’ll give it another try. Perhaps this tutorial will give you some valuable insight or even just a new idea you hadn’t thought of before that will give you a better result and thus make your efforts more rewarding.
Introduction to making dish flowers
This tutorial will utilize the “drill method” for making dish flowers. If you are planning on using a different method, other aspects of making dish flowers…such as ideas for pretty plate combinations and glue techniques will still be relevant to you.
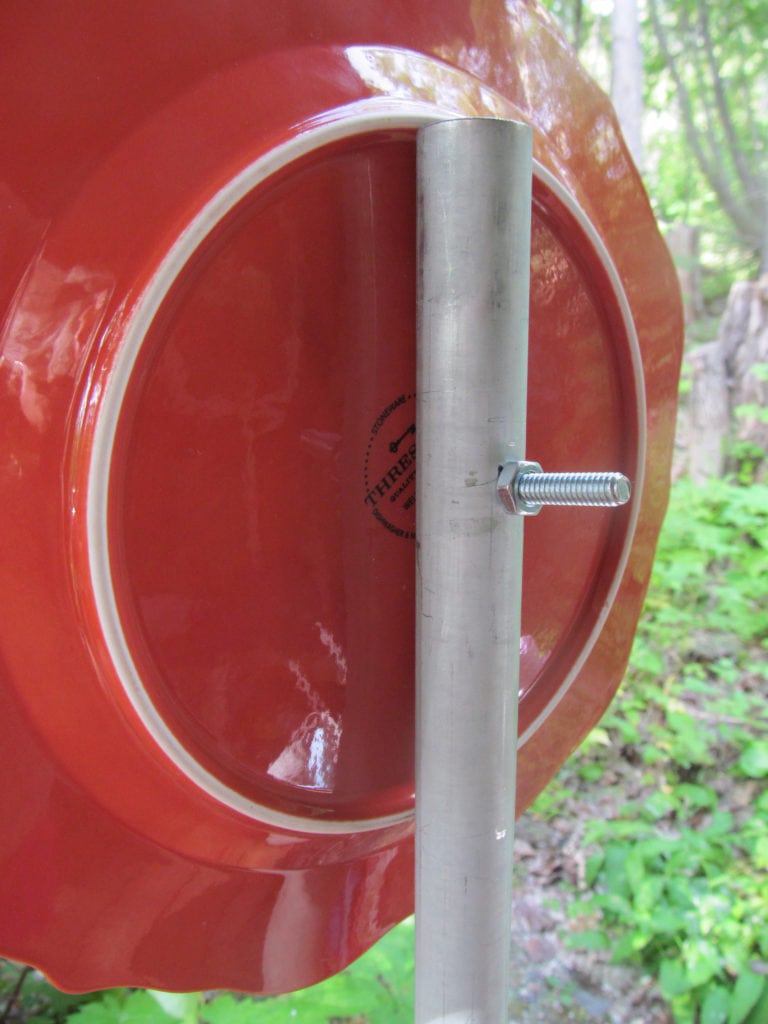
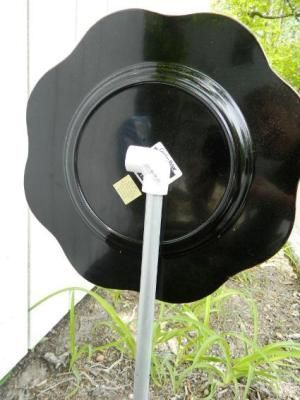
The drill method of construction involves using a special drill bit to make a hole through the center of the plate. The plate is then attached to the post using a machine screw and wing nut.
Drilling the plate is my personal preferred method to attach a dish flower to its post. The flower head can get heavy with all those glass and ceramic plates. While this method is a little more involved than gluing, I feel that the art piece is better supported and more secure when attached to the post with a bolt. Then, the weight of the piece is supported in two places: the entry and exit point of the post.
Gluing is certainly easier, faster, and generally doesn’t require any specialty tools. However, glue failures are the number one reason why dish flowers fall apart and sometimes break, particularly in hot climates. SEE my article on “The Best Glues to Use for Garden Art”. Construction methods are the number one question customers ask me before buying one of my dish flowers.
Other methods to attach to post
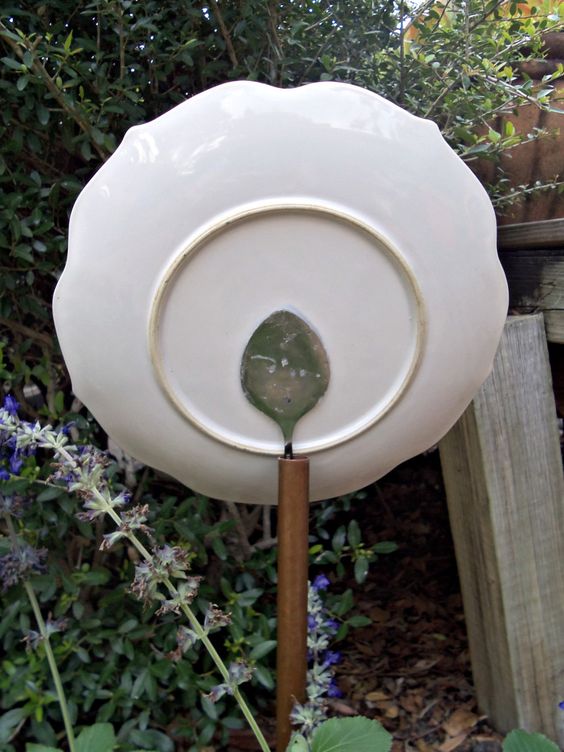
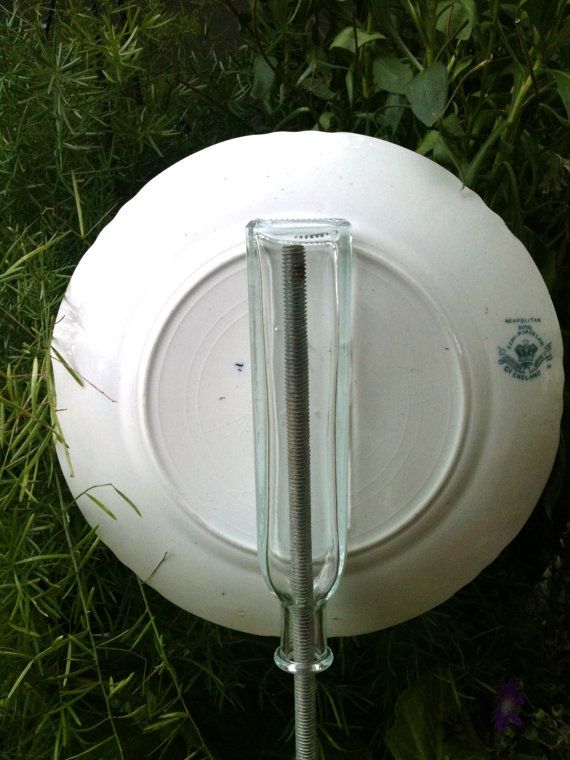
Different craftsmen use different methods for different reasons, such as gluing something onto the back of the plate. I do not personally use nor recommend these methods because the plate has a tendency to slip off. Never-the-less, here are some other examples of using adhesive to attach the dish flower head to the support post:
In my first tutorials, I tried to cover all the bases to give readers a couple of options for making dish flowers. Unfortunately, my enthusiasm got the best of me. There are just too many variables. Someone who is new to this craft wouldn’t be well served.
I tried to remember what it was like for myself, when I was first learning and which tutorials were the most helpful. For that reason, I have decided to offer only the drill method, which is the method I use as an artist. It’s included here, simply scroll down a bit.
Dish Flower Tutorial
- Part 1 Selecting Pretty Plates: Glass and Ceramic
- Part 2 Drilling the plate
- Part 3 Adhesives: which glues are virtually fail-proof?
- Part 4: what makes a great post?
Materials for one dish flower:
- 3 dishes of various sizes (See PART 1 below for recommendations)
- 1 tube of GE Silicone Clear, for exterior
- 1 5ft section of 3/4 ” metal galvanized electrical conduit (or 3/4″ copper)
- cordless drill
- 1/4″ round diamond tip drill bit
- 1 packet of machine screws 1/4″ 20x 2-1/2 in (with fastening nut)
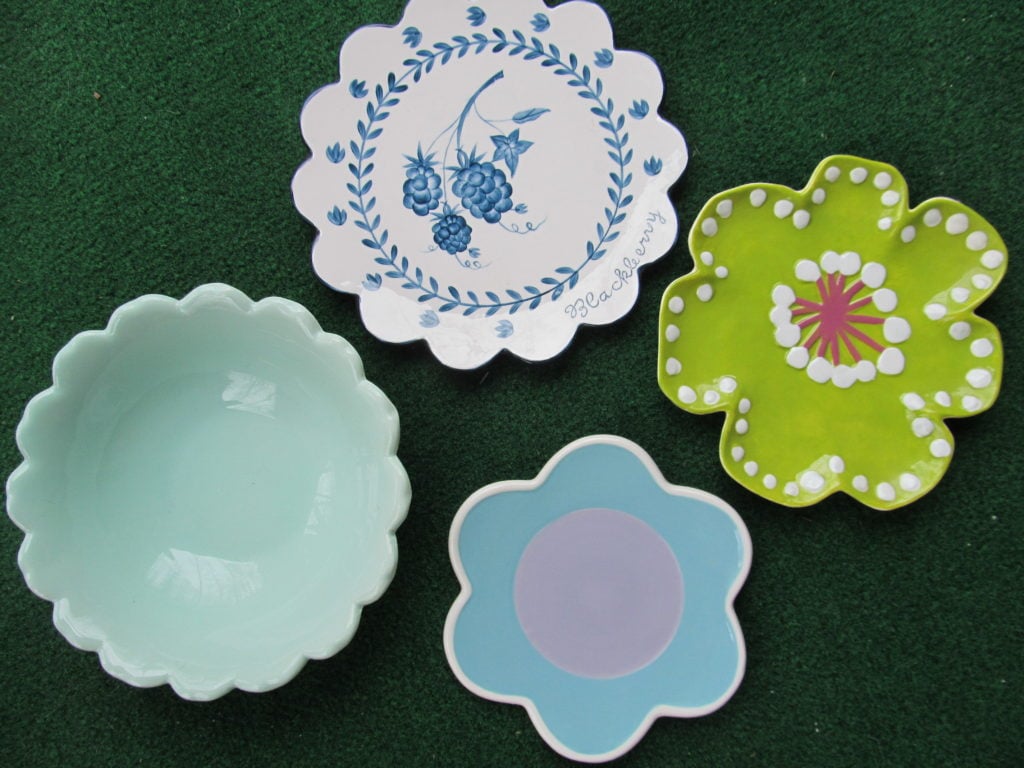
Part 1: selecting pretty dishes
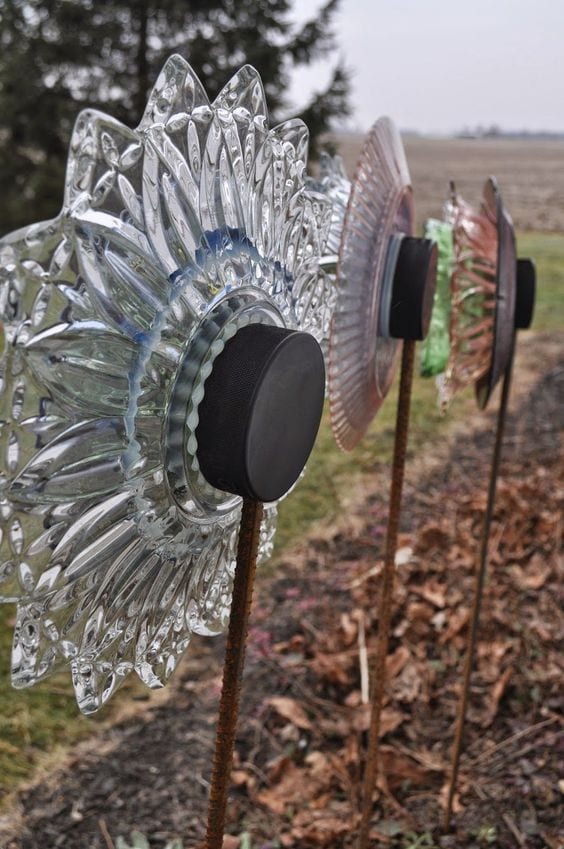
For inspiration, you may enjoy this gallery of dishflowers by Make it a Garden
What types of plates to use and why, makes all the difference in the world. But believe it or not, it’s a detail some tutorials take for granted. When I first became fascinated with making dish flowers, I watched some videos on You Tube. All anyone ever said was “just get a bunch of plates”. That didn’t exactly help someone like me who didn’t have a clue.
Eventually, I found one lady who offered more specifics. I wish I could recall her name because she was fantastic. She advised finding plates that actually looked like flowers. Plates with scalloped edges or bright floral patterns or colors. Now, I knew what to look for.
Where to get your dishes
- Thrift Store
- Garage Sale
- Flea Market
- Antique Shop
A Thrift Store is the best place to find the widest selection of plates. Some stores have a separate section for more vintage and antique-oriented items. Be sure to check there also for more unique dishware at a great price. Many thrift stores are run by non-profits and churches to fund local programs.
A garage sale is by far the cheapest place to find dishes, but you may have to go around to a few of them. Pick up several different pieces so you can switch them around at home to see which combinations you like the best.
Finally, antique shops are last on my list. While I love to shop for antiques and salvage, the prices are much higher. I don’t advise buying dishes for garden art there. For one thing, you can’t just buy one or two because dishes are for sale in entire sets. Once in awhile, vintage plates show up at the thrift store for considerably less!
On rare occasions, I have used antiques. Some make incredibly whimsical dish flowers. However, gorgeous as they are, a lot of vintage and antique items are on the more frail side. So, you have to choose carefully.
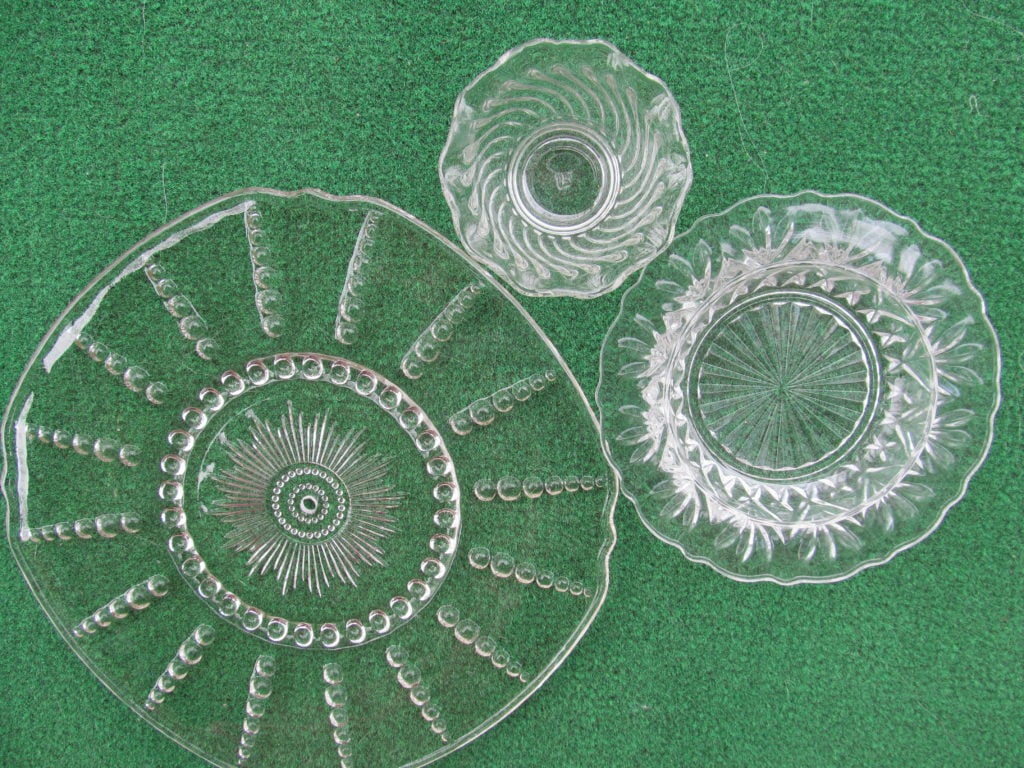
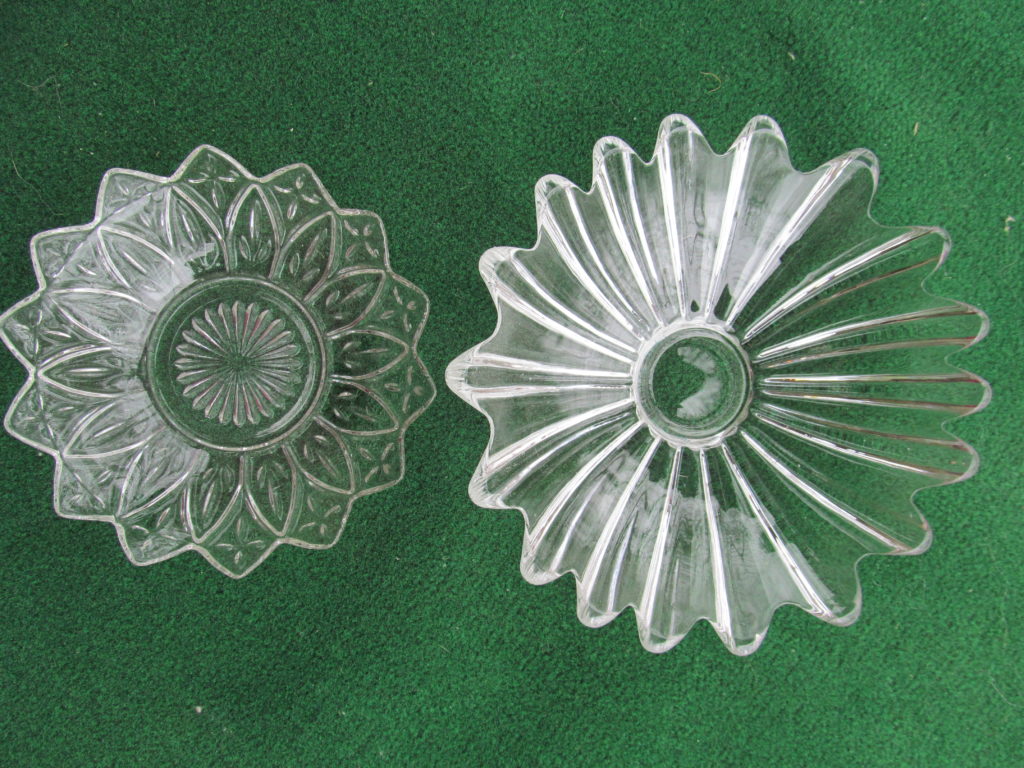
Which is better for making dish flowers: Glass or Ceramic?
If you’re making dish flowers for the first time, I recommend starting with ceramic plates. The only difference between using ceramic or glass plates is that clear glass additionally should be painted. Otherwise, they are like windows and they don’t show up very well in the yard or garden. Painting isn’t included in this tutorial but you’ll find a link at the bottom of this post.
While you might believe glass is more fragile, that’s not necessarily so. What’s more important is the ‘density’ or ‘thickness’ of the glass.
I speak from experience because I’ve broken a few. Yup, I have! But it’s taught me a lot about the inherent properties of glass and ceramics. Needless to say, I look at plates a lot differently now, then when I first started.
The 3 components of a dish flower
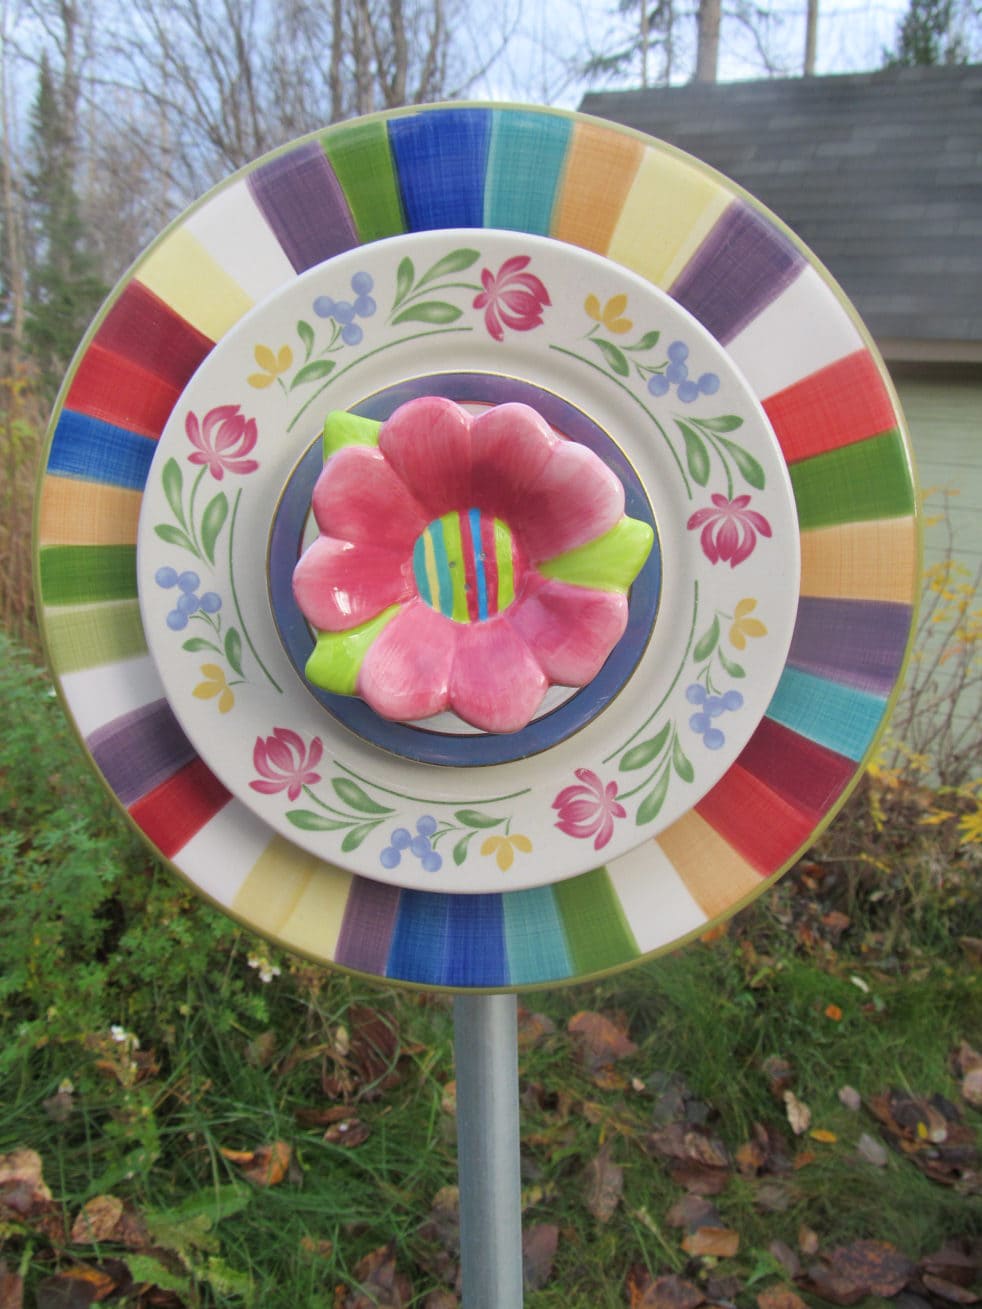
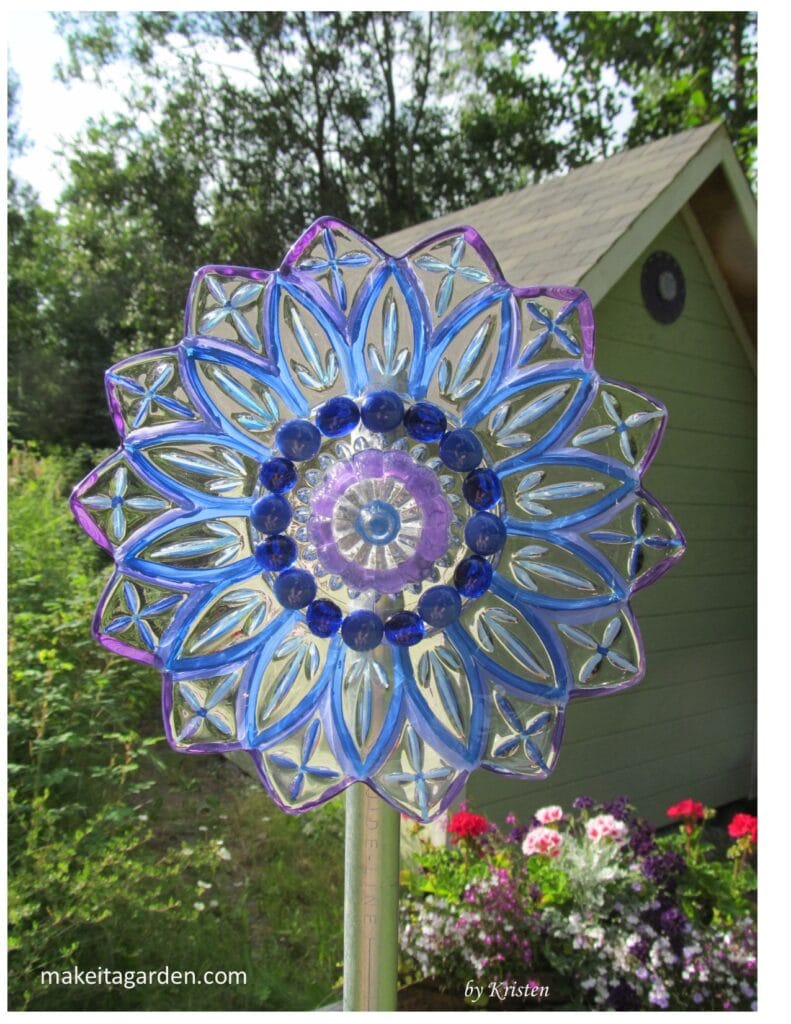
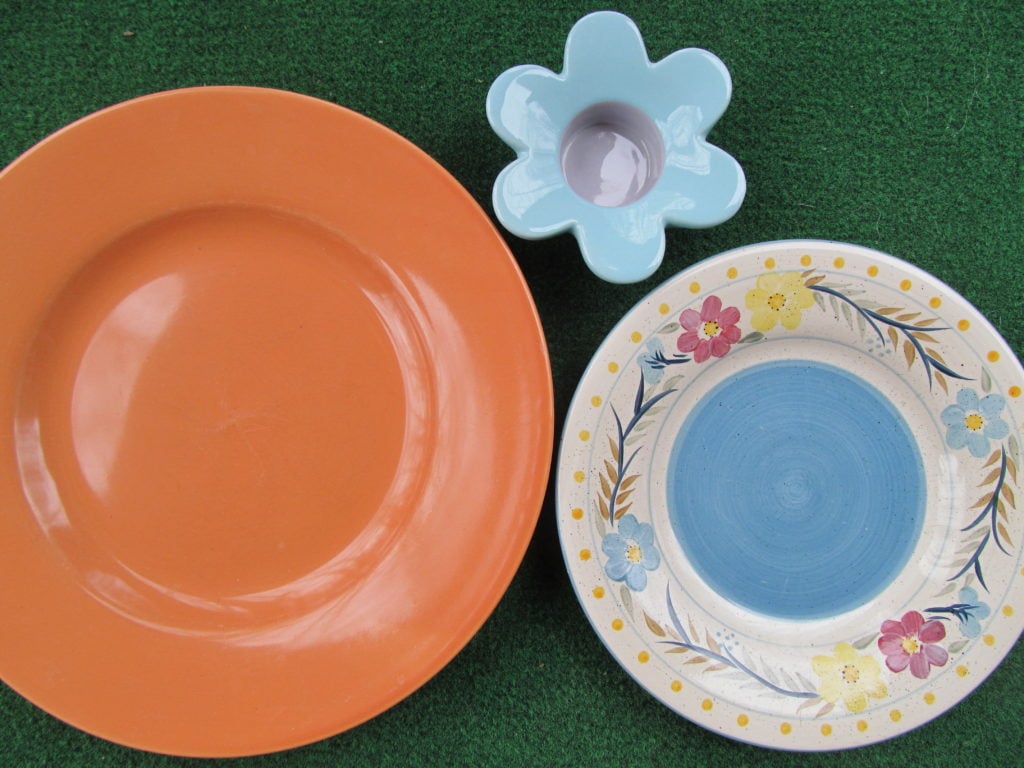
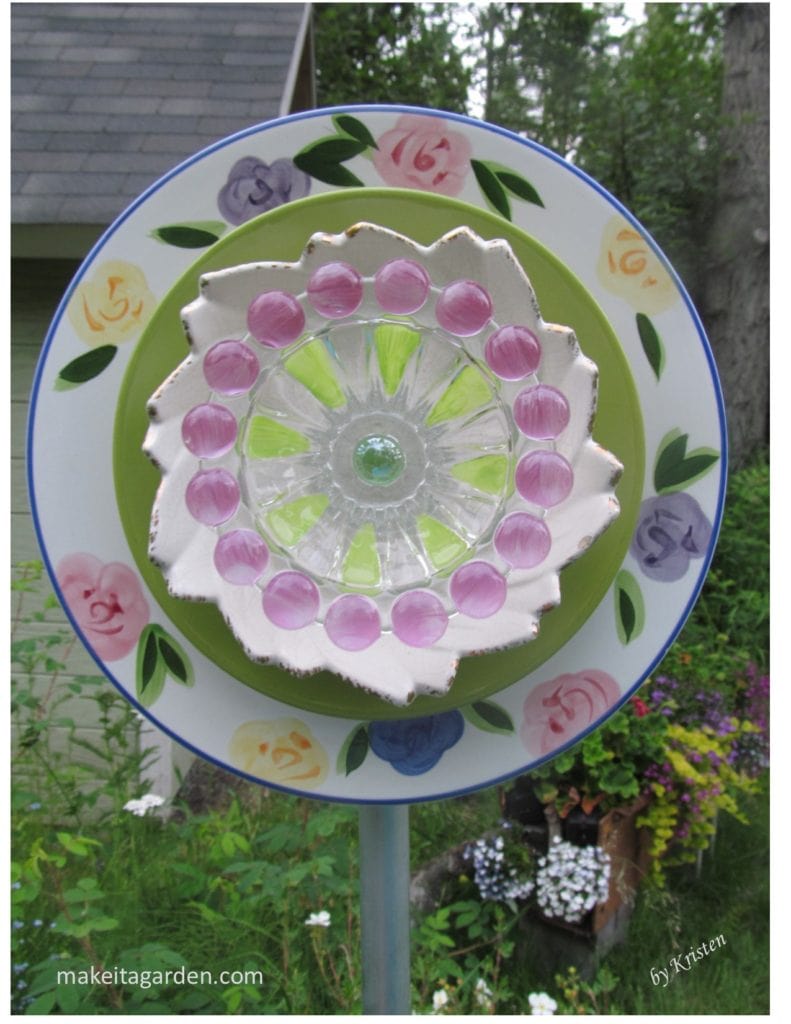
A simple plate flower consists of 3 parts: a dinner plate, a smaller salad-sized plate, and a centerpiece. It usually looks better if you use all of one kind…either all ceramic, or all glass.
Most ordinary, everyday dinnerware such as you have in your cupboards at home will work just fine outdoors. Likewise, heavier, more durable ceramic or stoneware is also great to use, as is the thicker, sturdier glass plates and bowls. Same goes for votive candle parts that make great centerpieces.
“Flower Power”: The shape of a plate
If you want to make a pretty dish flower, simply start with pretty dishes. It’s as easy as that! Dishes with a floral shape are a natural. Lucky for you, it just so happens that flower shapes are very popular for dishware and not at all hard to find!
Dish flowers on the rustic side
If rustic or “farm house” is more your style, use dishware in brown hues. Here’s where you can get your vintage look without actually using real vintage plates! Solid white plates can add contrast and “pop”. The point is to make something you personally like that will go with your motif. This one was one of my favorites. I personally love rustic!

The pattern on a plate
If you can’t find a plate with a floral shape, consider one with a floral pattern. Look for dishes with bright, cheerful colors and patterns. Floral designs, whether traditional or contemporary are very common on decorative plates.
Choosing the Best Plates: Review
With so many choices in colors and patterns and shapes, let your imagination run wild! The best plates to use for making whimsical dish flowers are the ones that produce a beautiful work of art. Whether glass or ceramic, that’s up to you!
Part 2: Drilling the plate
The bigger plate is the only one that gets drilled. Drilling a plate involves more time and labor as well as a few specialty tools to get the job done. But if you’re willing to be patient, your finished art piece will be much more secure. As an artist who sells my works, I’ve built my reputation on this method. I want that guarantee for my customers.
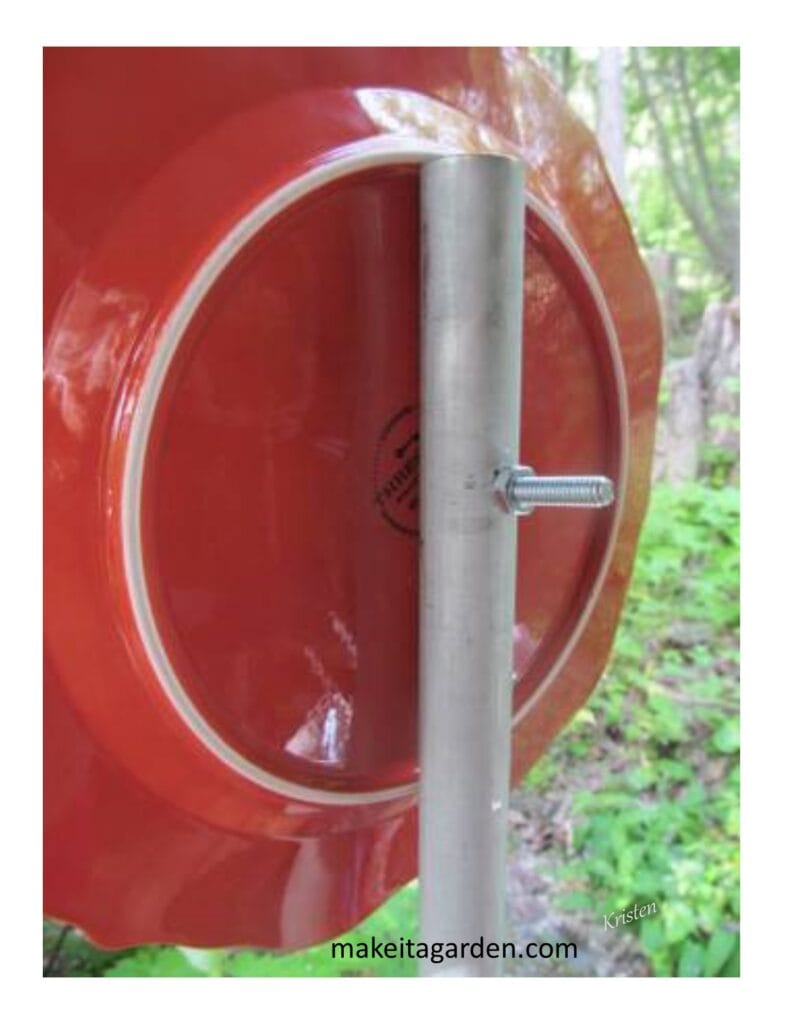
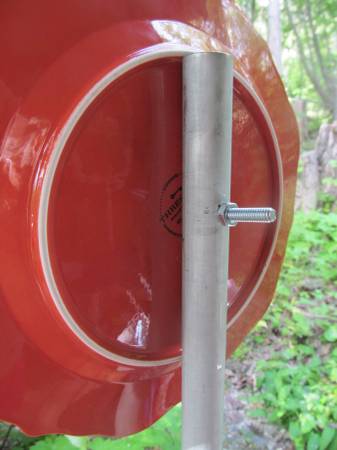
Actually, the word “grinding” is more accurate than “drilling”. A specialty drill bit is used to “grind” a small hole through the center of the largest plate. Then, a machine screw is inserted through the hole and it’s attached to a metal pipe and secured with a wing nut.
The weight of the piece is supported in two places: the entry and exit point of the bolt.
I know everyone’s different, but for me personally, learning how to drill plates was bit daunting at first. But once I got the hang of it, I realized how many other art projects I could do that required drilling glass. Now, I have the confidence to make all kinds of cool crafts for the garden or for the holidays. And so will you!
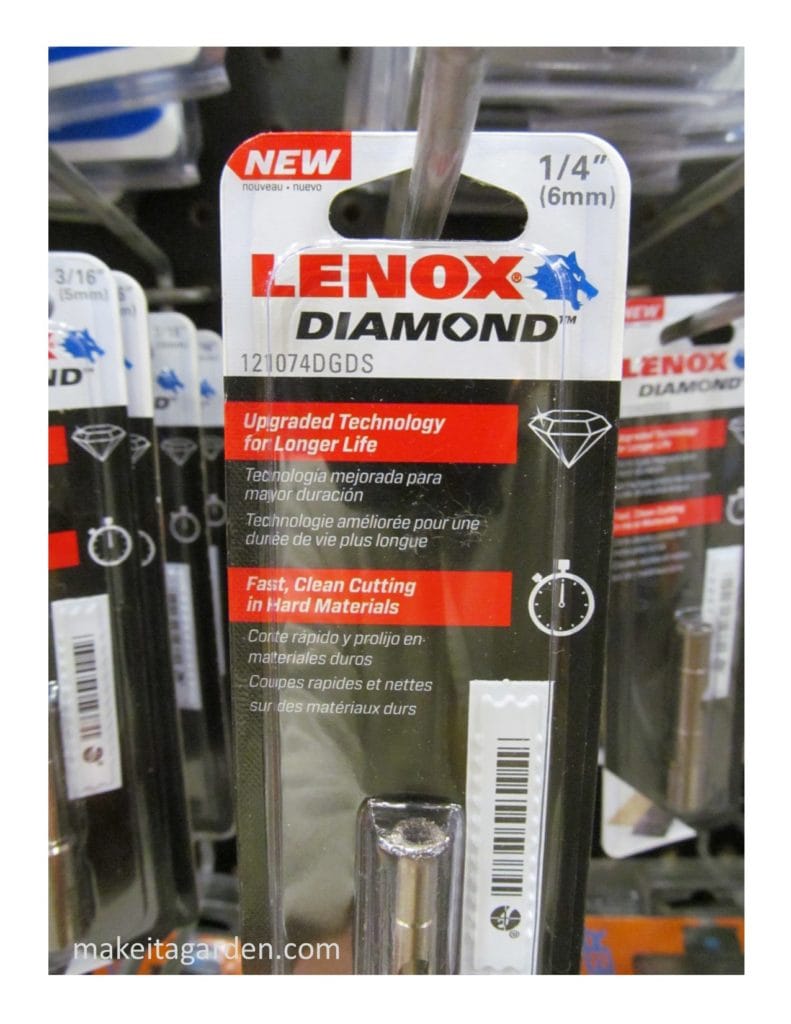
Use the right drill bit
I use a 1/4″ (6mm) diameter diamond tip drill bit. It’s round and very rough like sandpaper. When in contact against the surface of the plate, it gradually grinds a perfect hole right through. Depending on the makeup of the plate and the power of your drill, it can take anywhere from 5 to 20 minutes to drill a hole.

How do you drill a plate?
Remember, only the largest plate is drilled. Some craftsmen use a drill press. I don’t have one, so I use a basic 12V cordless drill. I have drilled hundreds of plates this way standing over my kitchen sink. See detailed WRITTEN instructions HERE for how to drill a plate. It’s easier than you think, trust me!
*TIP: Turn the plate over so it’s face down. (SEE photo below) With the concave shape of the plate, it gives you some clearance and will help prevent accidental damage to your sink.
This can also be done outside or in the garage, too. Use a plastic tub or something large enough for the bigger dish to lay flat. Fill with water just enough so that plate is fully immersed; but with only a very shallow 1/8″-1/4″ over the top. It goes without saying…do NOT use an electric drill around water!
Why do you have to drill in water?
The water is necessary because of the heat generated by the friction of the drill bit. Water keeps the tip and the plate cool and prevents the plate from shattering.
*TIP: DO NOT PRESS DOWN HARD while drilling or the extra pressure may break the plate. The weight of the drill tip against the plate is enough. All you do is just hold the drill steady.

After drilling the hole, insert a machine screw and fastening nut. Then, glue the additional frontal plates to the surface of main plate.

Part 3: Adhesives
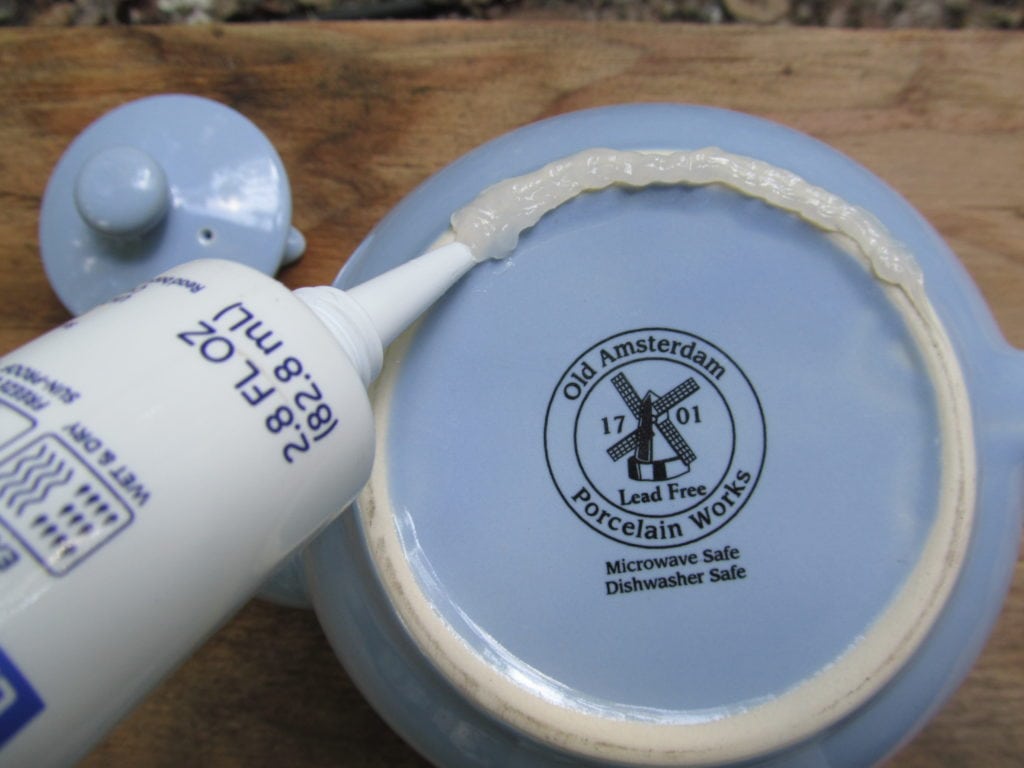
After drilling the large plate, add the other dishes to complete your artwork. First, insert the machine screw, then glue the smaller plates one on top of the other.

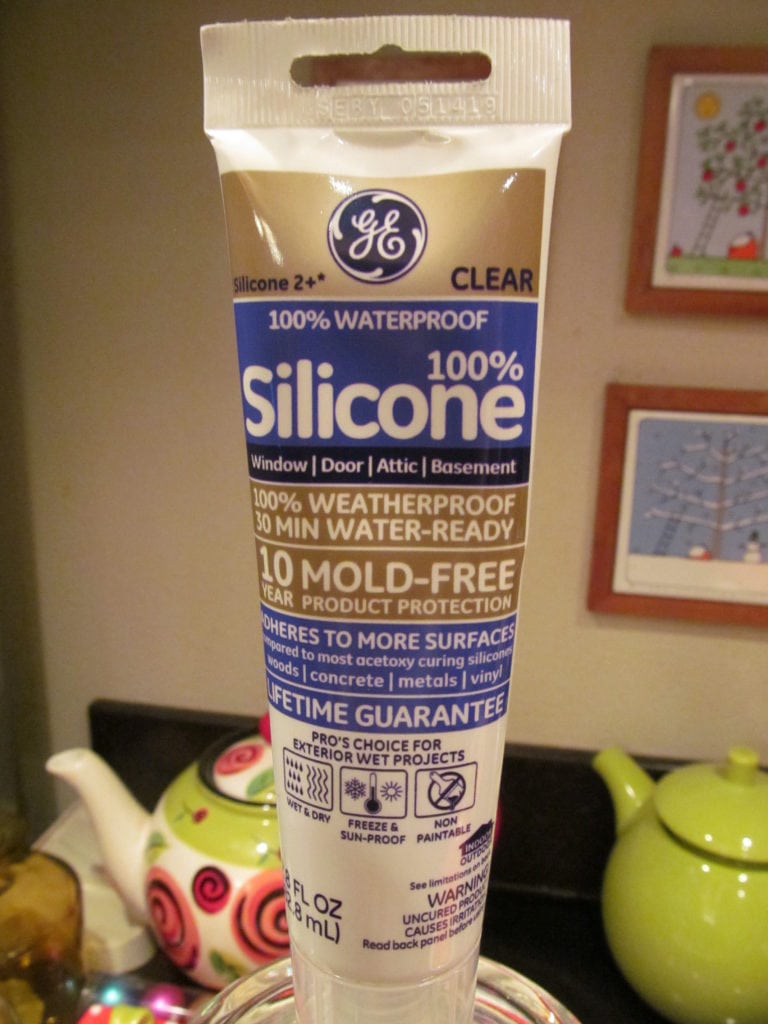
Use 100% GE silicone CLEAR for exterior to glue the plates together. The bead is thick and stays put where applied. It has no strong odor.
Glue all the way around the rim for best adhesion. Press small plate to surface of large plate. Allow for glue to set up –about 10 minutes–before adding the next, smallest dish. Let the flowerhead continue to cure overnight. I usually let it sit for 3 days before attaching it to the post.
100% GE silicone is the number one adhesive used by artists who make dish flowers and other types of garden art from dishes. It’s actually not glue, but rather a sealant. It’s primary purpose is to seal around the outside edge of windows. Therefore it can handle extreme temperatures from 60 below zero to 400 degrees. (according to the package) It dries to a rubbery like consistency and remains pliable in cold weather. It won’t freeze and crack, nor melt like butter or dry out and crumble apart in the heat.
The frontal dishes are smaller and lighter weight. The weight of the entire piece is well supported by the screw and the metal post.
Part 4: The Post
And the post is very important because it supports and displays your beautiful work of art in the yard or garden.
Since it’s going to be outside in the weather, wood is pretty much out of the question. Wood, unless specially treated, breaks down over time. It wouldn’t last very long. It’s not the best support for heavy glass or ceramic dish flowers.
What makes a good post for dish flowers?
Aluminum: Don’t use it. When I made my very first dish flowers, I experimented with 3/4″ plastic-coated aluminum garden stakes. While fairly inexpensive, it didn’t take too long to conclude that aluminum is not very strong. Glass and ceramic dishes are weighty. The aluminum can bend and break. Great for staking towering delphiniums, but not so much dish flowers.
Copper: A lot of craftsmen who make dish flowers like to use copper pipe as a post. It’s a classy, but very pricey choice for a dish flower. Over time, copper’s shiny finish oxidizes and develops a greenish patina.
Copper gives the dish flower a more vintage look that some people like while others don’t. If you’re making one or two dish flowers for yourself or a friend, copper (use 3/4″) is a fine choice as long as you don’t mind the price.
Metal Electrical Conduit
Galvanized metal conduit: In my opinion, galvanized electrical conduit is the best way to go. It’s what I use. Conduit is strong, galvanized and won’t rust.
It’s reasonably priced and Lowes stocks 3/4″ pipe is already cut into 5ft lengths. That’s a perfect length for a dish flower garden stake. The stake should be inserted at least 1ft into the ground for best stability. If you would like it shorter, cut it to length with a hack saw. Remember that 1 ft will go into the ground.
DON’T FORGET YOUR FREEBIE! Scroll down just a bit to join our community of garden and art lovers. You’ll receive “10 Artistic Ways to Make Your Yard & Garden Beautiful”, as well as our monthly newsletter. No weeds (or spam), I promise! Just interesting and enjoyable garden and art-related content.
Attaching Dish Flowers to a Post
Drill a hole through the conduit using a 1/4″ drill bit (same size as the machine screw). Use a file to file off the sharp barbs of metal on entry and exit holes. If you cut the post shorter, file the rough edges.
TIP: You might wish to cut the end of the pipe at an angle so it’s easier to insert into the ground with a bit of a point on it.

TIP: install the post into position in the yard or garden FIRST, and then attach the flower headpiece. That way, you won’t risk damaging the flower head in the process.
Attach the flowerhead. Do not tighten the nut too tight or the pressure will crack the plate. Tighten it just enough so that the plate isn’t loose on the post and does not turn. The flowerhead is quick and easy to remove for winter storage or a big windstorm, hail etc. Leave the post in place. Then re-attach the dish flower to bring smiles to your garden in the summer.

Other related posts that may be helpful:
2 of the Best Glues for Garden Art
How to Paint on Glass Plates for Beautiful Dish Flowers
Garden Totems (An Intermediate Tutorial)
The form you have selected does not exist.
Talk about labor intensive! Too bad you don’t have space for a drill press. Whew!
Need to earn enough money to build a workshop! Thanks for reading. FYI the program auto sends you every time I post. which will be about 3x week. I don’t know how to change that yet, but if you ever want it to discontinue, let me know and I’ll try to figure that out.
Do you use the same silicone glue on glass to attach the dish to the hockey puck ? Also, do you drill a hole on the puck to put the rebarb in?
In the article, I state that I do not use, nor recommend the hockey puck nor any gluing method. Some people have success with them, though. That’s why the others (bottle,spoon etc) are provided…but only as OPTIONS and alternative methods people could try if they didn’t want to drill. Since I have never personally used that method, I don’t know. But glue fails are common b/c of the weight of plates and glue softening in hot summer climates. (Do NOT use E-6000. This I know for sure!) Lots of people are intimidated by drilling (I was, too, at first) fearing broken glass, or not having the right tools. The hockey puck photo is used with permission from another source. I have no idea what glue was used. I have heard that many glues do not stick to the rubber that pucks are made of. It could be the heat of hot weather. You could try a 2 part epoxy, or silicone for exterior. You could research on-line for a glue that bonds to rubber or ask someone at the hardware store.
Silicone left to seal and set for almost a week failed flower pieces came off and broke ,, will be trying E6000 for nexted test with silicone around outer edge of plate, Very disappointing first attempt!
That’s quite interesting, I’ve never experienced that. You are free to try something else. Please be advised that E-6000 and silicone do not mix! I tried this once. Seemed like a good idea. But the chemicals in the E-6000 (even when given time to fully cure) squished between tiny openings and caused the silicone around the outside to become soft and gooey. My research turned up plenty of counsel about mixing glues and adhesives. I actually wrote a post about it. https://makeitagarden.com/weird-glue-failures-and-solutions-for-garden-art/. I also discovered that certain glues do not bond with copper or other metals or even certain plastics. Silicone doesn’t bond well with non-stick plastics…when I was attempting to make plastic dish flowers. It’s trial and error for sure. Thanks for visiting my site and good luck with your projects!
One more possibility that I have encountered…not me, but another crafter I know. She once had silicone that failed on her. She was perplexed and checked to see if silicone had expiration date. Indeed it did! It’s stamped in fine print at the tip end of the tube. Hers was old and came out a little on the rubbery side…meaning it was starting to set up inside the package. All adhesives have expiration dates in which the product will not perform like it’s supposed to. I encountered some old silicone at the store! So I don’t know if that may have been a reason why your silicone failed? Just thought I’d pass this along. ~Kris, Make it a Garden
Kristin, you’re wonderful to share all this information. You’ve inspired me to try making these plate flowers again. My first attempt resulted in plates falling off! Thanks so much for sharing your knowledge. Can’t wait to get started.
Judy, thank you so much for the kind remarks! Yes, unfortunately back in the earlier days of dish flowers, a lot of different glues were tried that just didn’t hold up. They may have been strong glues, but outside in sun, that glass heats up. Something that would otherwise be just fine indoors, doesn’t cut it out in the garden on a hot day. Some places in the U.S. get 90-100 (or more!) That’s why I did a ton of research on glues prior to making them and selling them myself. Silicone was the most popular recommendation b/c it’s a product used for sealing exterior windows. So it holds up to high heat and humidity. Drilling plates is just extra security because all that glass and ceramics gets heavy. I’m so glad you found us, and especially that you are trying again. I know THIS time, you’ll have pretty dish flowers for your garden that will last! Good for you for giving it another go! Feel free to drop me a line anytime.
Very informative. I’m going to give it a go. Will post after it’s done. I especially like the tip on adding a leaf to the post. Your great!
Thanks so much for the feedback Cathy, really appreciate it. I’m so glad you’re going to give it a try! I added a leaf once, just for the fun of it, and to make it look more like a flower. Turns out that everyone loved the leaf and I got so many compliments that I have since made a few more with the leaf. And ANYTHING can be a leaf, by the way. A spoon, a leaf-shaped ceramic dish, or flip flop! I can’t wait to see how your dish flower turns out…yes please send a photo. Let me know if you have any questions along the way. – Kristen
Hi Kristen,
Thanks so much for the informative post! I want my flower to hang on my fence. Do you have any experience with how to make a strong, reliable hanger?
Thanks!!
Kitty
Hi Kitty: that’s a good question. I have not tried that myself, personally. It’s a great idea! And you are right to think in terms of something strong and reliable. You could try attaching a picture-style hanger, or d-ring (a heavy duty one) to the back of the plate using 100% silicone (for exterior). Apply silicone to the backside and attach to plate. Then go around the edges of the hanger and completely cover the part that affixes to the plate with the silicone. Smooth it out with your finger and allow it to thoroughly cure at least 3 days before hanging it up. Silicone is strong and tough, made to seal exterior windows and doesn’t melt or dry out in high heat. I have seen other artists do this for hanging a ceramic art piece. Use a heavy-duty galvanized hook and the right type of nail or screw that will affix to the fence and hold w/o coming loose. Let me know what worked, ok?
The best tutorial I have ever read!, clear, explanations, pictures and solid advice . Thank you.
You’re welcome, and thanks so much for the feedback! That helps me write future tutorials. ~ Kristen
Thanks for such a very informative article. It has inspired me. I will need to slow up on my stained glass projects a little but I think it will be fun. Life is one big craft project after another!
Ah….that’s MY heart as well. You’ll be glad to know my next foray is stained glass! I’ve caught the bug making dish flowers. Can’t wait to get started!
Your post is loaded with information, I have been making these flowers for over 13 years and I drill all 3 or 4 plates that go together, and I also add to flowers lower on the post. I use large spoons 🥄 or what ever I can find or I will bolt a tea cup or saucer. I also use copper as posts people seem to buy them better than conduit. I am working on a flower that will spin, I have run into a few problems with the flower 🌸 breaking because of it spinning to fast in the wind. But again thank you again for you site
Thanks so much for taking the time to comment and sharing about your work. Feedback is very important to me and helps me know if my tutorials are helpful, comprehensible and contain enough detail. As I wrote in my post, when I first began researching this craft, those who were drilling had the stronger argument. Because I planned to sell my dish flowers, I didn’t want them to come apart on my customers. But I also wanted to do more creative things with the centers, and some items couldn’t realistically be drilled. I started off with copper, but soon switched because of the cost! I got a tip from another maker about using conduit. I’m impressed that you’re trying to work on spinning. That’s one of the main questions I get about them (probably you, too). I would certainly think that would be problematic, and would require a stiff wind (?). We’ve got pretty good wind. My little town is situated between 2 major river valleys and it’s almost always windy, particularly in the afternoon. Keep me posted on that, ok? Thanks again for dropping a line!
Thank you! After reading your “ how to “, I feel more confident in my venture into making my garden beautiful! Once again thank you for sharing!
That’s the best compliment one could receive. The sole purpose of writing this…carefully and with thoughtful details, is for the reader to have confidence and success. I remember the first time I made a dish flower. I hope you make some beautiful art for your garden this summer. If you have any further questions, don’t hesitate to ask. ~Kristen
Thanks for the informative post. The one problem that I have is my flowers wanting to turn backwards (I am guessing due to the weight). Any thoughts?
hmmm…yes the weight…but how to prevent that? (my garden scarecrow does that!). My best guess is that it has something to do with centering. With my scarecrow, I thought the rebar I put her on was inserted straight, but turns out it leans a bit, plus the weight of the scarecrow pulls it off center. And also the hole I drilled up inside the board that makes the body frame, isn’t quite centered on the inside…so she keeps turning. I would try this: 1) add some gravel or a big rock or two at the bottom of hole. Pack in gravel real good around the post. If your ground is softer, the post can tilt a bit…especially if it rains or from watering the lawn or garden. Make sure the post is straight up and down and use a level if needed.
2) you can try inserting the art piece into a larger diameter post or some type of iron ring/tube (or square cement block) at the bottom and fill it with gravel packed in around the post. Cover with your dirt. It will look like the post is in the ground, but underneath it is well anchored. That way, you can leave the post in place during the winter and just remove the head piece. It’s all ready to go for next summer. Also, what is the diameter of the post? Sometimes, something heavy or wide (that can catch the wind) on a skinny post will allow it to turn side to side. I was having that problem when I used 1/4″ diameter pipe for the post. Then I read an article where one maker recommended 3/4″, so that’s what I use now which makes it a lot more stable and secure in the ground. Hope this helps. Let me know how it goes, OK? – Kristen
Your tutorial is AWESOME ♥️♥️♥️. .I AM ANXIOUS TO MAKE
some BEAUTIFUL FLOWERS💐🌹🌺🥀🌷🌸💮🏵️🌻🌼 . .My Hubby has a drill press…Do I still need a diamond bit ??
THANKS…I try! And NO, you DO NOT need the drill bit b/c the drill press does the exact same thing (with less effort!) You are blessed to have a hubby with a drill press…drill away! NOTE: He DOES have to have a drill bit that is made to drill glass and ceramics w/o breaking it…and he’ll have to use a bit of water…but he may already know this. A circular diamond tip similar in diameter to the one I show in the tutorial is recommended. Use thicker glass and ceramics plates, which are less likely to crack. I’m always available to answer questions. Thanks for visiting my site. Have fun making your dish flowers!- Kristen
Your designs are very good. I have a suggestion only on the plate flower. If your readers push too hard while drilling they could break the plate. Secondly The bolt thru the conduit is great. In an are of wind the plate is like a sail and could flex enough to break the plate. A large washer. On back would give less flex . But I don’t make these and you have great success.
Thanks for dropping a line, Alan! You make a very good point on pressure. I thought I had mentioned it, but will go back and add that in. As for washers, I do use them occasionally, but usually only with the glass plates. When the nut is snug, the plate does not move on the post. Actually, I’ve cracked more plates fastening the nut too tightly. But yes, the additional hardware can be helpful. ~Kristen
Would the addition of either a rubber or galvanized washer aid in keeping the plates from cracking or breaking? We have lots of wind here, as well as freezing/thawing cycles. Everything from blizzards to tornadoes.
Good question. But the answer is “not really”. A washer won’t prevent that, anyway. Plates most commonly break if they slip off of what was holding them on (which is why I recommend the drill method), or if there is a sharp blow to the art piece… wayward rock gets thrown, something falls on it, or it gets knocked down and strikes a hard surface like a rock or concrete. A bear knocked one of mine over, but it fell on the lawn face first and the center glass piece hit first and stopped the impact. The center was thick glass, so it wasn’t damaged. (I was shocked but happy, of course!). The washer IS useful, however. Where the washer can be helpful is to keep the plate snug and from turning on the post. It also helps spread out the pressure and perhaps prevent the over-tightening of the nut. Tightening the nut too tight has also caused a plate to crack, and sometimes break apart. (which can happen with a wing nut that is easier to tighten) I always warn customers not to tighten too tightly for that reason. Sometimes I use a galvanized washer with my glass plates, but not always. But I’ve noticed that the washer does help to provide a smooth surface for the wing nut so the plate can be snug on the post and won’t come loose. Also, if you anticipate a big storm coming up or high winds, you can unfasten the flower head from the post and take it indoors. And I always recommend taking it off the post for winter. But you can leave the post in place and just put the art piece back on in the Spring. Hope this helps! Feel free to contact me anytime. ~ Kristen
I have never made plate flowers but always wanted to. I appreciate your tutorial so much. One question though. At the end you talked about the flower head and how you could remove it but you glued plates over the screw so I guess I’m confused on how it all goes together
The bolt (machine screw) goes through the large plate and then through the metal post and is secured with a wing nut. I can’t attach a photo here, but if you go to this link on my blog… https://makeitagarden.com/attaching-dish-flowers-to-the-post-pros-and-cons/ …and scroll to the bottom, there’s a photo of this method. It will become self-explanatory. Hope that helps. Feel free to contact me anytime. ~Kristen
Thanks for all the great ideas. I have a question. I have made some dish flowers using the hockey puck method but am eager to try my hand with drill bits. I think it will give me more options as well as other kinds of glass yard art.
I have a question. It looks like you might have painted parts of the some of the clear glass serving plates with some kind of paint. If so, could you please share that info.
Glad to hear you’re trying the drill method. Yes, it’s a skill that opens up other areas of crafts! As for your paint question, here’s a link to my article about painting on glass: https://makeitagarden.com/how-to-paint-on-glass-plates-for-beautiful-dish-flowers/. It covers the purpose of painting glass and what type of paint to use, as well a some examples and ideas for painting on glass. I’m always available to answer any questions.~ Kristen
Best post ever! Thanks for sharing your love of art, the garden, and tips and tricks!
oh, wow! Thank you Kimberly. Your kind remarks mean a lot to me. I try to include a lot of details and hope instructions are clear. But the only way to know it’s really helpful is from your feedback! Good luck with your dish flowers!
I tried something like this before, but had problems, so gave up. Your ideas and instructions are VERY helpful!! I can’t wait to try this again!
Thank you for your kind remarks. I try very hard to provide a lot of detail and suggestions so that readers have success with their projects. Feel free to contact me anytime if you have questions.
Two words Drill Press. I have drilled hundreds of pieces of glass with a drill press. There in no way I could have drilled all that with a hand drill! Carpel tunnel is real my friends. Do yourself and your hands a favor and invest in one. I drill holes in all the flower parts and make stamens from wire and beads. I use no glue for any parts. Have fun, I do 😄
Yes! If you plan on making and selling dish flowers, this tool is a MUST…and you can write it off on your taxes. As of this writing, a smaller unit that clamps to the edge of a work bench is $100-$200 at Lowes. You may be able to find a used one on your local fb marketplace.
Very interesting! Thank you for your time.
Please REMOVE ALL my images from your blog post about garden flowers! You may not take images from MY tutorial and use them for your tutorial. Not Cool! I would prefer your compliance to me taking further steps. Thanks so much.
Hi Kris;
Loaved your post and tutorials!! Couldn’t wait to get started.
I have followed all your steps and came across a problem. After drilling the hole in the large plate and inserting the flathead screw, the screw is not flush with the plate, so I am not able to lay the second plate flat , even with the gap from the rim.
Any ideas how to fix this?
I have bought so many plates, so need a resolution! – LOL
Thanks!
Your problem is one that happens from time to time and is probably the only downside to drilling. There are essentially two ways to work around it (unless you want to try a different top plate) 1) use a spacer plate between the two (the lowest rise one you can find). I have sometimes used a smaller, shallow-rise saucer or small dish face down over the top of the screw; then glue it all the way around with silicone. A clear glass saucer plate (if it’s a glass flower) OR white ceramic saucer for a ceramic flower. What this will do is make your dish flower 3D…more separation between the two plates. You just don’t want a huge gap, so look for a shallow rise dish of some kind, smaller than the diameter of the 2nd plate so it’s hidden behind it and not noticeable. 2) Counter sink the screw. This simply requires a bit more drilling (grinding) around the inside edge of your hole so the screw sits lower down in the plate almost flush..providing it’s thick glass or thick ceramic- like stoneware. Carpenters use this technique. It’s kind of a pain, but I have done it and it’s a good solution. Let me know how it goes, ok?
Hi Kris;
Thanks for the quick response! I was able to use a file to widen the hole abit. I think I can make it work. The problem is that the second plate has a shallow rim and is slightly concave down. My other plates seem to be fine.
Thanks for your help!
Yeah, dishes are all made a little differently. Some don’t have a rim on the bottom at all, they are flat. So I buy plates I can use as spacers to have on hand if I need one. But I don’t always like the look when a plate is elevated. So I’ve learned how to grind the hole enough along the upper inside edge so the screw head sits flush. The alternative way to use a bolt is to insert it from the back to front and secure with a cabinet knob. You’d have to use a bolt the same diameter as the knob.
Kristen- HELLO! Thank you for this very informative and easy read!! I also watched your drilling video and was so glad that I did- did not know about tilting drill upon begining of drilling! What a difference this made!
You are very creative and cleaver! Can not wait to receive your news letter!
Thank you again!
Annette
Wow…thanks so much! I really appreciate the feed back; helps me know if I’m on target.
Hi Kristen, I am so excited to start making some garden plate flowers. Your tutorial is excellent and I have had so much fun collecting plates and other items. I was wondering if you have ever tried using melamine plates. I didn’t know how they would hold up or if the silicone would adhere well to them. I found a melamine plate at a second hand store that would be perfect but I’m afraid to use it if it isn’t gong to hold up well.
Sure! Melamine plates make great dish flowers. Really, you can use just about anything! Believe it or not, my very first dish flowers were made from plastic and melamine plates. Silicone or epoxy (possibly even E-6000?) should work just fine, though you may have to experiment a bit. I discovered that Melamine does tend to fade over time out in the elements, but there should be several good years. Let me know if you have further questions. Have fun!
Thanks for the great post! You don’t really say why you only drill the back/base plate. I’m curious your experience. I’ve been drilling cups and saucers for bird feeders for a number of years. I was gifted some glued glass and it just doesn’t last through even one summer in Texas.
The reason I drill just the back plate (and sometimes the middle), is so I can use more variety in the center. Some items I use for centers can’t be drilled, or would take away from the beauty if drilled. This would also require extra drilling and b/c I make them to sell and make so many, it’s just a lot more work and you burn through drill bits faster. There are basically two options…#1 drill and insert the screw from the backside through all layers of dishes and then fasten IN FRONT with a drawer/cabinet knob. This is actually nice, but I don’t want to use knobs as centers all the time. OR #2, insert the screw from front to back and fasten behind the plates with a wing nut, or hex nut (which is the method I use). As for glue, the silicone (which is a caulk, not a glue) is rated for high heat and used by contractors to seal around the outside of a window…I’m pretty sure they use silicone in TX…you could inquire of a window installer or someone at Lowes or Depot. They make oven pans and cookware out of silicone so the product should hold up. But you use the method that works best for you. Every maker has a slightly different method, and that’s ok! Which ever you prefer and works best is the method you should stick with. 🙂
I make yard flowers and I drill all the plates, this way I don’t have to worry about anything falling apart. I also use a short piece of conduit (6 inches) on the back of the flowers and slide it over rebar. This makes it easier to take in during a storm or for winter.
This is why I’m such an advocate of the drilling method.
Thank you for your wonderful tutorial!
Much appreciated! It’s what I aim for, but your feedback is helpful in letting me know if I succeeded.
I’m inspired! Thank you!
Thank you for making this the #1 article/tutorial on my web site! Glad it was helpful.
Thank you for this series of articles. I have collected lots of plates and am excited to give this a try. I’m curious if there is a weight consideration to be aware of when using the drilling and silicone method? I have some combinations that seem really heavy, like 4+ lbs. Do you find that there is a limit to making sure that they will hold together? Thanks!
Silicone is very strong when applied to glass or ceramic surfaces. How strong? The “Advanced” Silicone I have says 5x stronger adhesion. The fine print on the back only says 5 x stronger than a previous formula. I’m sure specifics can be found on-line. Drilling plates allows the weight of the whole piece to rest on the bolt supported by the post. Each plate is separately affixed with silicone. I have never had any of my artwork come apart due to exceeding weight limitations. We’d be talking hundreds of pounds, probably. Remember, silicone is an industrial product! They are ‘heavy’ but not THAT heavy!
The only time silicone has not worked well was with certain types of plastics…like the non-stick plastics. The chemicals in these plastics don’t jive with the chemicals in the silicone and even though it may hold for awhile, two items can be pulled apart without too much effort. Silicone might not bond well and fail to hold up if there is grease or certain paints or remnants of some other glue on the surface of something. But other than that, silicone is practically made for glass applications. It’s waterproof and sun proof and is a great product for garden art. I’ve had mine for years!
Hi Kris! So glad I found your blog! I am getting ready to make plate flowers for our two daughters’ birthdays. I wanted to join your community but could not locate a link here. How do I join?
Thank you so kindly, Donna! I’m not doing the newsletter community anymore, my apologies. I need to go back in the posts and edit those out. You can always reach me through the comments, and I’m happy to help with any questions you might have. Happy crafting!
I love your work and I’m excited to get started!
these are so pretty … something new to look for at the thrift stores!