

6 Easy step-by-step instructions
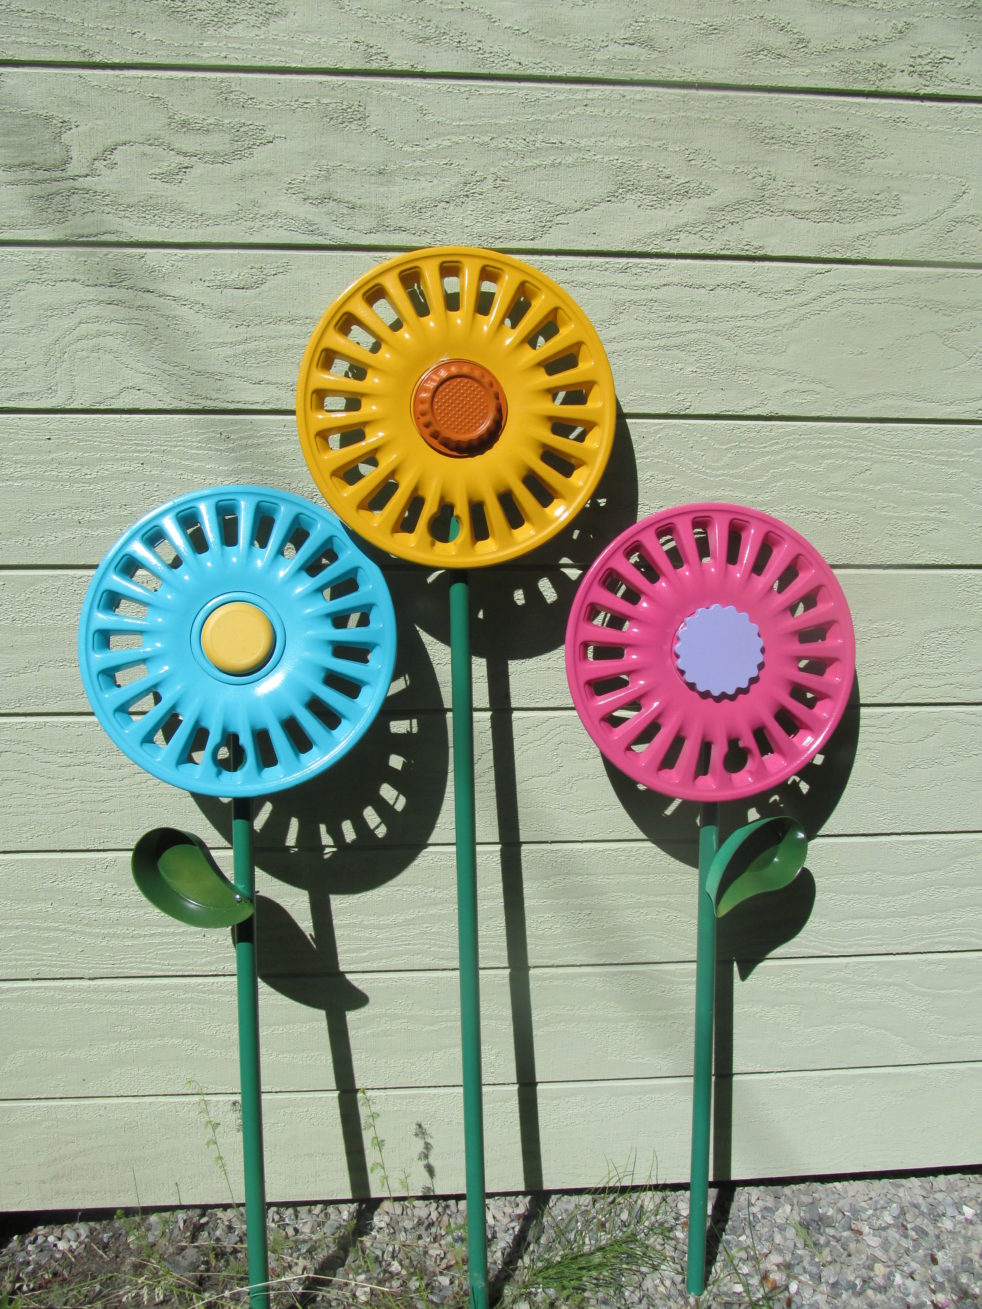
You’ll love these easy to make, happy-looking hub cap flowers! They are light-weight, hold up well in any weather and are virtually unbreakable. After all, they’re hub caps…how many miles have they seen?
I’ve personally made a few sets of hub cap flowers. All you need are common household tools. The materials are plastic of one sort or another and virtually effortless for the minimal amount of cutting and drilling required. They’re also fairly cheap to make when compared to similar crafts. The estimated total cost for all materials, hubs, plastic conduit, spray paint and hardware to make the three in the photo above was right around $30.00. (Less if you already happen to have some of these things around the garage)
A hub cap’s size and unique design are ideal for painting bright, bold primary colors. They are major attention-getters so be prepared for the compliments. Follow these step by step instructions and my helpful tips to add a little fun to your lawn or garden this summer.
Materials for Hub Cap Flowers
The following materials are readily available at your local hardware store:
- PVC Conduit 1″ diameter (for the stem)
- Spray paint Primer (one that bonds to plastic)
- Your favorite spray paint colors (for outdoors & plastic)
- machine screw at least 3″ long and wing nuts
Tools
- drill (electric or cordless)
- hacksaw
- tape measure
Where to find used hub caps

Hubs caps can be found at an auto salvage yard and sometimes at thrift stores or garage sales. I found one on the side of the highway last year. So, keep an eye out if you participate in your community’s Spring Clean Up Day.
Instructions for Hub Cap Flowers
Step 1: Remove ring on back side
First, snap off the metal ring from the brackets on the back side of the hub cap. For me, this was the only difficult part. The rings are tight and sometimes rusty and can be a real bear to get off.
Step 2: Wash
For best results, give those hub caps a real good scrubbing; and do it outside. In addition to ordinary dirt, there’s lots of grease and grime. Fill a small bucket with hot water and add a liquid dish detergent with a good degreaser. (like you would if you were washing the car). Dip your rag or scrub brush into the soapy water and wash off the hub cap. Use an old tooth brush to get hard to reach places.
NOTE: It’s important to get it as clean as possible so the spray paint sticks and makes the finished job look nice.
Rinse with a hose and towel dry.

Step 3: Drill hole
Use a regular drill bit to drill a hole directly through the center. The plastic is thin and easy to drill. SAFETY TIP: The hole will leave plastic barbs on the other side. While they are plastic, they are still rough enough to potentially prick a finger, so I always snip these off with pliers or wire cutters. Or use a file.

Step 4: Primer Coat
Use a primer as a base coat; one that’s formulated for outdoors and plastic. These days, most major brands of spray paint combine both paint and primer. You do not have to use a separate primer. But I highly recommend it.
A primer or “base” coat seals and protects. It preps the surface for a nice smooth paint job which means you get better coverage. A primer coat dries super quick. After about 10 minutes, you can spray your color coat right over the top. Don’t worry about the logo in the center.
Should you paint the back side? Yes. Again, you don’t have to. It may not be necessary if you’re planning on showcasing your hub cap flowers against a wall, like the the side of the house or a fence where the back won’t show. However, if they will be free-standing in a garden bed where the back of it will be visible, you’ll want to spray paint both sides.
Step 5: Add your favorite color
Since I don’t have a garage, I do all my spray painting outside. The only thing I have to worry about is good weather and mosquitoes landing in my paint. argh!

Step 6: Make the stem

Make the stem with 1″ PVC pipe. With the tape measure and a pen, mark a line for the length you want the stem to be. I typically make them 3.5 feet tall, but they can be taller or shorter. Using a hacksaw, cut the PVC to the desired length. It’s soft and very easy to cut. Sand off the rough edges.
Next, drill a hole through the stem piece. Lay the hub cap face down with the 3″ screw inserted. Position the PVC stem piece so the top is up against the flap on back side. Use a pen to mark the location for the hole. Drill hole thru the PVC pipe. File off rough barbs on back side.

Paint the stem piece
Before attaching the flower head, paint the PVC stem piece with a green spray paint (one that bonds to plastic) I like to use a medium “Christmas” green in a gloss finish, but you can choose whatever you like…it’s your project! (TIP: wait until the next day to attach the hub cap to the post. That allows spray paint to dry completely) Finally, insert the screw through the center of the hub cap and through the post. Fasten the screw with a wing nut.
Afterwards, you can make a center for your hub cap flower to cover the logo. Use whatever looks nice to you and fits. Try a jar lid or some other round plastic bowl or small dish. Spray paint it a contrasting color and glue it on. Any adhesive for outdoor use will work.
Now you’ve got some garden cuties to show off to friends and neighbors. If you make them, please let me know. Send some pics and I’ll post them on my blog for the whole world to see!

More Garden Art Topics You May Enjoy:
How to Make Easy Dish Flowers Out of Pie Tins
How to Get the Most out of Your Garden Decor
The form you have selected does not exist.
Thanks for the comments. We love the hubcap flowers, too, and hope you’ll give it a try!
what did you make the leaves out of ? Very cute. I will give it a try.
I’m so glad you enjoyed the post. The leaves were made from a small Tupperware-type dish. Any plastic dish or even just a lid that has a leaf shape will work. I spray-painted it green and drilled a hole thru it to attach it to the stem piece. I thought that a leaf would give it more of a “flower” look. They are very fun to make. I hope you’ll give it a try…you’ll certainly get compliments on it.
I have hundreds of hubcaps and I am going to try to make a few of the flowers.
Oh, GOOD! This is one of my most popular articles on the blog. Group them together to pack a punch! Their size really makes them stand out, especially if you paint cheerful colors. You’re gonna get raves! -Kristen/MIAG
I really enjoyed making these! Thanks for the tips!
I will attempt to send a pic.
Oh, GOOD! They are “happy” flowers, always bring a smile.
I like the look of the leaf, but am having a hard time trying to figure out what works😣. What’s an easy leaf to make?
Thanks for visiting my blog! As for a leaf…look for a shallow plastic container (an oval shape) that has a lip/flap on the edge.(for attaching to the post) It could even be a lid. Or even a short plastic spoon. Or cut the handle down on a longer spoon. You could even make a leaf by cutting a leaf shape out of a larger piece of pliable plastic. The easiest is a plastic container or lid that you spray paint green. The lip part is what attaches to the post. I screw it on with skinny machine screw and nut. But you might be able to glue it on. Finally, you could use a metal mending brace and glue your leaf to the brace, then attach the brace to the post with machine screw & fastening nut. A leaf really gives it more of flower look and I get a lot of compliments on the leaf. Be patient, I know you’ll find something that works. Let me know if you have further questions. ~ Kristen
I think your hub cap flowers are beautiful. I would have liked more picture showing the process of when you mention to snap of the metal ring from the brackets at the beginning and perhaps a picture of where you drilled the hole in the center of the hub cap. Looking at the pictures you provided I can’t make out where the screw was drilled on the front of the hub cap. Your finished product is really beautiful but someone like me needs more pictures. I hope I can figure this out and make some because I just found 4 hub caps at Goodwill that I plan to use. Thanks
Oh, wonderful! Glad you found hubcaps! Thanks for the feedback, too. I’ll try to take more photos (as you suggested) for that particular tutorial. Some hubcaps will have the ring…and different makes and models have it attached differently. The set I showed in the pictures…the thin metal ring was worn and a bit crusty and bent (as were the brackets) and did not snap out easy. But yours may not be that way at all. As for drilling the hole…I just eye-balled it. It doesn’t have to be perfectly centered…but you can also use a tape measure as a guide to find the exact center, mark it with a pen and drill the hole. It DOES matter for the hole to be correct on the post, or it will appear crooked and off center. You will love making these! I’m sure you’ll get lots of compliments. Thanks for dropping a line. ~Kristen
I bought some metal fence post. They aren’t that expensive and they have different lengths. That way, there are already holes in the posts to mount your hubcap. I’m not sure about the centers of the hubcap, I was just going to paint them a different color and leave it in. I’m not too crafty so this is a real project for me, but my brother in law gave me four matching hubcaps to use and he passed away last year and thought I’d honor him and put them in front of my shed that faces the street.
I’ll send you a picture when I’m done.
Thanks for sharing that Peggy. What a wonderful way to remember your brother-in-law. Hub caps seem to look best when they are simple.I would love to get a pic when you are done! That would be awesome! ~ Kristen
After using the primer can you use acrylic paint instead of more stray paint? Or how do you get the designs?
Hi Erin. It sounds like you’re interested in hand-painting designs on your hub cap flowers(?) From what I’ve heard professionals say; it’s always best to match your paint due to chemical compositions. So acrylic with acrylic and spray paint with spray paint. However, I did some real quick research and a lot of folks are saying ‘yes’, you can use acrylic paint on top of spray paint after allowing the spray paint to thoroughly cure. Other opinions say: (quote) “Acrylic paint can stick to spray paint under the right circumstances. It is important to preface by saying that acrylic over spray paint may not be the route you should take depending on the end result.” I would go ahead and give it a try. One recommendation: you might want to use the acrylic paints made for outdoors. This weather-resistant acrylic paint is specially formulated to resist water and adhere to surfaces, even in changing temperatures. No sealing or varnishing. They cost a bit more, but may be worth it for your project. Let me know how it goes! Thanks for visiting Make it a Garden. ~ Kristen
Hi! I’m thinking I’ll try these pretty hubcap flowers. I am pondering adding a small string of solar lights in a swirl shape. The solar lights like you would use decorating in a wine bottle. The sun collector part could go in center of my flower and swirl outwards. I’ll get you a pic.
Absolutely! I always encourage ingenuity and using your own imagination to embellish upon something as basic as hub cap flowers. I’m from Alaska where gardeners typically don’t decorate with solar lights b/c it never gets dark in summer! So that’s something I don’t think about (ha!)
What are used for the leaves?
The “leaves” are shallow plastic containers that were spray-painted. Other things would work, too! Like wood (scrap plywood cut with a leaf shape), a spoon, the lid of a plastic container etc.