

Tips & Tricks for Crafters
What’s Covered?
- Why use the drilling method?
- Tools: drill bits, bolts
- Safe drilling practices
- How to start the hole without using tape
- What are the best plates to use and which ones to avoid?
- Benefits: Drilling plates will open up a whole new arena of crafts

At craft shows, people always want to know how I attach my dish flowers to the stake. On display, they are only visible from the front. So, I turn the art piece around to show them how the plate is “drilled” and attached to the stake with a bolt. The word “drill” is rather shocking, so their next question is: “how do you do that without breaking the plate?”
Good question and precisely why I put this together for you!
A quick introduction
If you’ve always wanted to make a dish flower for your own garden, or to sell at craft shows, this article gives you tips and tricks to drill a plate and the confidence to give it a try. I promise you it’s not as hard or complicated as it may seem.
I’ll let you in on a little secret. I was terrified of drilling plates when I first started making dish flowers. I did a ton of research and was convinced it was the method to use. But I was afraid of breaking glass and cleaning up a mess. I didn’t know anything about tools either, and it seemed a little daunting.
But my desire to make a pretty dish flower like the ones I had seen on Pinterest compelled me to keep looking around on the Internet and learning from others until I felt comfortable enough to give it a try myself. I happened across a few brilliant creators with a treasure trove of knowledge. I would have their names right here in lights, but at the time, I was years away from having this blog.
Why would you drill a plate?
There are several methods crafters use to attach a dish flower to the stake. Each artist has his or her own preferred method and reason for doing so. There’s no ‘right or wrong’, per se.
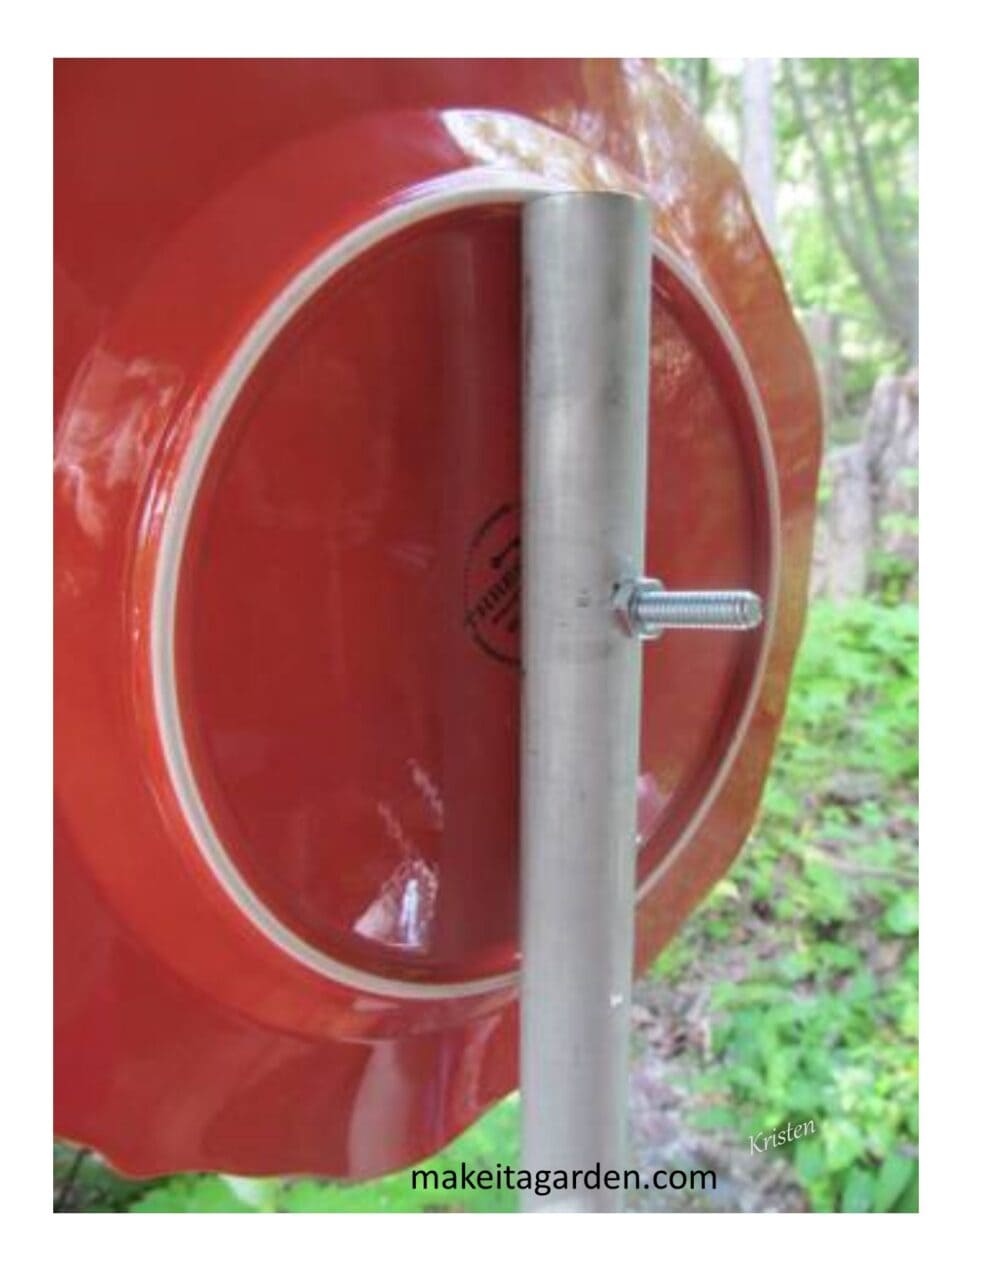
Even so, I prefer the drill method. Why? Because all those glass or ceramic plates are heavy. Drilling allows the weight of the plates to rest on the bolt. The bolt is thick and it rests in two places –an entry and exit point– of a metal pipe giving more balance and security to the art piece.
Keep in mind that dish flowers are sculpture…not whirly gigs. The nut and bolt firmly hold the dish flower head piece in place so it doesn’t turn or sway from side to side in the wind, which could potentially damage it.
That being said, there is more time and cost involved with the drilling method. Depending on the make up of a plate, it could take up to 20 minutes to drill a hole. Then you must drill a hole through the metal pipe to accommodate the flower head. It’s faster, easier and cheaper to just glue something like an upside down bottle or spoon to the backside of the plate to hang it on a pipe or piece of rebar. I include this for your consideration.
To drill a plate requires a specialty drill bit. Also extra time and effort on your part to drill the hole. It requires extra hardware to attach the flower head to the post. Then drill a hole through the pipe. Therefore, at the craft market, my dish flowers may cost a bit more than those sold by another vendor, and that cost, as you will see, is justifiable.
Essential Tools to Drill a Plate
- Battery operated drill
- circular diamond tip drill bit, 1/4″
- 2-1/2″ flat head machine screw (recommend stainless)
I used to use a 3/16″ bolt when I first started, and it performed well enough. But now I prefer the thicker 1/4″ bolts and think they handle the heavy head piece a little better. Especially when I use the larger diameter platters. Whatever you decide, just make sure that the bolt size matches the size of the drill bit you choose.


How to drill a hole through a plate
Warning: This tutorial is only for a battery-powered drill. DO NOT use an electric drill in or around water! It’s very dangerous. For this craft project use ONLY a battery powered drill.
A round tip drill bit will travel and move all over the surface making it difficult to drill your hole. Some people have suggested placing a piece of duct tape or painters tape on the surface to give the drill bit a place to grip while you get the hole started.
Here’s a much easier way to do it without tape:
- Start with an old ceramic plate you can experiment with. If you don’t have one at home, you can pick up a cheap one from the thrift store.
- Turn the plate upside down (face down) in a plastic tub or basin or sink. The plate creates a raised dome that leaves a gap between the plate and the bottom of the tub or sink. That way, you’ll be able to tell when the hole is drilled completely through and not risk damaging your tub or sink. If you wish, place an old towel in the bottom of your sink. It may protect the surface and prevent the plate from slipping around.
- Fill the tub or sink with water just enough so it barely covers the surface of the plate. About 1/8″ of water. (Once again, DO NOT use an electric drill for this project! Only use a battery operated drill)
What’s the reason to drill in water?
Drilling a plate in water is critical! A lot of friction is produced by drilling which causes the drill tip to get very hot. The water acts like a lubricant to keep the drill tip cool as it makes contact with the plate, so the high heat caused by friction of the drill bit does not shatter the plate. This would be exactly the same for a professional drill press.

How to start making your hole.
Drill as close to the center of the plate as possible. I usually just eye-ball it, but you can measure and use a magic marker to mark your spot on the back side of the plate.
As previously mentioned, some people use painters tape to hold the circular drill bit in place when starting a hole. Try this instead:
Make a ‘half moon’ anchor hold:
Hold the drill at an angle so only one side of the tip meets the plate. Use two hands to steady the drill if you wish. You don’t need a lot of pressure. Slowly start drilling and keep it running without stopping for 30 seconds. You’ll see a little half-moon divot in the center of plate as in picture below:

Now that your drill bit has an “anchor” hold, you should be able to rest the drill tip in that little half-moon pocket. Start the drill again and keep it running as you slowly bring the drill to a straight-up, vertical position…about 1-2 minutes. You should now be able to hold the drill in a vertical position for the remainder of the hole-making process.
As you drill, you’ll see a white cloudiness in the water which is the fine debris from the plate.
Eventually, you’ll be able to see a circular marking appear on your plate. Again, depending on the make up of the plate, drilling a hole could take anywhere from 5-20 minutes. Better quality dishware such as high density stoneware, porcelain or glass may take longer. As you can see from the photo below, it’s really more of a ‘grinding‘ process than “drilling”.

Caution: DO NOT push down or use too much pressure while operating the drill or the dish could crack. The weight of the drill itself against the plate is usually enough. So save your energy.

What plates are good and not so good to use?
Generally speaking, most tableware both modern and vintage is just fine for drilling. Don’t choose plates that seem a little thin. Avoid the brand “Corelle“. Glass dishes that are thin as well as some of the more delicate china, won’t take the pressure and will crack. Even when drilled in water.

Add additional pieces to finish your dishflower
With the 2-1/2 inch machine screw inserted through the plate, with the head of the screw on the front side, I use silicone to ‘glue’ the additional dishes on top of the drilled plate. When completely dry or “cured”, I attach the flower head piece to the post.
I find that wing nut fasteners are much easier to handle than the hex nuts that usually come in the package with the screws. Caution: to not tighten the nut too tight or the pressure will crack the plate. Tighten slowly a little bit at a time until the flower head is snug enough that it doesn’t turn on the post.
The dish flower may easily be removed from the stake for storage in winter.
DON’T FORGET YOUR FREEBIE! Sign up below to receive your special garden decor tips and be part of the Make it a Garden Community!
The benefits
Whether you’re making this for yourself, a friend or to sell at craft shows, I hope you’ll give it a try. The drill method suggests a little more quality and care is taken in the creation of the art piece. Though there’s more time and effort involved in this method, I’m of the opinion that it’s the most secure one. I’ve found that customers appreciate the reassurance that their garden treasure will last. That it will be enjoyed for many years to come.
Dish flowers are not your box store variety garden art, they’re sculpture and must be treated as such.
And not just dish flowers! Once you’ve mastered drilling dish flowers, you can drill coffee mugs, glass wine bottles etc. Get a Dremel tool and there’s even more fun, creative and beautiful things you can drill. It will open up a whole arena of crafts for you!
If this article was helpful or insightful , feel free to share it. Better yet, leave a comment as I really value your feedback. Remember to sign up for the newsletter below, and tell a friend about Make it a Garden. Happy crafting!
More Garden Art Topics to Explore:
Garden Art Projects: how to get glass sparkly clean
How to Make Dish Flowers Part 1
How to Make Dish Flowers Part 2
The form you have selected does not exist.
This is a very informative article, Kris! Awesome details for plate drilling. I have a Dremel tool and may try doing something like this some day but I’m going to start with shells and other items I’ve found on the beaches of Alaska.
” )
Thanks so much for your comments! Yes, the crafts you described doing with shells are precisely the new, fun and creative avenues that open when you learn how to drill a plate. There’s so many new crafts you can do, especially with a Dremel! That’s one of the benefits of learning to drill a plate for making dish flowers. I’m glad you enjoyed the article.
This was great, I just started doing birdbaths, totems, and just beautiful pieces. It was supposed to only be one (I saw one in a yard and thought I would try to make one, it turned into 25 much to my husbands horror!) I can’t seem to stop, but have so many questions on how to do things “better”, and this was before I even had looked on Pinterest (fired from job after 27 years, that was almost 3 years ago). I’m now 64 and have never had time for crafts, etc. so this was extremely helpful. Thank you.
Thank you for the lovely comment! I see you’ve found a new hobby now that you have time for crafts, and yes, it’s addictive. But it is so much fun. There are a lot of things I want to try, too, that I haven’t gotten around to!
Do you have a suggestion of securing dish flowers in an urn planter rather than on a tall stake in the garden? I want my dish flowers to provide year-round color on my back patio where the constant sun makes it hard to keep flowers watered enough to live in the hot summer!
Thank you!
Thanks for the question. And great idea, by the way to bring color to your patio! I would cut the stake down to the length you need. Dish flowers have quite a bit of weight to them, so they do require some type of post or stake that can provide adequate support. I always recommend (and use) 3/4″ galvanized metal electrical conduit. Lowes carries 5ft length for around $4.50 (your prices may vary)…but metal conduit can be cut with a hack saw. You can get 2-2.5ft lengths from that. Be sure to file off the sharp barbs at the end. You can also use copper, which is a softer metal and even easier to cut, but it’s a lot more expensive, and too much of it would be wasted anyway,if you’re cutting it down.(unless you’re making more than one dish flower) The 3rd alternative is 3/4″ plastic plumbing conduit which is super easy to cut, plus it’s thick and strong, too.
Finally, ensure the weight of the dish flowers doesn’t make the urn tipsy. Urns made from styrofoam are pretty light. Heavier urns made from ceramics are better for displaying something like glass/ceramic dish flowers. Let me know how things go. Happy planting! – Kristen,MIAG
You are my HERO!!! I have wanted to make these for so long but have been unsure how to put them together. Also, I have been looking for the beautiful colorful plates but couldn’t find them. Little did I know that these were painted!!! I have spent the entire afternoon painting all the clear plates I have! My husband is picking up a diamond drill bit tomorrow and I am going to town!!! Thank you for sharing all this very valuable information!!!
Oh, I’m so happy to be of help! Happy that you’re loving making your own dish flowers. Happy you have such a great husband who is picking up a drill bit for you. As for the painted plates…I used to think they were some kind of antique or unique glass work. I looked around too and never found any, but certain they would be expensive when I did. (ha ha) and then I learned they were painted. Have fun and please let me know if I can be of any further assistance!
I created a few glass sculptures for my yard and used E6000 glue to hold them together. After about a year the glue on all of the pieces fell apart. What is the best glue to hold the front flowers to the back one? Does any glue really stand up to high outdoor temperatures??
Hi Ande: that’s so disheartening when that happens. Glass absorbs heat. It really heats up in full sun and stays hot for a long period of time. That’s the reason for glue fails in hotter climates. As you can imagine, glue is THEE #1 issue when it comes to glass garden art. That being said, E-6000 is a good, gripping adhesive for glass, but I have heard from others, too about it not holding up in high temperatures. Instead, use 100% GE silicone, clear for exterior. Read about it here: https://makeitagarden.com/2-of-the-best-glues-for-garden-art/. Silicone DOES withstand temps up to 400 degrees. That’s why some of our modern kitchen and baking ware is made out of it…like cookie molds, pot holders etc. It can TAKE the heat. Silicone is a thicker consistency so the bead stays put, and has no harsh fumes. It’s not as clear as E6000, but if you apply it sparingly and smooth the bead out, it’s not too bad. Silicone is used to seal the outside of windows, so it’s shrink proof, sun proof, waterproof. Give it a try and please let me know how it goes! Thanks so much for dropping a line! ~ Kristen/MIAG
This is a wonderful article! I’m new to dish art and I can’t wait to get started. I’ve gained a lot of valuable information, thank you😀
You’re welcome! I had to learn, too. You might be interested in my tutorial if you haven’t found it already: https://makeitagarden.com/whimsical-dish-flowers-and-how-to-make-one-part-2/. It’s full of those great little details and helpful ideas so your craft project is not only successful but beautiful. Happy to answer any questions you might have along the way. ~Kristen
Thank you for the great information! I just found your site and signed up for your blog. I love unusual things in my yard and gardens, even though my neighbors may be startled! Looking forward to more ideas.
You and me both! I’ve tucked the articles about garden design under the heading of “In the Garden” on my website. I’ve written on different garden themes, like cottage and flea market, dolling up a garden shed, re-purposing thrift store finds into garden art, and how to make things like hub cap flowers. So please visit again and take a look around. I’ll be writing more on these subject, too. Thanks for taking the time to drop a line. ~ Kristen
Great tips and information. I have a wonderful glass flower I bought but can not find the artist now to purchase more. His pieces, 3 successively smaller pieces, are all drilled. Is there a reason why you only drill the largest one and glue the others?
Good question, Katy! When I was researching to learn the best way to make my dish flowers, I came across folks like the artist you got your beautiful garden art from who drilled all 3 pieces. So, this convinced me drilling was the way to go, because I also intended on selling these and did not want them to come apart. Typically, they insert the screw from the rear forward and secure with a cabinet knob. What I do differently is simply a preference. No right or wrong. From an artistry perspective, I discovered creative things I could do with the center and many items could not be drilled without marring them or breaking them. It opens up more possibilities to play around with. Since they are lighter in weight, I found 100% silicone was ideal for securing them to the front. So, I began the technique of just drilling the large rear plate, then ‘gluing’ (silicone) the middle plate and the centerpiece. (Although sometimes I drill the middle plate, too) But the weight of the entire piece is supported by the bolt thru the post. It gives me more fun options…rather than always having to use a knob. Or just ‘certain’ dishes that would work with that. It’s a bit faster when only drilling one item and preserves my drill tip a little longer. My customers have told me their dish flowers have held up well and I also have a couple “test pieces” in the yard I kept for myself so I could ensure this method worked summer after summer. But, again, the primary reason boils down to pure creativity. Thanks for asking! ~ Kristen
Your article has given me the confidence I think I need to start drilling holes in my glassware!! I’ve been doing my homework on how to do this but still was a bit unsure. I have many pieces that need to be drilled but wasn’t at that comfort level just yet. Just an hour ago I sent my husband a text asking him to go by our local glass company to see if they would do it for me but now I feel confident enough to do it myself! Now to find the drill bit you use. The ones I’ve seen here have a pointed end but I like the one you use better. I feel I’ll have better results. Can’t wait to read your other articles. Thank you for sharing your tips with us.
Thanks Alicia for the feedback. My goal is to be helpful so your comments are much appreciated. When I was first learning, I started with a pointed glass drill bit and it was NOT very effective. I kept looking on-line and eventually found someone showing the round tip and how to use it to make the hole. Presto! That worked so much better, so naturally it’s what I’ve been using for years. You can find the round ones in the tool sections of Lowes or Home Depot. FYI not all glass is drill-able. Make sure it is the thicker glass plates/bowls that have a bit of weight to them. Those older Glass plates for deviled eggs are good, ones with a cut-glass pattern (such as Federal glass –the pointy edged petal plates). I know exactly what it’s like to have to work up the confidence because I was unsure myself when I started. If you know someone with a drill press, it does the same thing on a much larger scale, and they could help you, too. Good luck and let me know what you think after you’ve drilled your first plate. I’m always available to answer questions. ~Kristen
Hi, I’m a 66 year old woman. Love yard work. Recently cut back my hours at work, now with more time on my hands, I started to do more things in the yard. I fell in love with the metal flowers in the stores. My husband says he has never seen me so excited about anything in a long time. So I started to wait for them to go on sale to purchase them. (They are so expensive). But my husband said ” to go ahead and get them since it makes me happy”. So I looked on line to learn how to make them. I even thought about getting a hand held soldering iron. But came across the glass flowers, and that did it. Now I’m so excited to learn how to do this amazing project. Can’t wait to start. Still trying to convince myself I can do this. But thank you so much for your information. I think I can!!
Your husband sounds like a wonderful man! Soldering and metal work is useful and fun, too and something I still want to learn, if I ever get a garage or workshop. You’ll love making your own garden art from dishes or whatever you can find. It’s inexpensive to start and a fun way to keep busy in winter making things for summer. But yes, it’s all too easy to ‘catch the bug’ so to speak. I make myself available to help, so if you ever have any questions or run into a problem, drop me a line! ~ Kristen
Really loved the article on drilling plates found it very informative. I was kind of wondering if a rubber grommet would help protect the drill hole?
In my research, I have not seen makers use them. The plate does not spin…it’s stationary sculpture. So, while someone could use a grommet, a hole larger than 1/4″ would probably be necessary. (I don’t know how small grommets come). In my experience, 1/4″ diameter hole is sufficient. Interesting idea, though.
You mentioned the importance of drilling in water to prevent the plate from shattering due to the heat generated by friction. Are there any other precautions or techniques you’d recommend for beginners to ensure a smooth drilling process, especially when working with more delicate or ornate plates?
Some plates cannot be drilled b/c they cannot withstand the pressure. So a more delicate or ornate plate—one with thinner glass will break. ‘Correlle’ is a brand that cannot be drilled. I had to learn this myself! So only drill a thicker, heavier glass or ceramic plate. But you could use the more ornate plate as the middle plate in a dish flower which I glue. (I only drill the rear plate) Also…if you are just learning to drill, get yourself a few “practice” plates…ordinary ceramic plates to experiment with until you get the hang of it.
I am so thrilled in reading your articles. I have made many of these for Christmas. I have drilled through all three plates, and also intend upon sealing them with GE silicone. We live near Carson City NV so we have some harsh winters and hot summers. My question is if the plates are sealed with the silicone, can they be left left out year-round or do they have to be brought in during winter so that the rain and snow don’t crack the dishes when we hit below freezing? I thought perhaps if there was too much moisture that accumulated between the plates, it might force them to crack. Any information would be appreciated. Thank you I appreciate your guidance.
Thanks for your feedback. I try to write the best, most helpful articles, so it’s nice to know I’m hitting the target! Congrats on drilling! I’d be more concerned with harsh weather, a rock flying from a snow blower, or getting hit by a plow truck etc. Yes, you certainly can seal around the joints where dishes come together. You can even apply a thin layer around the inside of the hole using a toothpick. I typically recommend bringing the flower heads indoors over the winter (they detach from the post so the post can be left in place). However, I did experiment and leave some plates out during our cold, snowy winter in AK. They were ceramic plates and didn’t break. That’s not to say they can’t break! Most regular dinner plates are sealed; they can take the microwave or oven or freezer (as can most glass). I just haven’t left my stuff outdoors enough in winter to be able to advise. What I would do is two test pieces. One with the silicone and one without and see what happens. I did leave a teacup garden stake out one winter. The cup filled with rain water and froze. With a few freeze/thaw cycles, the ice eventually cracked the tea cup…but I will say it lasted a long time until that happened.
What voltage do you recommend for the cordless drill? 12 or 20? I am gathering the tools & supplies that I need to start making the dish flowers. I have to purchase the drill, so want to make sure I get the best one for the job.
Go with a 20. It’ll get the job done faster. I personally use a 12v only b/c it was lighter weight and fit my small hand comfortably. I use my drill a lot, so comfortable fit was important to me. But it does take longer to drill my holes. A 20v will cost more than a 12v, but you’ll appreciate the voltage for other uses, as well. Have fun with your project, I’m always available to answer any further questions!
Thank you so much for this info. I was able to drill through plate just fine. But sadly, there was not enough clearance for screw head to glue the 2nd plate. 😪 I had already prepared 6 flowers plates. Something to watch out for on future projects.
I have run into this problem a few times. It all depends on how a plate is made. Some have a shallow rim that doesn’t clear the screw head. Some plates are completely flat on the bottom. So here’s the solution. When this happens, I just drill the second plate as well and insert a longer screw/bolt. OR use a spacer in between.
The perfect spacer plate is a smaller, shallow plate turned upside-down so the rise in the plate covers over the screw head. Then I use silicone to affix the next plate or dish to the spacer. Make sure the spacer plate is smaller in diameter so as not to really show and minimize the degree of space in between. Sometimes this technique presents a kind of 3-D effect to the art piece. It helps if the spacer plate doesn’t detract from your colors. Sometimes a clear plate accomplishes this beautifully. I always keep an eye out for good spacer plates when I’m out shopping for dishes.
Thank You so much! your articles have inspired me to start my own business! not as beautiful as your work, but I’m trying. my question is I seem to shatter glass plates when I’m trying to drill the hole: I’m trying to be patient, trying to go slow, trying to not put pressure on it and I get to 3/4 of the way through the plate and then the whole thing shatters – is this a the plate is too thin or am I doing something wrong? Your input and feedback would be greatly appreciated
I must say you are brave and determined to have more than one shatter and keep on going, where others throw in the towel! First question: Are you drilling in water? Water cools the plate as the friction from drilling gets hot. That alone can shatter a plate. But it Sounds like these plates are not the drillable types. Many are not tempered glass. I had plates shatter on me too when I was just starting out and have learned over time…and you will as well. Always use the heavier, thick glass…like deviled egg plates or those Federal petal plates (you can google it), a serving platter, crystal etc. Consider wearing eye protection as well.
This looks so cool. I can’t wait to try.