

“Come feed the little birds, show them you care. And you’ll be glad if you do. Their young ones are hungry, their nests are so bare. All it takes is tuppence from you.”
from Mary Poppins, words by R. & R. Sherman
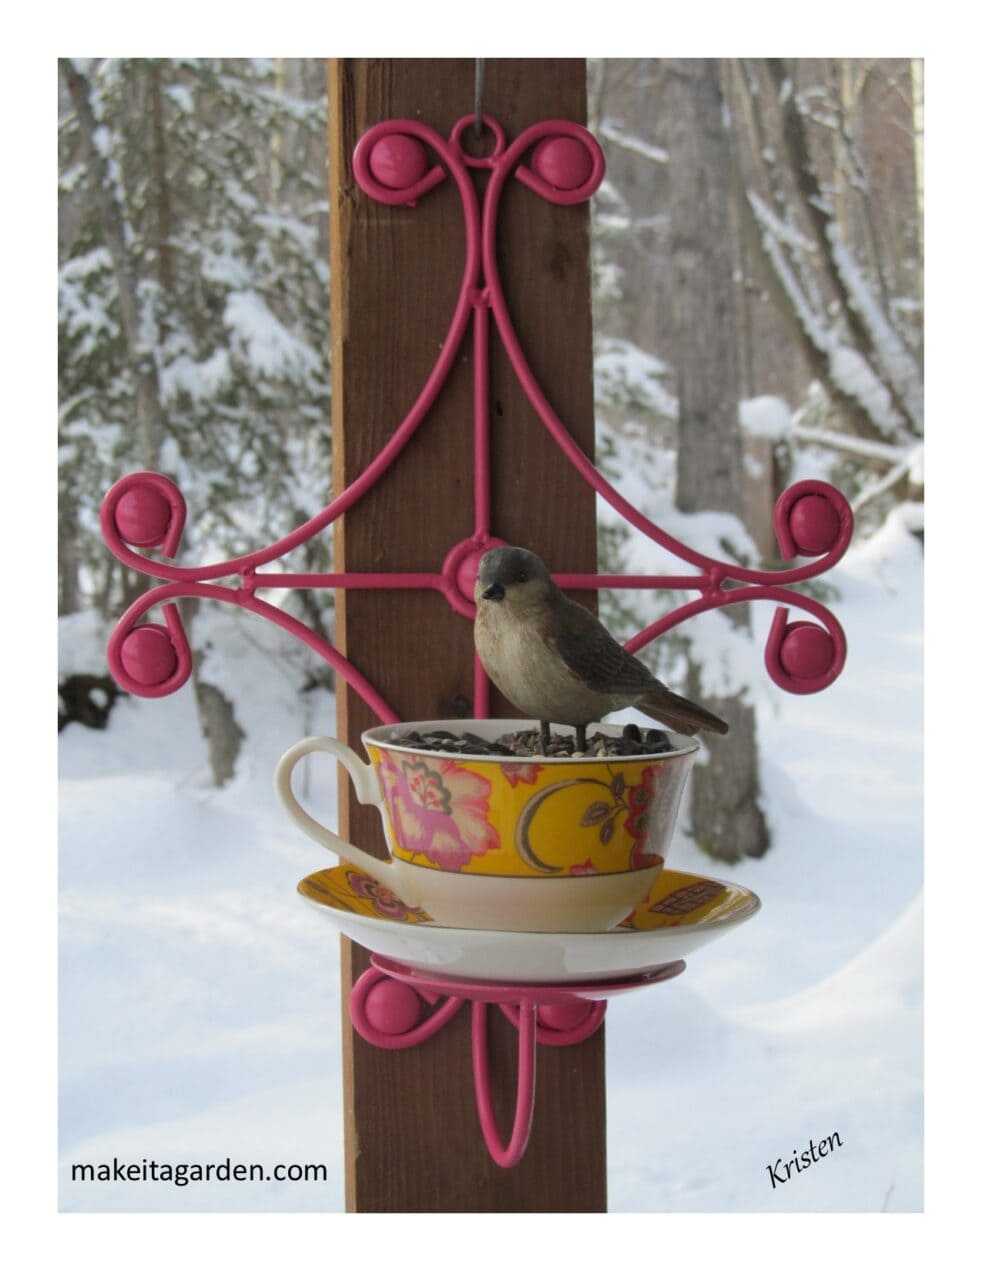
Your love for birds and love for the whimsical come together with these charming bird feeders from tea cups. They are super simple to make. All you need is a pretty tea cup and something to mount it on.
They hold up very well outdoors and I’ve had mine up for two years! Because they are small, they’ll need to be re-filled often. For that reason, I highly suggest you place your tea cup bird feeder on or near the front porch. Or hang on the side of the house or wood porch post. (as in my photos)
You want to be able to easily reach and re-fill them, but also to see them. They’re to be enjoyed as something pretty and decorative around the front door.
In some areas of the country, people feed birds year-round. But in Alaska, we let the chickadees and nuthatches and other small birds eat a natural diet in summer. But in winter when they need the extra fat, they will gorge themselves on black oil sunflower seed. You can also warm those square suet cakes and press them into the teacup.


Bird Feeders From Tea Cups
Materials:
- Tea Cup & Saucer (saucer does not have to match, saucer isn’t necessary if you only have a cup…it looks nicer to have both)
- Metal hanging candle sconce (one w/o a spike in the center. ) Fairly easy to find at thrift stores in the home decor isle among all the candle stuff.
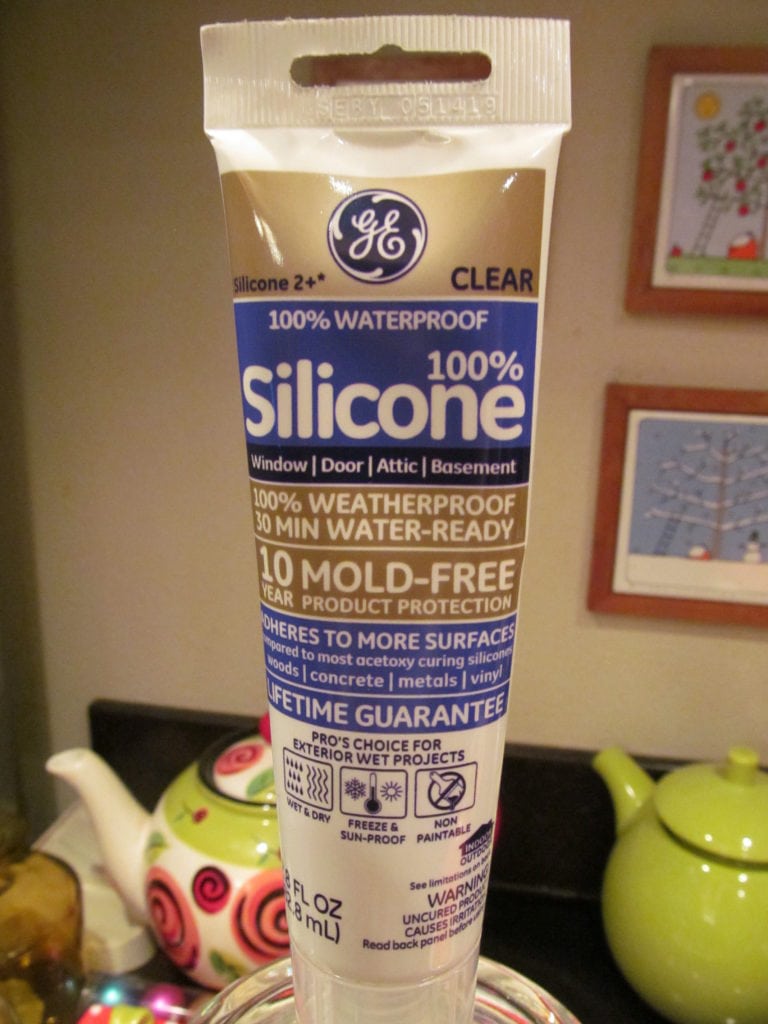
- 1 small tube of GE Silicone II -Clear for exterior. (no calking gun necessary!) Note: silicone is the #1 product used for dish garden art. It’s made for outside so it’s rain proof and won’t crack and come apart in cold weather, or melt in hot temperatures.
- Spray paint (optional)
- beads or small spoon for added decoration (optional)

Directions:
- Rinse metal candle piece in hot water. Examine closely or feel for wax residue. It’s important for all the wax to be off the surface for a nice spray-paint finish (if desired) AND for best glue adhesion…so the silicone is making contact with the surface and not the stuff that’s on it.
- Spray paint the candle sconce if desired. I like to pick a color that looks best with the tea cup. Allow complete dry time as recommended on the can. You can do a 2nd coat if you wish, but I usually do not for this type of project.

- Use the silicone to ‘glue’ the tea cup to the saucer. For best adhesion, turn the cup upside down and apply a bead around the bottom rim of cup. Set cup in center of saucer and press down lightly. Some silicone will squish out the sides. This is desirable! Smooth the bead around the outside edge of the cup to make a seal using a q-tip or your finger. Wipe off the excess.
- Allow silicone to set up and thoroughly dry according to directions on package.
- Use silicone again to glue the tea cup/saucer piece to the metal candle sconce. Try to center the saucer best you can. Note: Some saucers might not fit exactly on center. As long as there is good surface-to-surface contact and good balance, it’ll be fine!


Gift-Giving Tips
Who doesn’t love a tea cup? Wonderful for Moms and grandmas and teachers, too!
**Be sure to include a small pouch of bird seed tied with a pretty matching ribbon, so it’s ready to be hung up when received. That way, the gift can be enjoyed right away by both the recipient and her bird friends!
**Make the tea cup feeder a little more decorative by adding some matching beads, plastic crystal or pendant. String them on a piece of monofilament fishing line and tie beneath tea cup.
Finally…
I hope you’ll enjoy making yourself (or someone else) a sweet little bird feeder from tea cups. They are so easy to make and such charming front porch decor. Here’s another fun project for bird lovers from my blog: Make a birdbath from re-cycled dishes.
DON’T FORGET YOUR FREEBIE! Sign up below to get your special garden decor tips and be part of the Make it a Garden Community!
Happy crafting…

Kristen specializes in up-cycled crafts. She has a reputation for quality and attention to detail, and her artworks show it. She takes such joy in making things “extra special”, especially during the holidays. Her craft posts may entail a bit more description geared to those who don’t make crafts on a regular basis. Even if you do, you’ll appreciate the thoughtful insights so your projects turn out beautiful!
Here’s another fun winter craft to try!
Golf ball snowman Christmas tree ornament
The form you have selected does not exist.
We appreciate the comment! The tea cup feeders are adorable (and easy to make).
Do you ever make the teacup on a post?
Thanks for the question and YES I have made them. I haven’t done a tutorial yet, but the way I do it is to mount the teacup on the bottom of bottle turned up-side down. There’s much more surface contact for glue with this method. Then I slip the open end of the bottle over a piece of rebar. You can also use a vase with a narrow neck. You don’t want the neck too wide or there will be too much ‘play’ and it will move around too much. Here’s a link to an article that shows a pic of this in my garden. https://makeitagarden.com/weird-glue-failures-and-solutions-for-garden-art/. I have tried the method many other crafters use…which is to glue a copper pipe cap to the bottom of the teacup / and or saucer and stick the cap over the pipe. It works, but with not too much effort, I can loosen the cup/saucer. If left alone, it would probably do just fine…but there’s very little surface contact and the cap is not completely flat and there’s enough tapering that the glue can run off to the side while curing, so there’s less adhesive to grip. Also, some glues resist the metal in copper and don’t set up well. That’s why I’ve changed and gone to bottles or vases. You can find some very attractive ones for garden art. With clear glass, the bottle doesn’t show up and you see the teacup.