
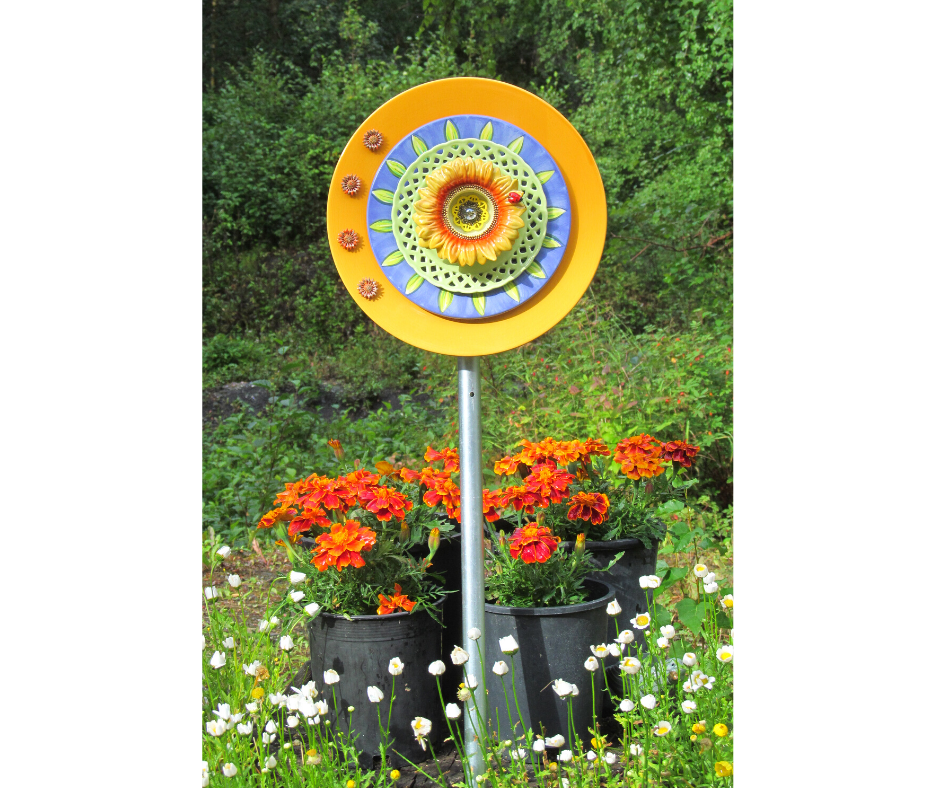
“How do you attach it to the post?” That’s the 2nd-most question I’m asked at garden and craft shows where I sell my dish flowers. Some people have seen dish flowers before and the different methods makers use. Others are simply curious as to how the flower-head is suspended on a metal post.
Mounting the dish flower
This is a real problem! The reason dish flowers can be so aggravating to make is because of issues with mounting it to the post. Through the years, crafters have experimented with a variety of ways to attach the dish flower headpiece to the post for display in the yard or garden. You may have seen some of them promoted on Pinterest or other sites.
But just because it’s popular and/or “easy”, doesn’t necessarily make it the best or most secure method. Here, I’ll present a few of the more prevalent methods along with their Pros and Cons. I’ll also share my own preference, as an artist and why I recommend it over some of the other alternatives.
Pros and Cons
I’ll review the pros and cons of the following methods commonly used to mount the plates to the post:
- SPOON METHOD
- BOTTLE METHOD
- HOCKEY PUCK METHOD
- DRILL THE PLATE METHOD
Gluing:
Most of the methodologies for attaching dish flowers to the post involve gluing something to the backside of the plate. And then inserting the art piece into a hollow post or slipping it over the the top of a piece of iron rebar.
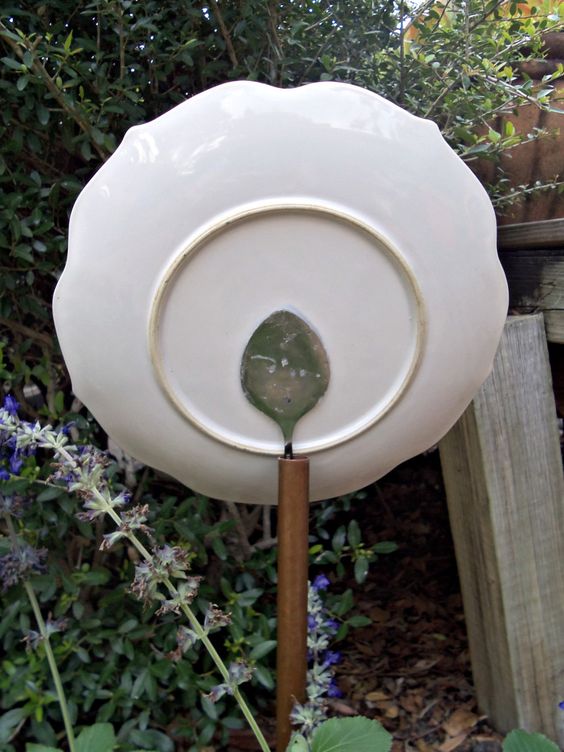
Flattened spoon / bent spoon method
Pros: This is perhaps the most popular method crafters use. Spoons are easy to come by at the thrift store. It takes a bit of pounding with a mallet to flatten the spoon, but other than that, no special tools or skills are required. That makes it the simplest and easiest way. So, it comes as no surprise that it’s also the most common method you’ll see for attaching a dish flower to the post. The handle is then inserted into a hollow metal post.
Bent Spoon:
Some crafters do this a little differently. After flattening the spoon, the handle is curved over. Heat from a small propane torch is applied to the metal spoon to make it pliable so it won’t break. The flattened spoon is then glued to the backside of the plate and the handle inserted into a hollow post.
The difference is that a bent spoon holds the plate out a little ways from the post, tilted slightly upwards. That position angles the dish flower to make its face more visible when looking down at it.
Cons: Despite it’s popularity, this is also the method that fails most consistently. There’s not much surface contact on a spoon, either, to hold the weight of all those glass or ceramic plates. Another problem is the glue. Often, the wrong glue is used for an outdoor application. When the glue fails, the heavy plates slide right off the spoon and crash to the ground. If you’re lucky, your dish flower might not break depending on where it lands.
The other problem is the weather. The glue you see recommended in a You Tube video might be compromised by the heat in your part of the country. One of those glues is called E-6000. While it’s a good craft glue and a strong-bonding one, it’s only rated by the manufacturer to withstand 180 degrees. SEE my short article on E-6000.
Glues are made up of different chemicals. Believe it or not, there are some glues that interact with the type of metal in a spoon. (although this is more rare, it can and has happened) The metals in spoons themselves may be made of different ‘ingredients’, so-to-speak. Eventually, the glue weakens and the flower head detaches from the spoon.
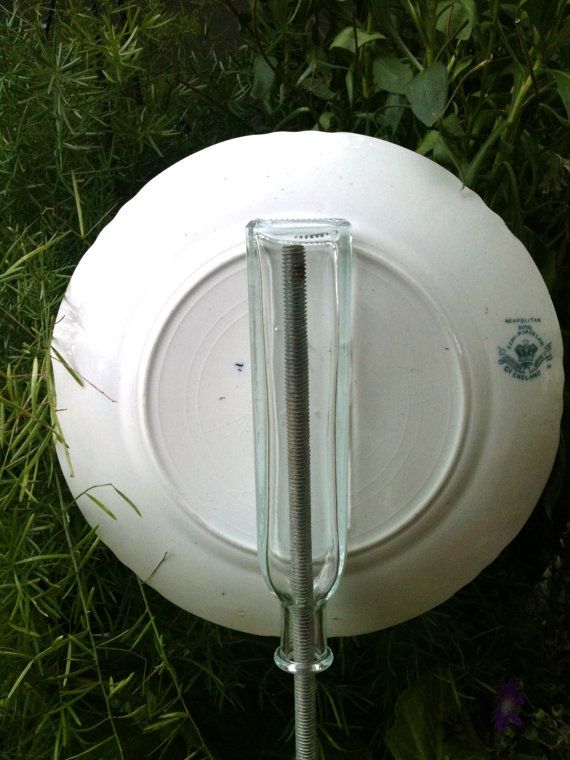
Glue a bottle method
Pros: Again, the ease and simplicity of this method is what makes it so popular. Heck, it’s easier than messing with spoons! What could be more simple than gluing a glass bottle upside-down on the backside of a plate and sticking it over the top of a piece of rebar or galvanized rod? This way, if the weather turns bad, you can quickly remove the dish flower from the post and put it in the garage for safe-keeping.
Cons: Again, the downside to this method boils down to glue. And there is even less surface contact with the bottle than with a spoon. In the photo above, the bottle is glued to the rim of the plate at the top and bottom. If the glue should fail, the artwork is busted.
TIP: This technique would be a bit more secure if the sides of the bottle were glued to the plate as well…but that would require a lot of glue due to the gap between the bottle and the back of the plate. In that case, something thick like 100% silicone would do the trick.
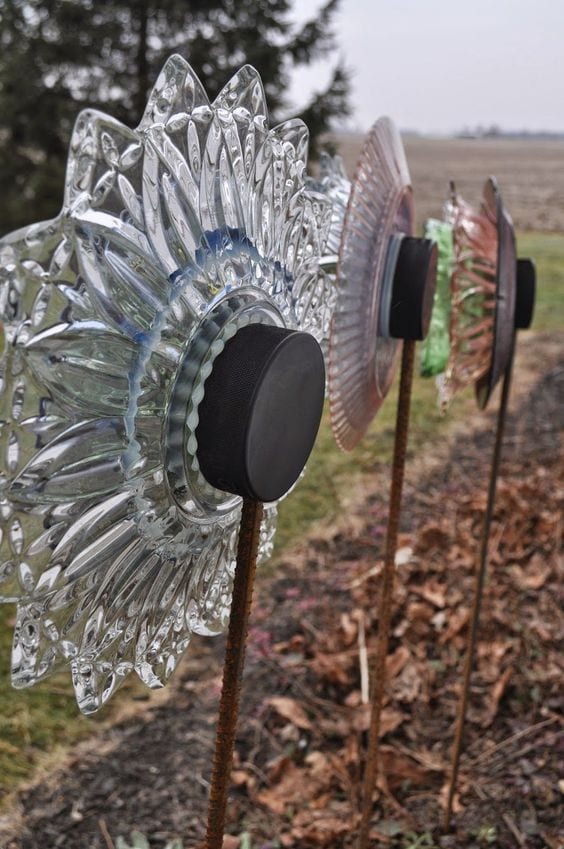
The hockey puck method
Pros: This is a newer idea that’s gaining traction when it comes to attaching dish flowers to the post. Providing you can find an old hockey puck; or maybe just buy a new one.
A hole is drilled in the side of the hockey puck, at least half-way through. Fortunately, rubber is a fairly easy material to drill. Then, the puck is glued to the backside of a plate. When dry, the hockey puck is inserted over the top of a piece of iron rebar.
Cons: Once again, it’s the glue that could potentially fail. One reader wrote to ask me what glue to use that sticks well to rubber, because the one she tried, didn’t work. Finding glues that bond to various surfaces is tricky. Just because an adhesive is water proof or made for glass, doesn’t mean it will bond well to rubber or other substances. My article on Weird Glue Failures might be helpful to better understand how glues work.
TIP: When choosing a glue for outside garden art, research on line or read the fine print on the package. Ensure the glue or adhesive is made for exterior and bonds to metal, glass, rubber or whatever materials you are using to mount your art piece. Then check the maximum temperature it was designed to withstand.
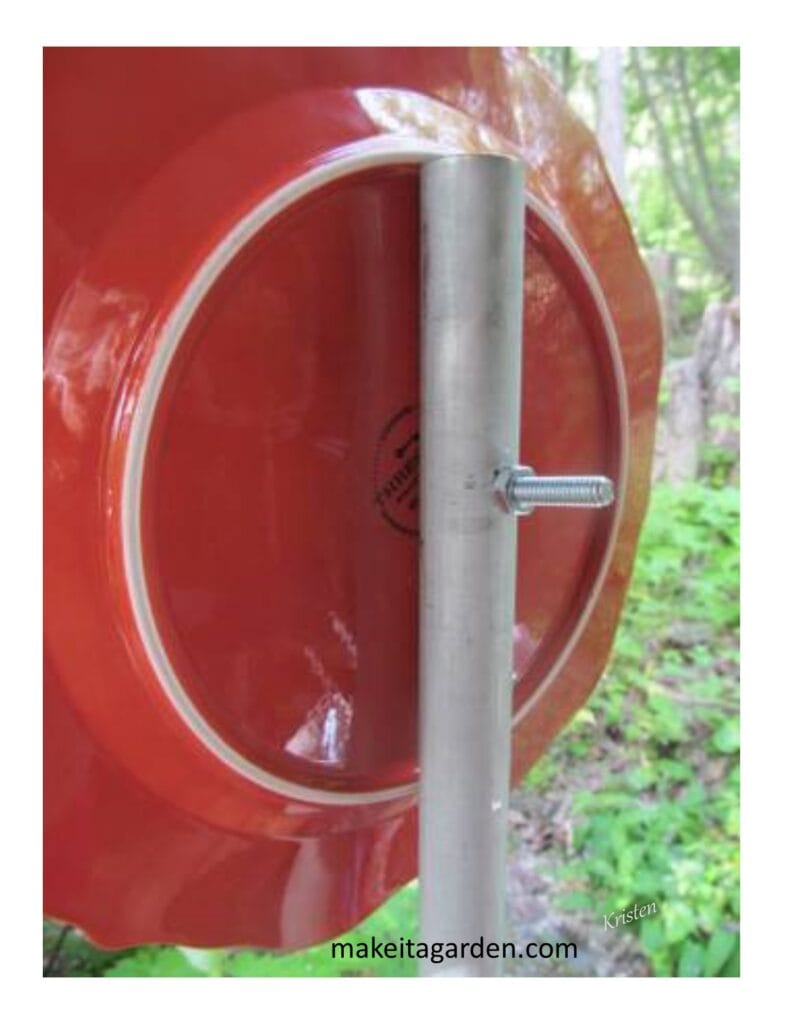
Drilling the Plate Method
Pros: Finally we come to my preferred method of attaching dish flowers to the post. From experience and from what I’ve seen and heard in DIY garden art circles, drilling is probably the most secure method compared to the others.
What sets it apart is that the flower head is physically attached to the post…not glued to another object. It’s there to stay no matter how hot it gets in your climate.
A hole is drilled through the center of the plate (the larger plate that makes up the dish flower) A bolt is inserted thru the center, then through a metal post. Those heavy glass and ceramic plates are supported in two places on the post: the hole’s entry and exit points. SEE my article on The Best Way to Drill a Plate.
Cons: The perceived negatives for drilling are the reasons why the spoon, bottle and hockey puck methods are favored. Why? Well, first off, drilling seems daunting. I’ll admit that I was scared to attempt it because I worried about shattering glass and cleaning up a mess. But, I learned from others who made videos (like I did), and they convinced me to give it a try.
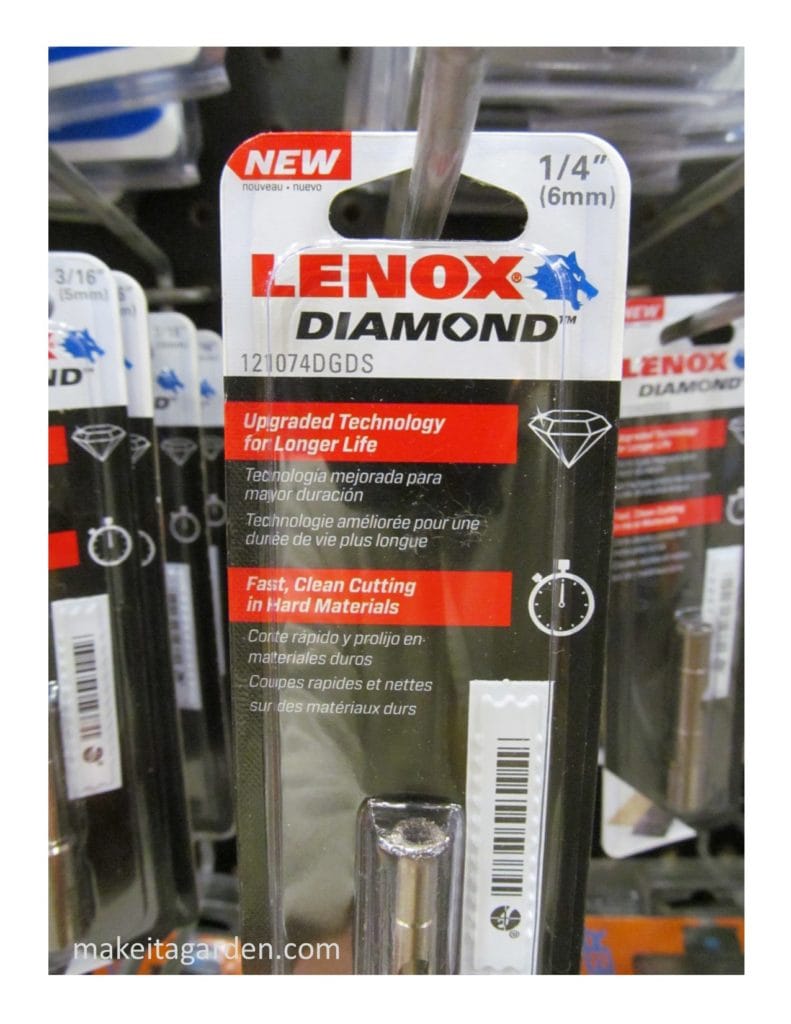
Secondly, a plate requires the purchase of a specialty drill bit. You can find one at a hardware store like Lowes.
The third reason why the drill method is less popular is because some of those who love DIY garden art aren’t accustomed to using power tools, or are intimated. (that was me, too, by the way!) It’s true that it takes a little more time and practice to learn how to drill, plus the extra 5 minutes or so to drill the hole depending on the make-up of the plate and the power of your drill.
To Drill or Not to Drill
The choice is yours!
As shown here, there are many ways to assemble your dish flower. Each person can decide for themselves which one will work best for them. Not everyone lives in a hot climate so one of the glue methods may indeed work out.
The good thing is that dishes are pretty cheap and easy to replace. If it breaks, just make a new one! But if you’ve been left frustrated and disappointed when one of the other methods fail, you might want to consider drilling a plate so you can compare the two. You may even discover, as I did, that drilling a plate is not as hard as it seems.
And there are some advantages, too. As one of most popular garden and art bloggers says “As soon as you are confident that you can indeed drill holes in all sorts of used kitchen items, the entire key to the garden art kingdom is yours.” Empress of Dirt. To that, I heartily shout, “Amen!”

Kristen is known for her one-of-a-kind dish flowers and artful garden totems. She happily shares her knowledge and expertise and her tutorials are first rate. Most of all she loves helping others learn to make things and find their creative spirit.
Tutorials from Make it a Garden
How to Make Beautiful Dish Flowers
Make Unique & Artistic Garden Totems
I love your ideas. We live in California and have to water everything. How do you water a wheelbarrow full of flowers?
The wheelbarrow becomes like a planter and as such, it stays in place. I drag a hose all over my yard watering things. I also water it by hand with a watering can.
I am new to dish flowers but have found the drilling is not that bad. I am drilling all layers of the plates and gluing too. Does drilling weaken the plates and is this overkill. I live in Michigan.
Thanks for visiting my blog and for the great question. It sounds like you are doing just fine! Dishes are made of natural material, so a small hole in the center has no impact at all. Unless of course the material itself is weak. Sometimes an old antique plate can be more prone to breaking during or after the drilling. On a very rare occasion, there may be a defect in a plate not known to you, and after drilling, it begins to show a hairline crack..which could just be on the inside of the glass, with the plate still intact and holding together well. Other times, the problem may be on the outside surface that you can feel with your hand, and generally that means it won’t hold up for very long. I’ve only had something like this happen maybe 2 times and I’ve drilled hundreds of dish flowers over the years. That being said, NOT all plates are drillable. Most are…but not thin, delicate glass nor Corelle brands. From what I’ve observed, it’s not overkill to glue the plates together after you’ve drilled. I think that’s a common practice, but you certainly don’t have to. I think people do it to seal out water and debris (dirt)from getting in-between the plates and perhaps protecting the hole a bit. I glue mine.
Can this particular drill bit be used to drill holes in wine bottles?
Yes, it will work for glass bottles. If you plan on inserting lights, make sure the style of lights you plan to use will fit through the size hole. The tiny “fairy lights” should. If you desire a slightly larger hole you can use a similar drill tip called a “HOLE SAW”. Don’t let the word “saw” alarm you. It doesn’t look anything like a saw. Here’s an article I wrote about drilling wine bottles: https://makeitagarden.com/the-easy-way-to-drill-a-hole-in-a-wine-bottle/. Hope this helps! I’m happy to answer any further questions, too.