
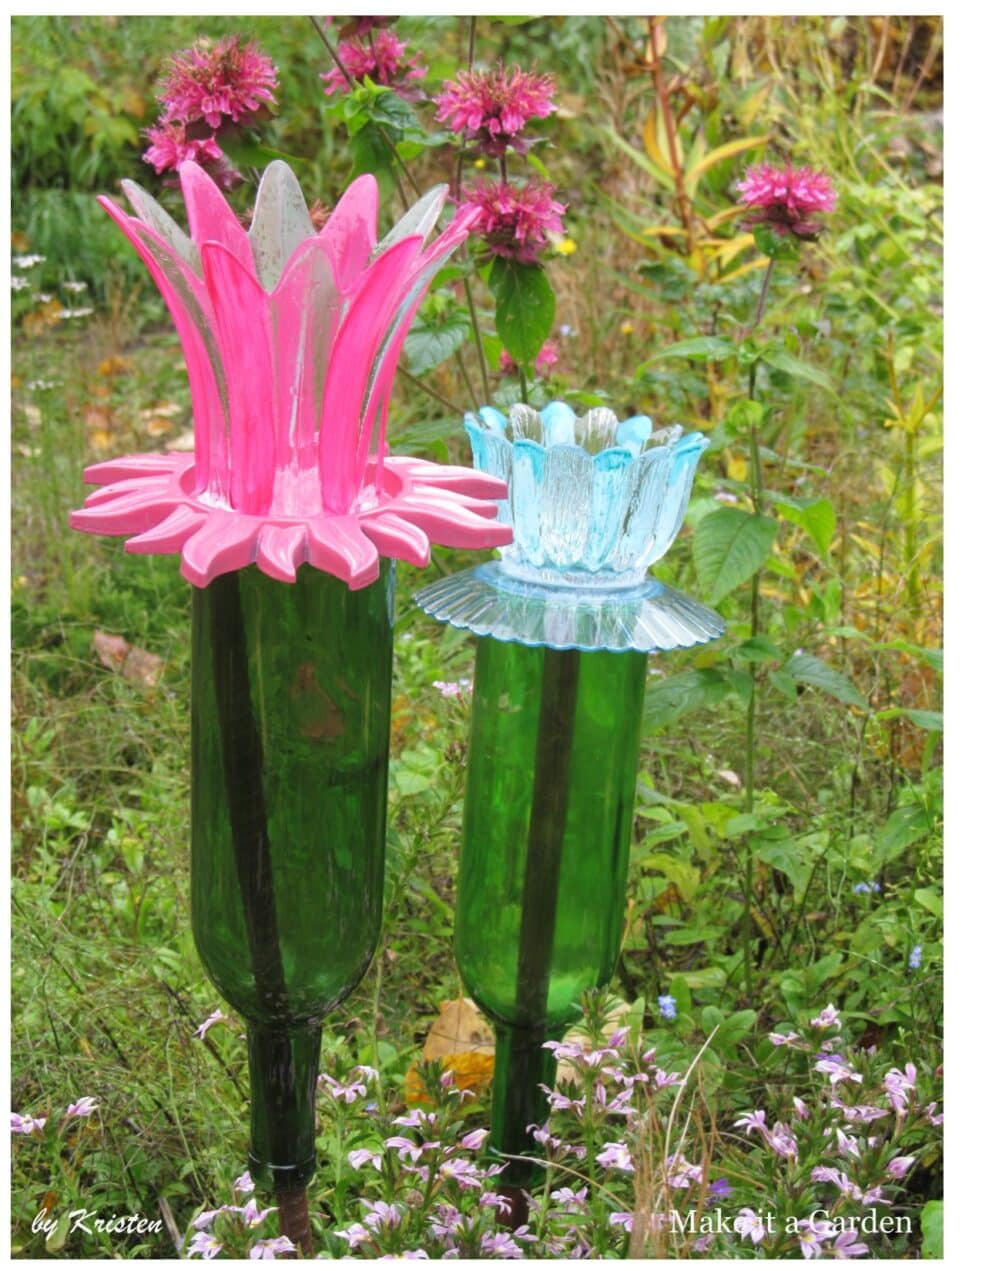

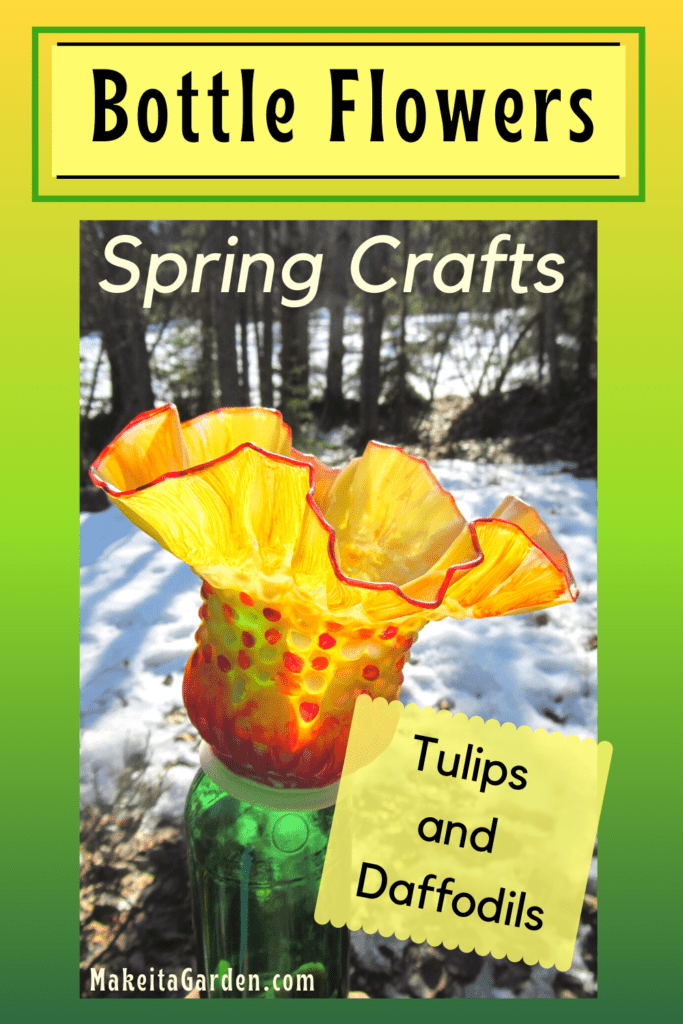
It doesn’t get any easier than this!
These wine bottle flowers look impressive in the garden and all you need is glue. If you like dish flowers, but discovered making them is more complicated than you want to get into, you’ll love this super easy alternative. In fact, the hardest part may be shopping (or not!).
Last summer, a neighbor up the street gave me a bunch of unused wine bottles. As a hobby, he used to make his own wine, but wasn’t doing it anymore and the bottles were taking up space in his garage.
I, on the other hand, wanted to make garden art and other crafts from wine bottles and was more than happy to take them off his hands.
Materials for wine bottle flowers
Some glass garden art crafts can be intimidating. Not this one! There’s no cutting, drilling, or special tools needed at all.
Wine bottles are easy to come by. Beer bottles work, too, by the way, though the green glass ones are a better color choice for “flowers”. You may have some at home. Just soak the labels off. Some thrift stores also sell empty bottles or you could try garage sales, Craig’s List or your local recycling center. Wine bottle crafts are quite popular.
TIP: use bottles with a flat bottom, not with a dimpled bottom. Bottles with flat bottoms have more surface for gluing which makes your finished artwork more secure.
Finding the right glassware
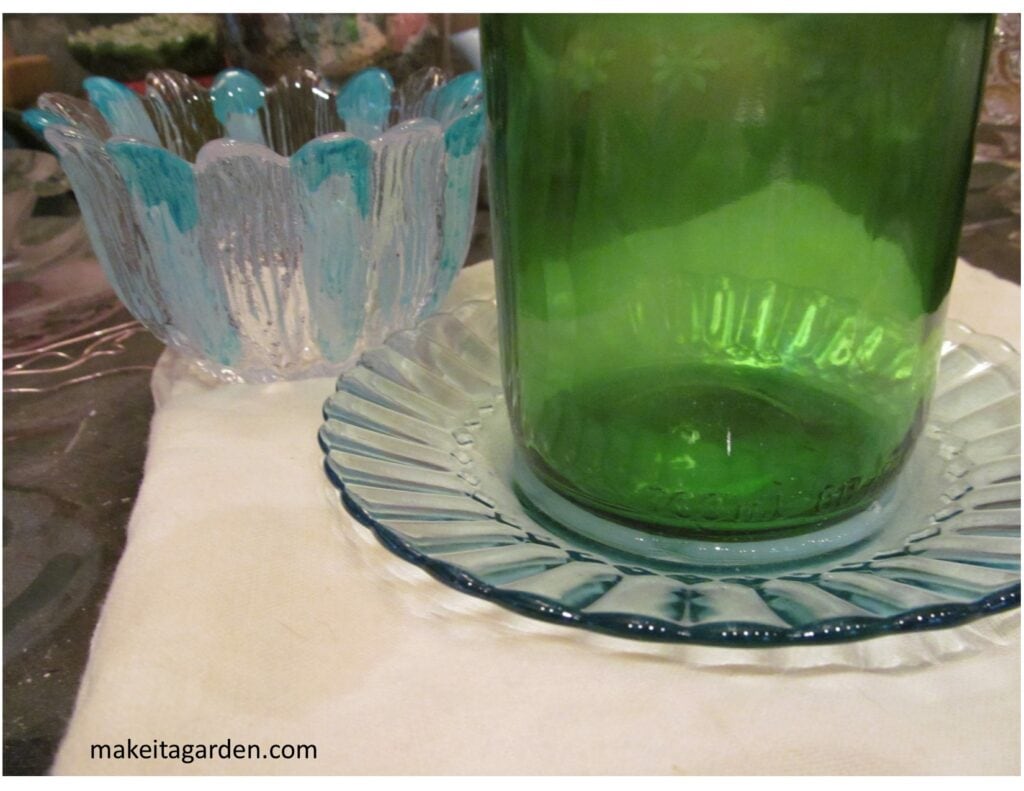
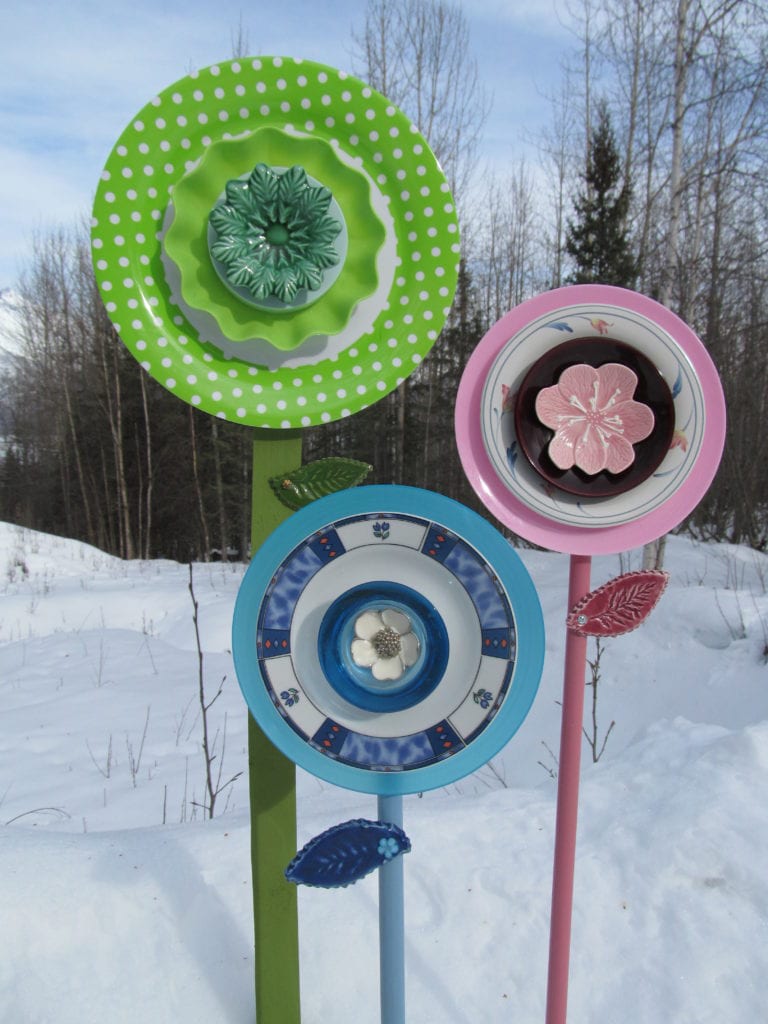
What may be a bit harder to find is glassware for the “flowerhead”. Shop a few thrift stores in the housewares section. Look for glass items that have a flower shape to them.
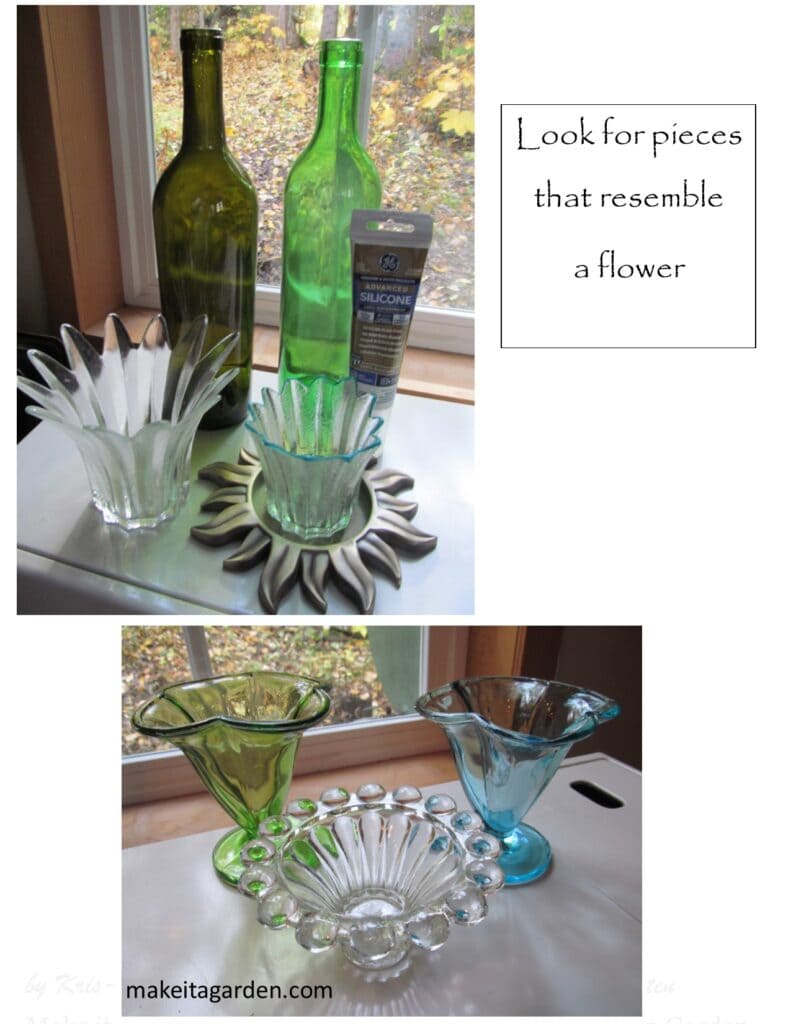
Ideas: candle ware, light fixture with a scalloped edge, ice cream sundae dish, small fluted vase with a frilly edge.
If you can find colored glass dishware, great! But, clear glass is just fine, too because you can paint it to give it some flair. Keep reading: I’ll show you how to do that and what kind of paint to use.
While you’re out shopping, you’ll also need to pick up a glass or ceramic saucer. They’re usually sold individually at a thrift store. Again, look for “pretty”, because it makes your garden art pretty, too!
Jazzy up with paint
The cool thing about painting on glass is that you can experiment over and over. If you don’t like how it looks, simply wash it off under the faucet, dry, and try something else!
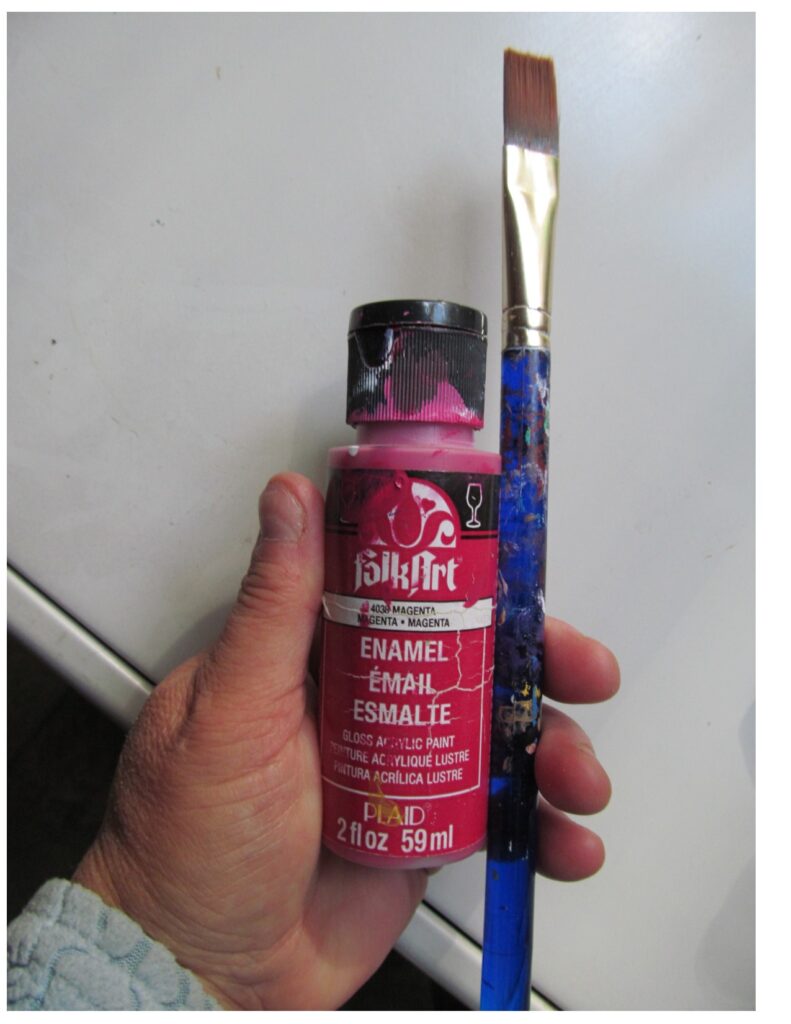
IMPORTANT: For best durability outside in the rain, use High Gloss ENAMEL Paint
There are several brands that make enamel paint for use on glass. It’s available at most craft stores like JoAnn and Michaels. High gloss paint dries super tough and does not wash off.
The directions say to let it cure 30 days, or speed the process by baking on low heat in the oven.
I was in too much of a hurry, and used a blow dryer for a few minutes on each piece. I waited a few days before putting my wine bottle flowers out in the garden. So far, the paint has help up. Now, if I were selling them, I’d go through the whole process. But since these are just for me, I’m not too worried about it.
Tips for painting:
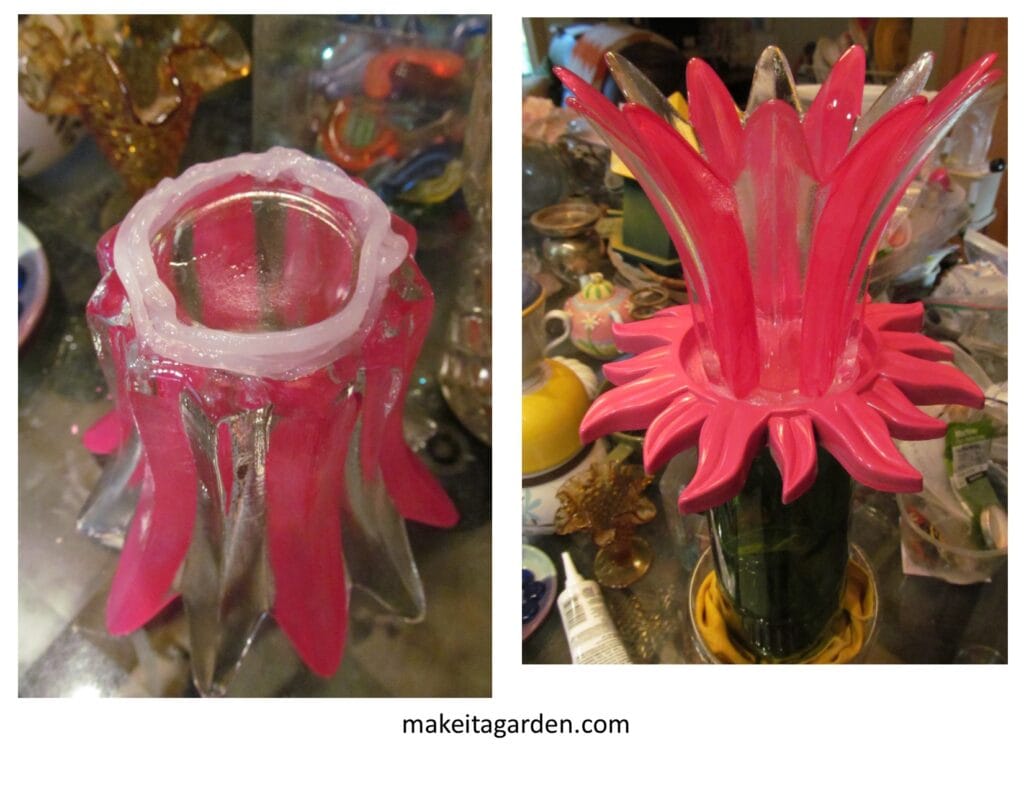
As far as painting goes, I personally like to keep it simple so it looks like a flower. I like to leave some of the clear glass showing so it sparkles in the sunlight. In the photos, you’ll notice that all I did was paint basic stripes, following the contours of the glass. That actually has a big color impact. But play around with it. You can always rinse off the paint and try again.
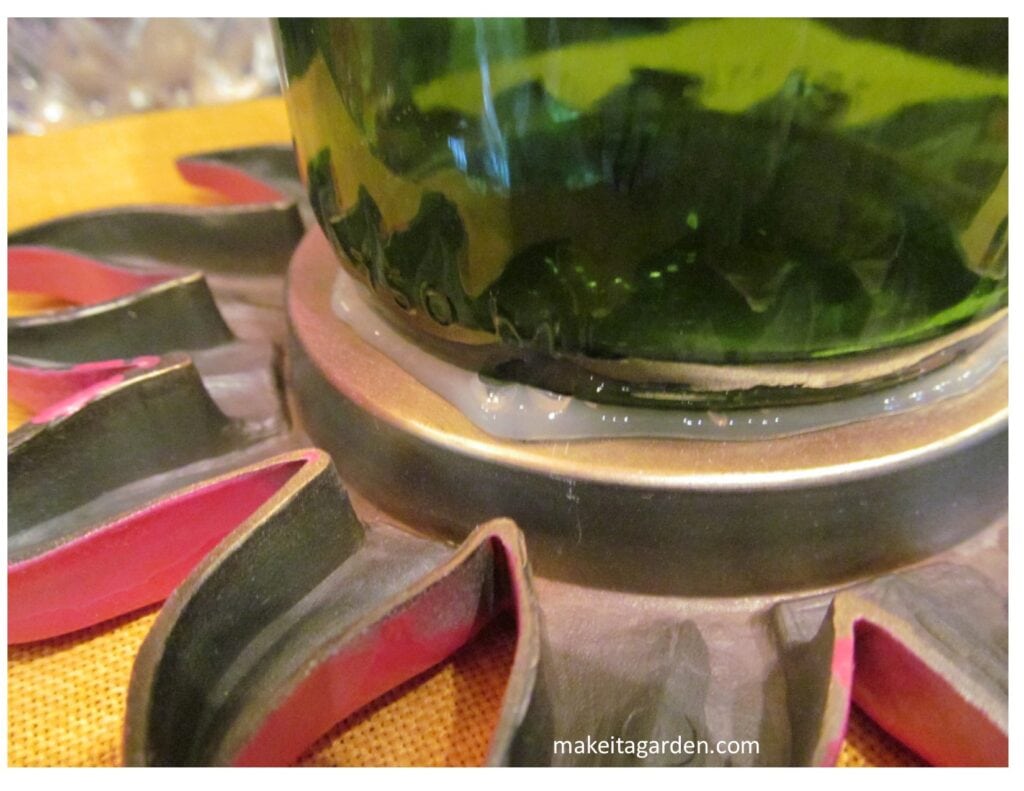
For one of my bottle blossoms, I used a metal candle coaster instead of a glass saucer. You can make a substitution, too!
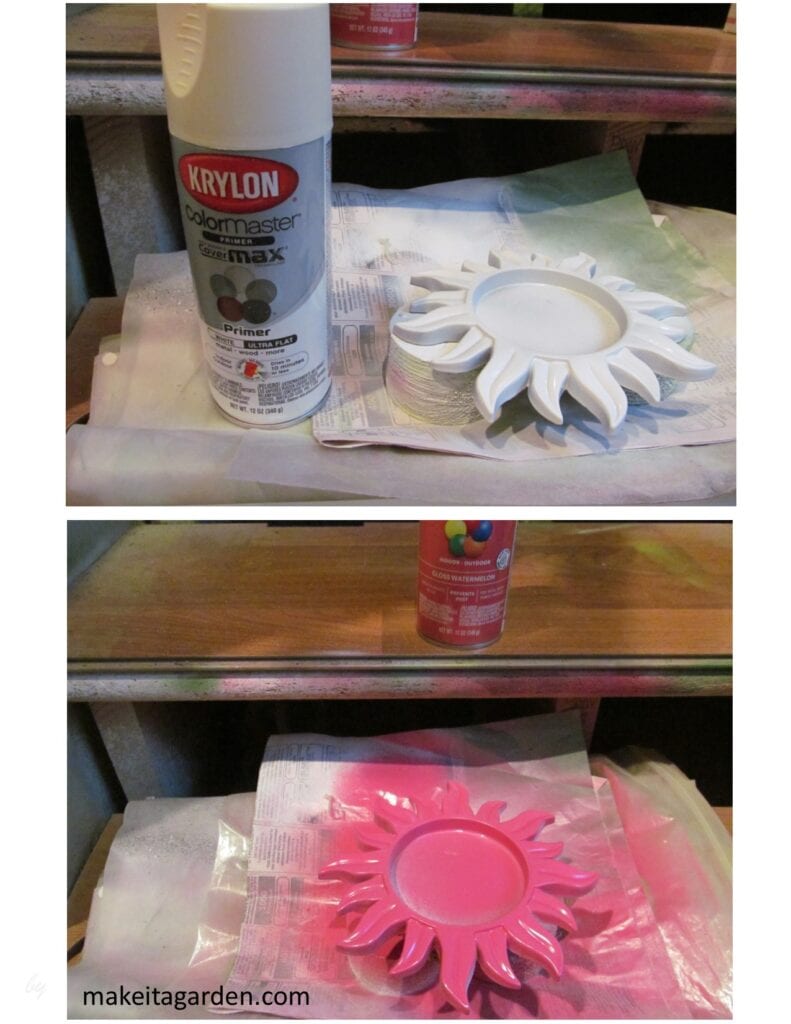
While today’s spray paints usually include a primer intended to save you time and money, I prefer to use a primer anyway. The primer coat dries quickly and the color coat may be added within the hour. I’m of the opinion that using a primer still results in a better overall finish.
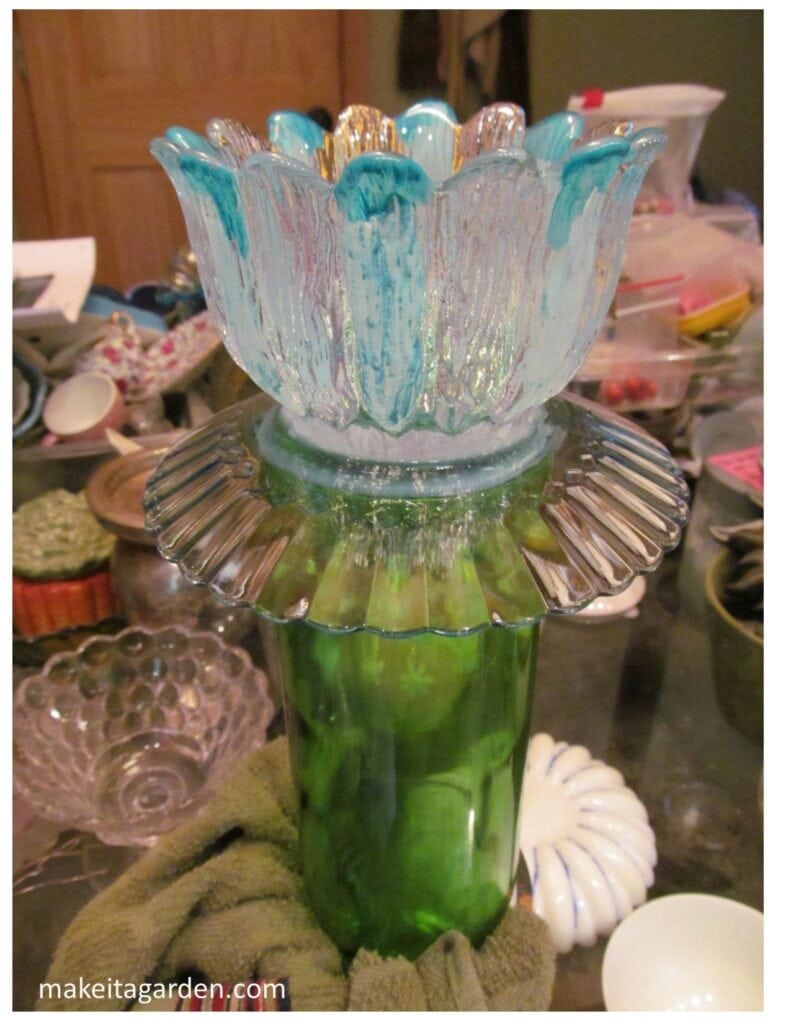
Put your flower together
MATERIALS:
- wine bottle (with flat bottom)
- glass saucer
- glass flowerhead piece
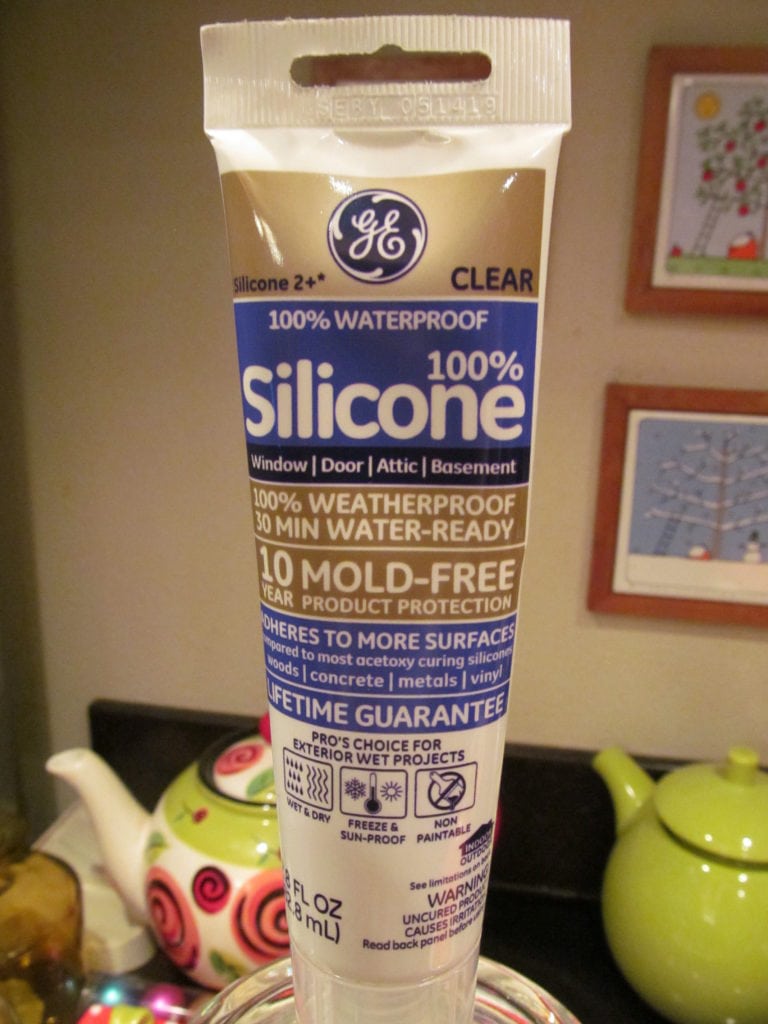
- Small tube of GE Silicone II -Clear (exterior)
- Craft paint- gloss (optional)
- 2 – 3ft piece of rebar OR section of 1/4″ copper or galvanized pipe for stake
Instructions:
1) Wash all glass pieces by hand in warm, soapy water. Towel dry. Soak bottle in warm water to remove label.
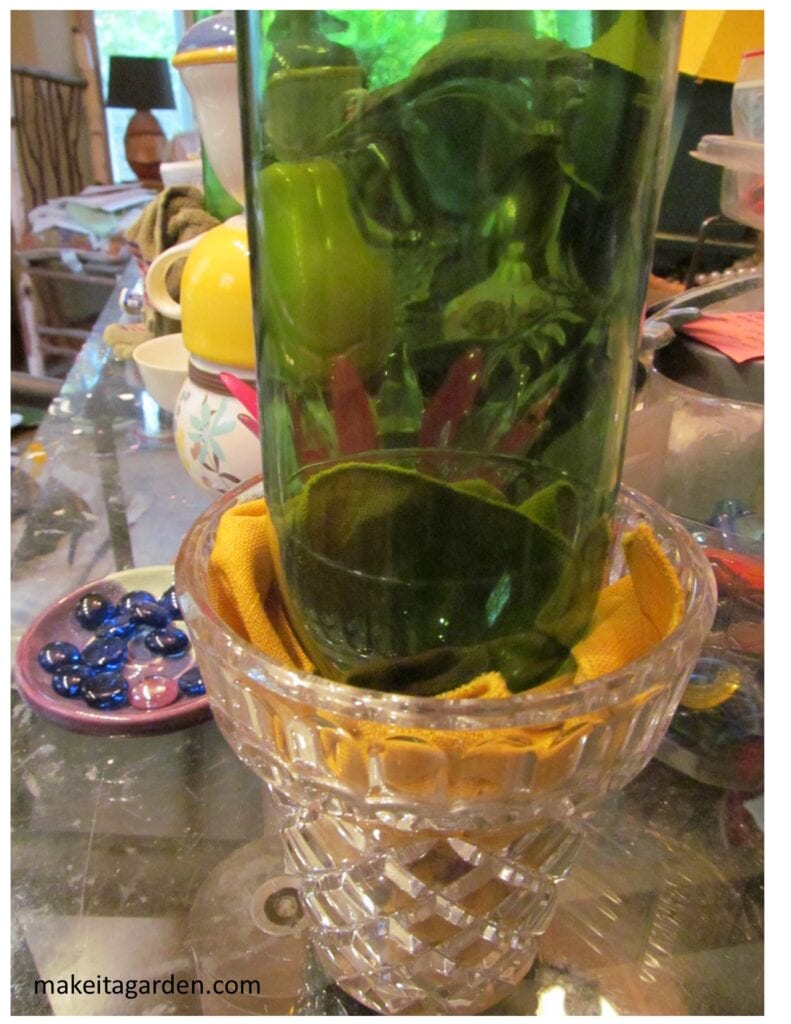
2) Turn wine bottle up-side-down. Prevent it from falling over by placing it in a tall drinking glass, or some type of container. Then pack around the edges with a kitchen towel, or newspaper just to hold it in place and keep it from wobbling during the gluing process.
3) Add silicone “glue” adhesive. While it says “clear”, it’s actually more of a milky color. Squeeze a bead out round the outside edge of the bottle.
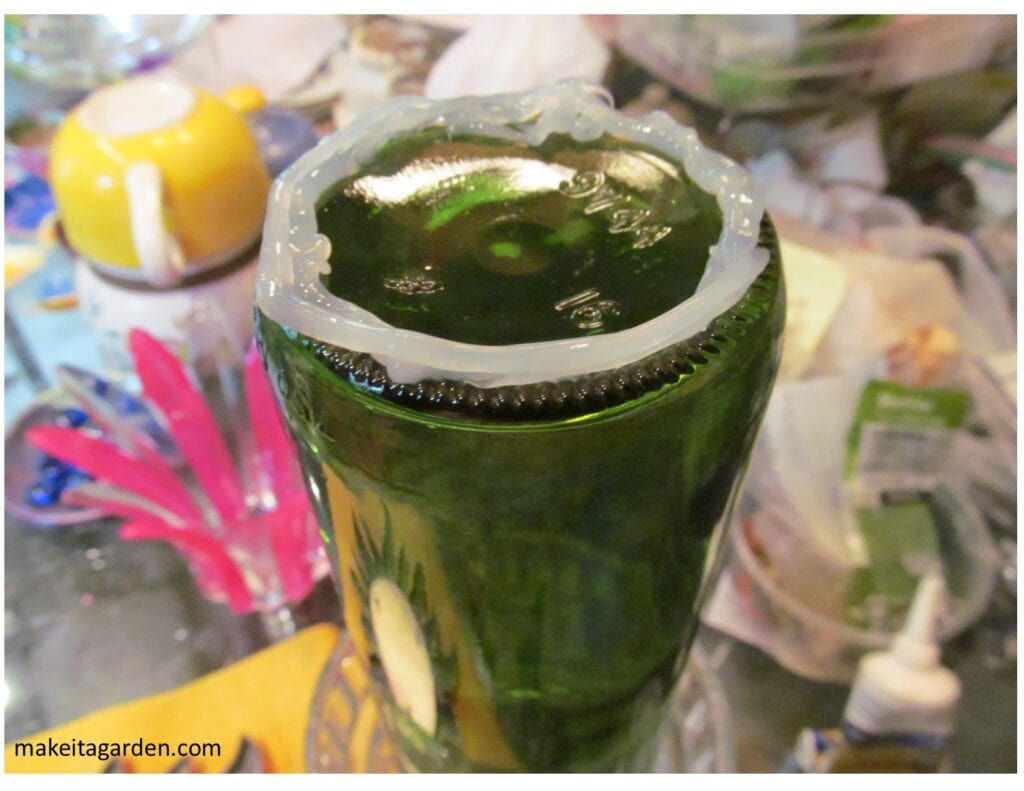
Set the bottle, glue-side down to the saucer. Press down gently to make good contact with the surface. Some of the silicon will squish out the sides. This is good. Smooth the bead with your finger or Q-tip swab to create a seal all the way around.
Allow it to sit undisturbed for 24 hours.
4) Turn the bottle upside-down and again use the drinking glass and towel to steady the bottle for this final step.
Apply silicone as before, placing a bead around the outside edge and attach to the saucer. Allow to dry 24 hours.

DON’T FORGET YOUR FREEBIE! “10 Artistic Ways to Make Your Yard & Garden Beautiful” when you join our garden art lovers community. Scroll down just a bit to sign up. No ads, No spam! Just fun, inspiring garden and art-related content.
Display your wine bottle flowers
Once the silicone adhesive is thoroughly set, you’re ready to display your art piece in the garden. Use the rebar or 1/4″ diameter pipe and pound it into the ground far enough so it’s good and stable. If you want your bottle flower to stand a little higher, use a longer piece of rebar or pipe.
Slip the bottle over the top of the rebar and take a photo to show your friends on facebook!
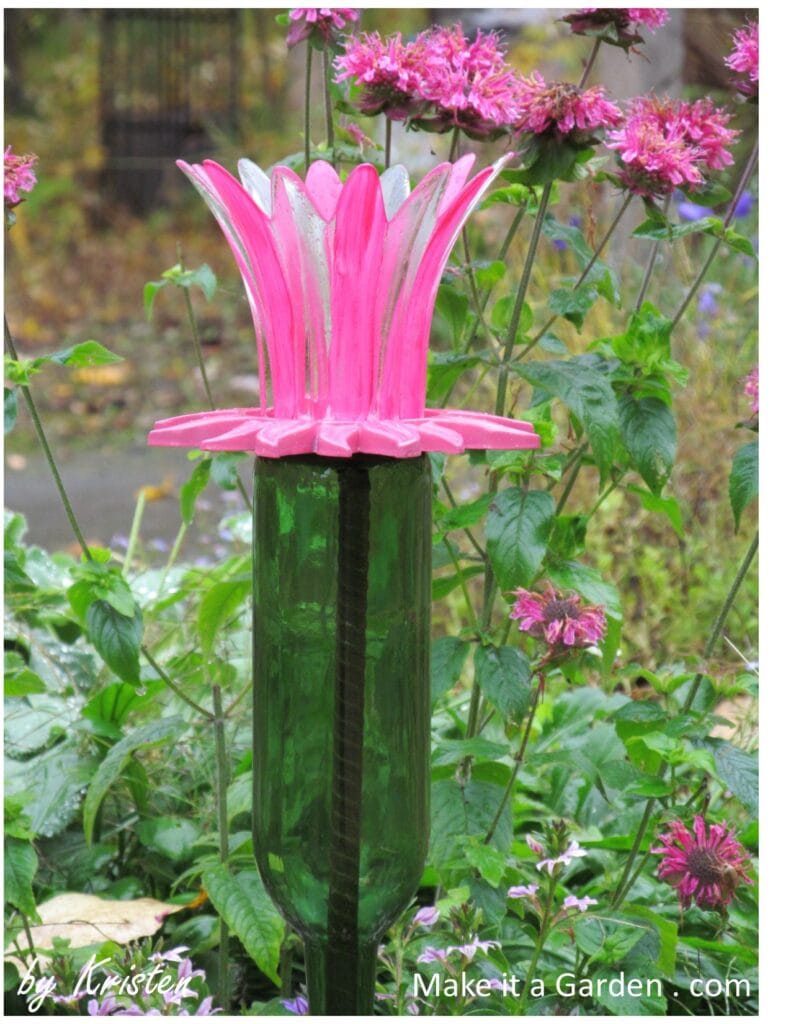
I hope you’ll try this easy craft project. Shop the thrift stores or garage sales and keep an eye out for pretty floral-looking pieces. Add a touch of paint to clear glass if you wish. Then break out the silicone and glue ’em together. Amazing how something so simple can look so elegant in the garden. A grouping of three or more wine bottle flowers together would look very artistic indeed!
Before you go, please leave a comment or question below. I always respond and would love to hear from you. Happy crafting and thanks so much for stopping by!
Other Easy garden crafts to try

The form you have selected does not exist.
Awesome craft idea! I love that your art is simple to do. I might try this one since I have a couple of wine bottles!
Thanks for the inspiration, Kris!
Thanks so much for your kind remarks. I’d love to see what you made so send me a pic and I’ll put it up on our braggin’ board! – Kristen/MIAG
I really like your bottle flowers; but my question is : we get so much rain and the “flowers” would fill up with water and if it freezes I’d have a bowl of ice. The solution to that would be to remove them before the temp drop but that doesn’t solve my “rainy day” (weeks) problem.
Thanks for the question. I always advise bringing garden art into storage in regions with freezing winters. I’ve actually been thinking about this problem, myself. We don’t get that much rain and I’m accustomed to just dumping it out when it does. However, if the stem used for a bottle flower can bend or be bent, (as opposed to being completely vertical), then it’s less likely to fill with water or will drain. The other idea I had was to drill a small drainage hole in the bottom of the bottle, before attaching the flower head. Most of the water will drain out. But not everyone wants to learn to drill…it’s an extra step that makes the craft a bit more complicated. Bottom line, rain water should not hurt the garden art. If you apply paint on the flower head (as I did) paint on the outside of the glass piece. Use high gloss glass craft paint that dries super hard and won’t wash off. If you come up with an idea, I’d love to hear about it and may include it in the tutorial! Thanks again for dropping a line.
I love your clear instructions.
Your imaginative crafts are fun. Is this style drill good for plates too?
The image of a “big brown butt” made me laugh. I hope your continue
to stay clear of all such obstacles.
Sue Verbaan
It’s always good to know if the instructions are clear and that there’s enough detail. Sometimes I worry about too much detail. But those things are important to me. Yes, you can use a hole saw for plates, but you won’t need anything that large…it’s kind of overkill and you’d also need a larger diameter bolt, too. There are smaller diameter drill bits that are better for drilling plates. I use a 1/4″ like the one shown in this video:https://www.youtube.com/watch?v=8vJ2FgV4UBc&t=14s. The reason for a hole saw is that they come in larger diameter (make a larger hole), to accomodate the TYPE of light you may wish to use for a bottle or glass block. Some people may prefer ball lights and others, the tiny wire lights. So choose the type of mini lights you like, then find a drill bit to accomodate the hole size you’ll need. Come to think of it, a 1/4″ might do it if using those tiny little wire string ones. Thanks also for subscribing to our newsletter. Neighbors had sent out warning on our commumity facebook page that there was a brown bear siting in our area, though it had been a few weeks. So that’s what popped into my mind as I rounded the curve in my driveway. Whew! Moose can be dangreous too, but here, they are more accustomed to people…still, with a rut on, a bull could be unpredictable. Fortunatly, he was more focused on the cow.