

Hoop House Makes Backyard Gardening Affordable
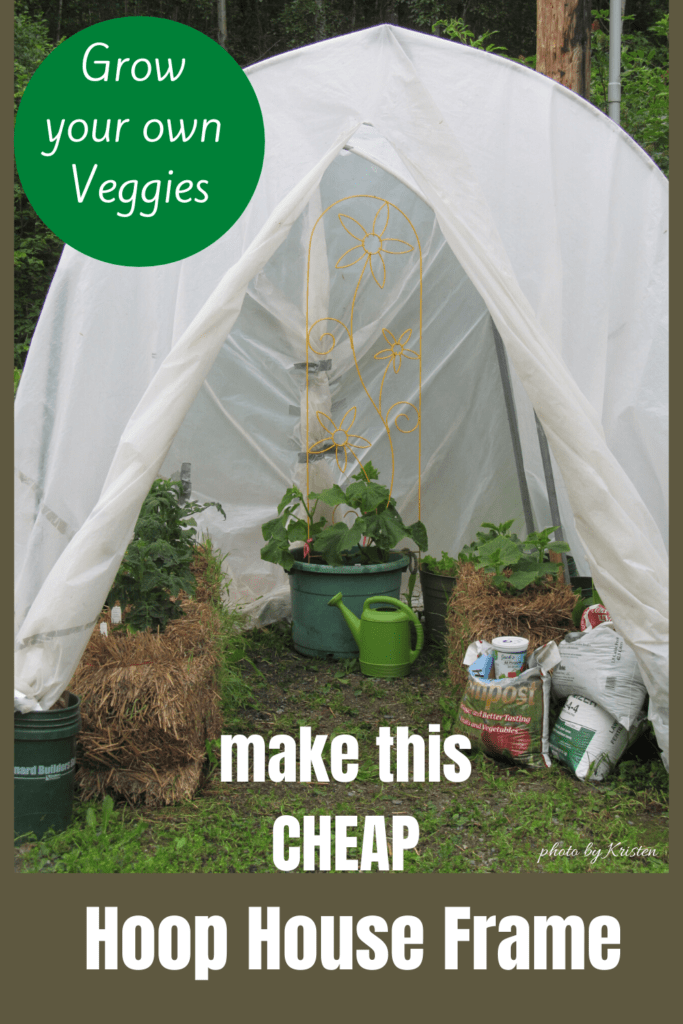
If you’ve been looking for an affordable greenhouse set-up, the hoop house may be just what you need. A hoop house gets its name from the rounded “hoop” frame, which is then covered with plastic sheeting to let light through and retain heat.
There are many factors that make a hoop house ideal whether you live in the country or the city.
Why go with a hoop house?
- Economical, materials are inexpensive
- A temporary structure. Can be easily taken apart and moved
- Surprisingly versatile framework to fit your needs
- Strong, long-lasting water-proof materials that don’t rust
- Easy to make and set up in one day
- Start seeds earlier in the season
- Perfect for small backyards, decks or patios
- Ideal for renters or condos because it’s not a permanent structure
Backyard gardening is making a strong come-back! Many people want to grow their own food, organically, without chemicals. Likewise, there’s a certain satisfaction that comes with growing your own food. But let’s face it, fresh fruits and vegetables straight from the garden just taste better. And the interest is not limited to young families, either. Older adults are also looking for an easy way to garden that helps them stay active and eat healthier.
This writer always planned to have a vegetable garden. My blog, “Make it a Garden” is primarly about garden art, design and landscaping. So this article about ‘how a hoop house makes backyard gardening affordable’ is a bit of a departure. But I just couldn’t help it.

Hoop House makes backyard gardening possible
My home is located on a thickly wooded lot. Opening up a space for sun-loving vegetables would mean cutting down some trees. Unfortunately, they’re mostly big cottonwoods and at the moment, it’s not an affordable option. Then there’s the additional expense of a fence to protect my garden from free-range moose. So, for someone like me, a hoop house makes backyard gardening doable!
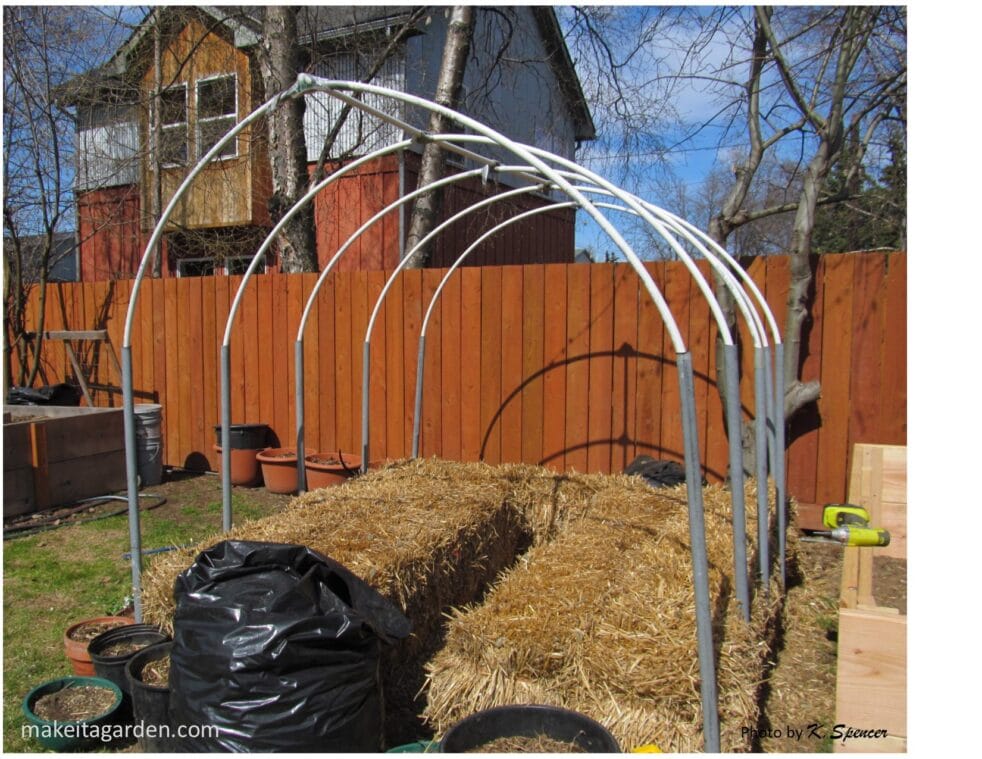
I set mine up in the “turn-around” part of my driveway. Since the frame is small (mine is only 7×7) it fits perfectly in this space. The plastic covering will help keep critters at bay. Although it’s a great, sunny location, the ground there is hard and rocky. But a hoop house still works, because the support posts can be placed in buckets filled with gravel. Tah-dah!

So, that helps defeat some obstacles with hard ground, location and moose. I’m excited about gardening in my new hoop house.
If you find that it’s too difficult to get your posts into the ground; if you only have a paved surface, or the landlord doesn’t want holes in the lawn…the buckets are the perfect solution. My good friend Karen is the gardener extraordinaire and she helped me set this up. We were feeling very much like “pioneer women”.
Materials for a Hoop House
NOTE: Materials below are based on a 7×7 structure. If you wish to construct something larger, simply adjust the measurements. Although 7×7 seems small, you’ll be amazed by how much you can grow in this space if you plan wisely.
- 10 posts made of 1″ galvanized plumbing conduit (cut to 5’9″ (69″) length). Insert approx 1 to 1-1/2 ft into the ground.
- 5 hoop “ribs” made of 1/2″ flexible pvc plumbing tubing (cut to 10 ft length)
- 7ft length of 1/2″ plumbing tubing for ridge piece.
- *10 plastic 5 gallon buckets (NOTE: use for above ground set up if you won’t be putting posts in the ground)
- *fill buckets 3/4 of the way with gravel. (try to find a free gravel source–maybe there’s a river bed in your area with good access. Otherwise, find a gravel supplier that lets you pick it up yourself. You can also buy gravel in 60lb bags at the hardware store.
- Plastic Sheeting (Visqueen) 6mil. (a 7×7 structure requires 22ft x 18 ft when posts are inserted in the ground) It’s over-sized so the ‘extra’ length can be folded up taut and well secured on the sides so it doesn’t tear loose and blow away in the wind. I wrapped mine up around a long 2×4 with heavy rocks to weight down. Helps retain heat, too.
TIP: Find lower-cost materials at a Habitat Restore, or other locally operated store that re-sells remnant building materials. You just might find what you need for less!

Assembly Instructions

Step 1 conduit
Note: Remember, this is based on a 7×7. If you’re making a larger structure, adjust measurements accordingly!
Cut metal 1″ conduit/pipe to 5’9″ lengths
Use a tape measure for accurate alignment of posts and insert into the ground. Recommend inserting posts 1ft-to 1-1/2 ft so they’re good and solid.
*Note: if you are using buckets for above ground structure, drill drainage holes in bottom of bucket. Make sure they are properly aligned, then fill with gravel. I used scrap wood blocks to keep posts straight and prevent them from leaning in.

Step 2 cut the “rib”/hoop pieces
Cut the 1/2″ PVC pipe into five (5) 10ft lengths. 5 may seem like a lot, but it provides a more supportive framework for the plastic cover to shed water off making it less likely to accumulate water and cave in.
Set the front and rear hoops up FIRST. Insert each end of the 1/2″ pvc pipe into the 1″ metal pipe. Push them down in far enough that they hold secure. Install the center hoops.
*Note: if you are using the bucket method, you can always scoot buckets around as needed to ensure they’re in the proper alignment. But they are heavy!


Step 3 cut the ridge piece
The ridge piece is the one that goes across the top.
Cut the 1/2″ PVC pipe to a 7ft length (based on a 7×7)
Hold the ridge piece under the hoops. Use a pen to mark the place where each hoop meets with ridge piece.
Cut a v-shaped notch at each mark where it connects to a hoop.

Secure the ridge piece to the hoops. Run the ridge piece underneath the hoops and wrap tightly with duct tape. to connect it to the “ribs” and wrap the two connections together snuggly with duct tape. The ridge piece goes underneath so the ridgeline is as smooth as possible when you lay the plastic over the top.

STEP 4 plastic covering
Use Visqueen or plastic sheeting that’s a strong 6 mil. Most likely, it will not be clear, but rather semi-opaque. It’s not a problem because it will still allow plenty of light through.
Cut a single piece large enough to not only cover the frame, but have a foot or more extra on each so plastic can be pulled taut and wrapped securely so it won’t blow off. (Note: a 7×7 – posts in the ground unit required a piece of sheeting approx 22ft x 18ft.)
Pull the plastic as tight and as firm as you can over the frame to improve its ability to shed rain water.
*Note: if you are using buckets: the buckets sit on the inside of the plastic covering.
Wrap the extra lengths around a board and secure with large rocks. Or use a mallet to pound long spikes through the boards and into the ground to secure. Whatever works!
STEP 5 doorway
At one end, cut the sheeting straight up the middle. The extra length is needed so it can be rolled back on either side to create a passageway and allow ventilation. You can also roll the sheeting back off a couple of hoops to let in more direct sunlight.
Start your veggies
You can do container gardening, build boxes, or even experiment with straw bales.(Milwaukee County, University of Wisconsin Extension Service)
TIP: Do not leave your hoop house plastic sheeting up over the winter season. Take it down and place in storage so it won’t get damaged. You’ll want to use it again next summer. But leave the posts in place. They are galvanized and won’t be harmed by the weather.
Final thoughts
For a cheap and practical way to grow fruits and veggies, you can’t beat a hoop house. It’s not terribly fancy, but it does the job. Because it’s a temporary structure, you might find it’s the best option for a small backyard, a rental or condo situation where you can’t have a permanent building.
I certainly appreciate something that will fit in the only space I had available. In my state, some type of heated environment is necessary in order to grow cucumbers, tomatoes and peppers. I don’t have the budget for my dream greenhouse. But the hoop house will still easily produce the veggies I love. Plus, after summer is over, I can drag the buckets off to the side and be able to use my turnaround in the driveway once again.
I hope this little hoop house is an answer to your gardening needs. I hope you’ll share this post with family or friends and be ready to cheerfully lend a hand to help them set theirs up. You may also be interested in joining our little art and garden community. Scroll down just a bit to receive our monthly newsletter. Have a great summer and happy gardening!

Kristen, MIAG Editor
Other posts you may enjoy
Straw bale Gardening: I tried it!
She sheds and MORE, for the kid at heart
Natural looking options to grass lawns
How to choose perennials at the Garden Center
The form you have selected does not exist.