

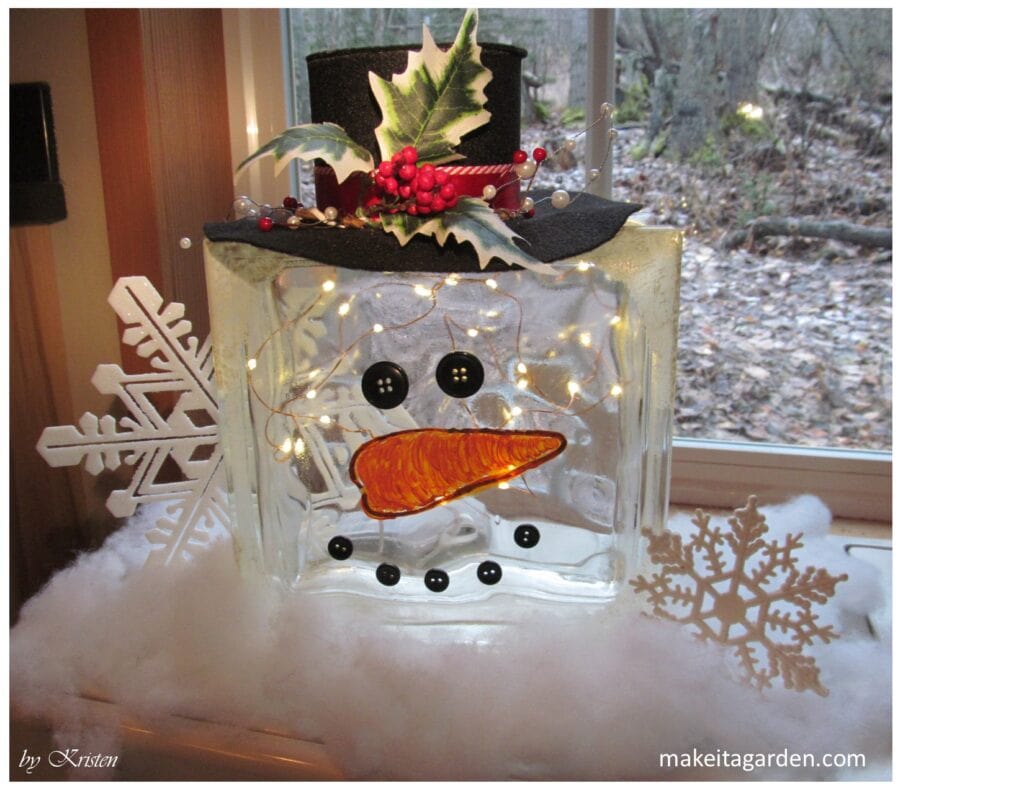
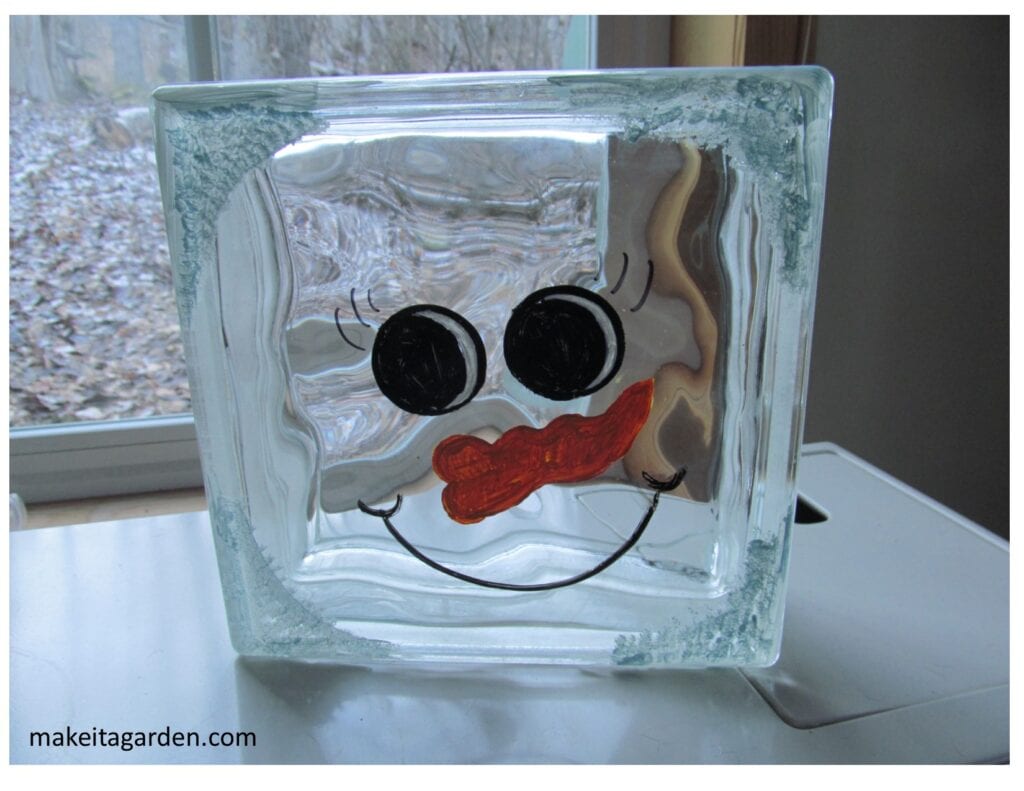
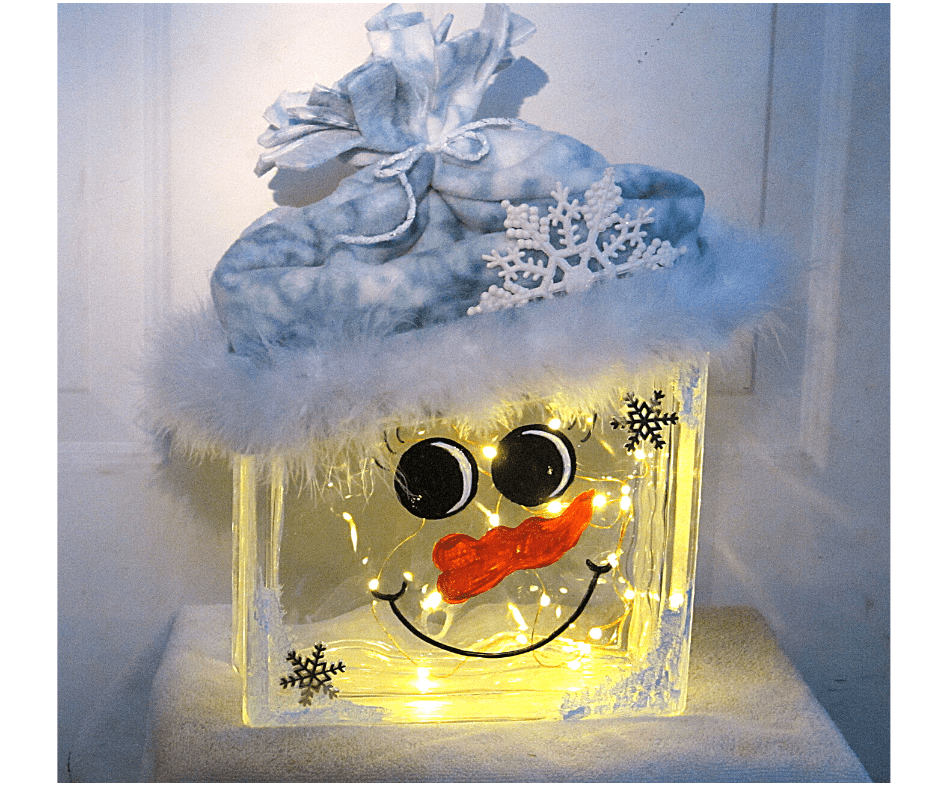
I love snowmen!
And this lighted, glass block snowman is merry and bright. Although, at my house, they’re not just for Christmas, but all winter long!
This tutorial demonstrates the drill method for making the hole in the block to insert LED mini lights. Then, keep scrolling for decorating tips and ideas so you can embellish it with your favorite snowman ‘look’.
- PART 1 How to drill a hole in glass block for the lights
- PART 2 How to paint a great snowman face
- PART 3 How to make a felt top hat
At ‘Make it a Garden‘ we encourage readers to develop their creativity and learn new skills through DIY such as drilling glass and painting a face rather than using vinyl decals.
It’s all included here!
Overview: Lighted glass block snowman
Glass block is cheap! A standard, clear 8x8x4 or 6x6x3 block is under $10 bucks at the local hardware store.
Below is a precise list of everything you need as well as instructions on how to drill the hole. If you’ve never done that before, you can learn the technique right here. You’ll be proud of yourself for this accomplishment, so go ahead and give it a try!
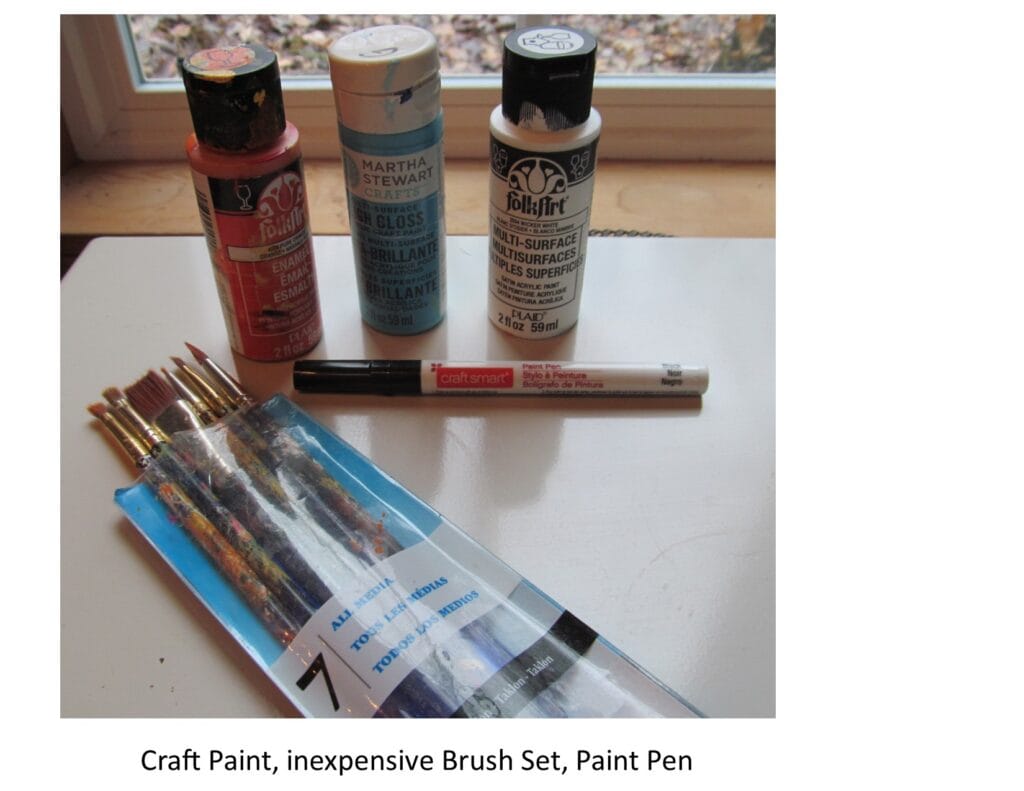
Materials List
Hardware:
- Cordless drill
- 1/2″ hole saw for glass and tile
- Glass block with smooth surface (a smooth surface is easy to paint on or to apply decorative face decals if you prefer)
Craft Items:
- Black buttons (eyes, mouth) / or substitute with self-adhesive vinyl face decals
- Orange craft paint for ‘carrot’ nose
- Black felt, ribbon (if you wish to make your own top hat-SEE Part 3)
- Craft glue
- LED Fairy lights
PART 1
How to drill a hole in a glass block
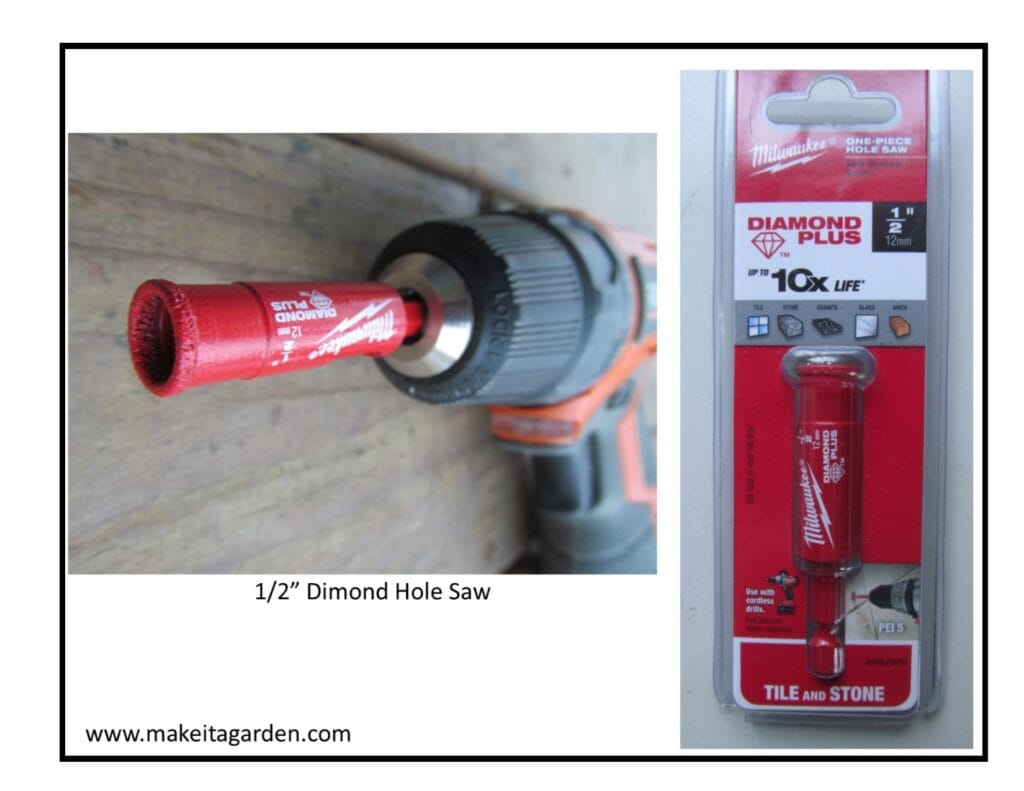
A “HOLE SAW” is a drill bit for making holes. It fits right into your cordless drill. You’ll want to get one that’s made for drilling glass and ceramic tile. It’s a common item at your local hardware store.
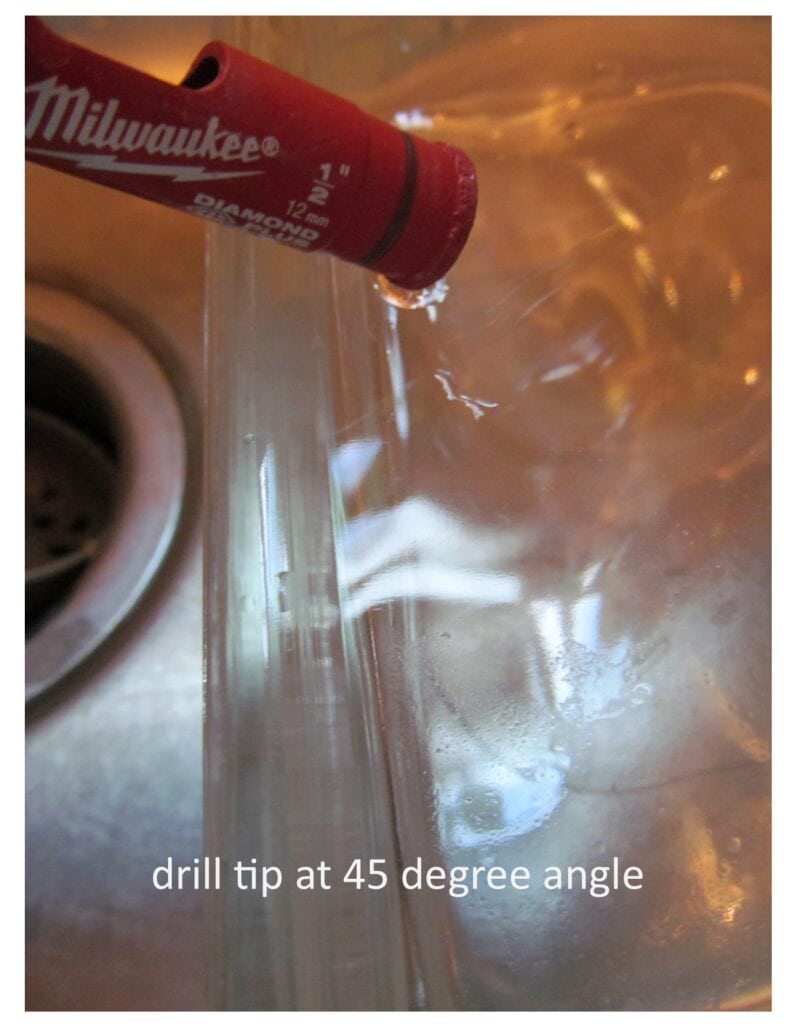
USE WATER. It’s important to drill with water, either by a trickle of water from the faucet that runs over your drilling point. OR by immersing the block under 1/4 inch of water. Why? The drill tip gets extremely hot under friction. It can cause glass to shatter. Therefore, the water acts as both a lubricant and cooling agent that keeps the tip cool in the drilling process.
I have drilled hundreds of glass and ceramic plates for making my dish flower garden art. Personally, I prefer to drill with my plate (or glass block) in the sink, under 1/4 inch of water.
How to start the hole
Lay the glass block face-down in the sink. Start your hole near the bottom and centered. Place the drill tip at a 45 degree angle against the block. SEE IMAGE BELOW:
Start the drill SLOWLY. At first, it will want to roll back and forth across the surface. Hold it steady for about 30 secs and you’ll be able to see and feel a little half-moon divot in the glass. Keep the edge of the drill tip in that groove until it grips and stays in place.
While the drill is running, slowly raise it to an upright position on the glass block. You’ll quickly have a circular groove to hold the drill tip in place for the completion of the hole. About 5-10 minutes depending on your drill.
DO NOT PUSH DOWN HARD! Just hold it in place. The weight of the drill is sufficient to make contact with the glass and the diamond-tip bit will do the cutting. You’ll see a white cloud that results from drilling the glass.
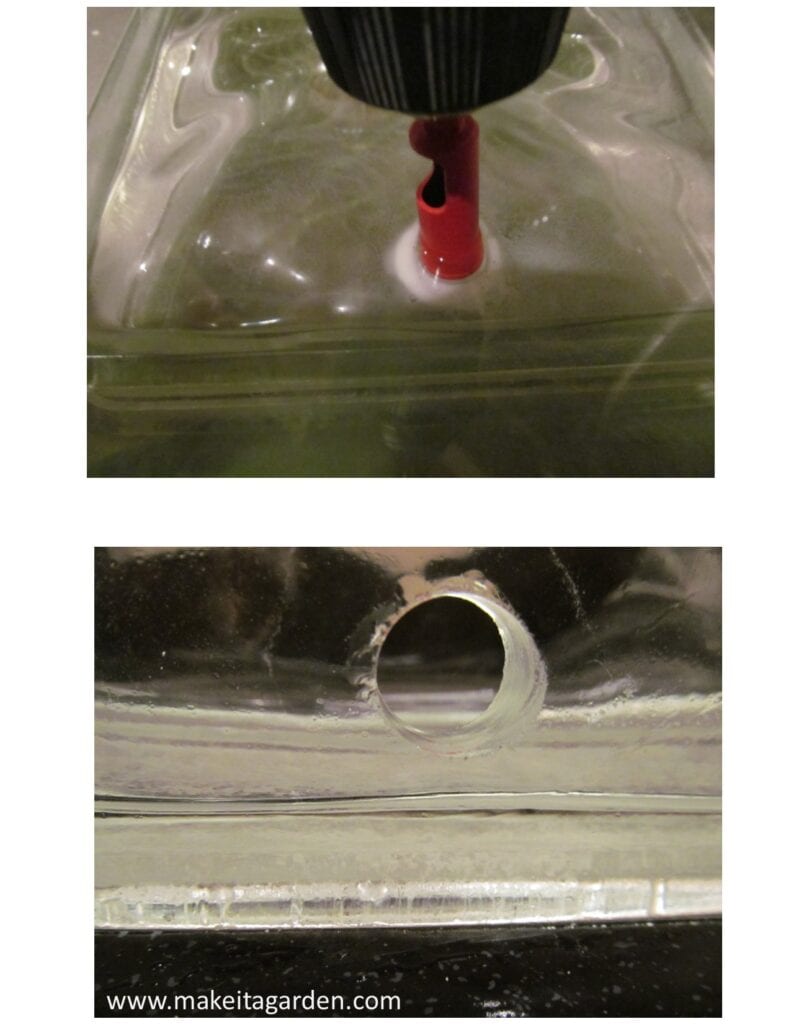
After the hole is complete, drain water from the block. Don’t worry if you can’t get it all out, as it will evaporate in a day or two. Be sure to rinse the sink thoroughly as there may be some small shards of glass from the drilling process.
PART 2
How to paint your own snowman face
MATERIALS LIST
- Ordinary craft paint (black, orange)
- basic, inexpensive paintbrush set / paint markers (optional)
- Black buttons for eyes and mouth (optional)
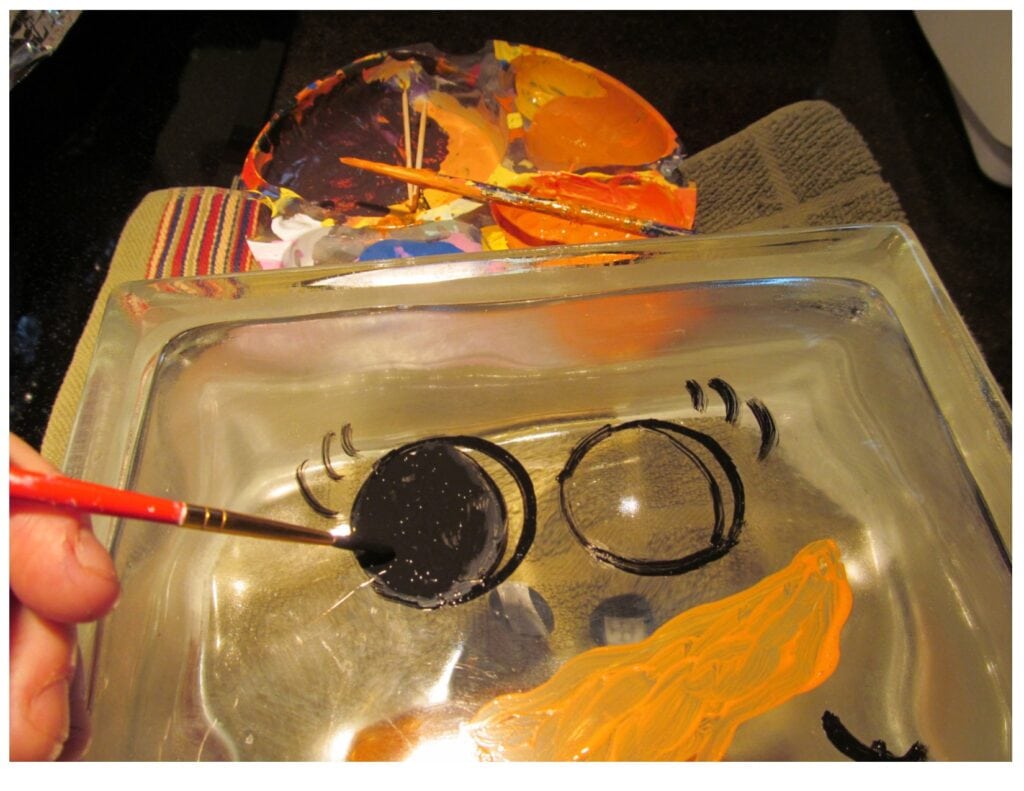
The great thing about painting on glass block is that if you don’t like the way it looks, just wash it off and start over until you get something you like. You can also use rubbing alcohol/isopropyl and a paper towel or q-tip swab to “erase” a minor paint mistake.
The easiest EYES & MOUTH are simple black dots that resemble the traditional coal used by children to make the eyes and mouth of a snowman. You can use sponge daubers for quick, easy eyes and mouth. A carrot NOSE is basically a long triangle or skinny heart-shape. Paint markers make it easier to draw your face. “Simple” is just as cute!
As an alternative, you can certainly use vinyl face decals. The craft stores in my town do not carry decals. If yours do, then great! Otherwise, you may have to buy them on-line. Since I already have paint at home, I decided to make my own face.
Facial Expressions
Your glass block snowman can look goofy, happy, sleepy, excited, or charming all depending on how you draw the eyes. In particular, the size, shape and position of the eye pupil. I really stink at drawing, but still managed to reproduce this face (below) from looking at other examples.
Here’s a bunch of cartoon expressions for ideas.
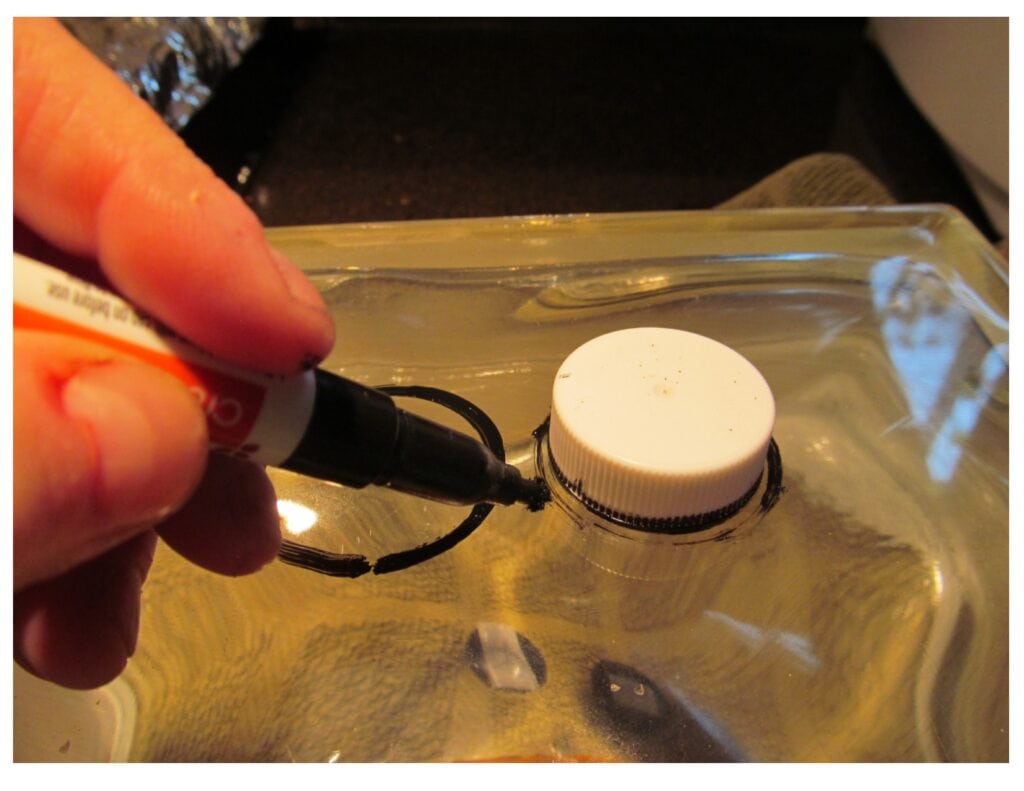
TIP: It may help to draw the expression on paper first, to get an idea of how it looks. Drawing it out on paper also gives you a bit of practice before working with the paint. You can also make a cut-out and trace around it onto the glass block. I used a small cap to trace the eyes. It took me more than one try to do the face on mine!
PART 3

How to make a snowman top hat
MATERIALS LIST
- Black felt regular + sheet of thick, stiffer felt
- Craft Glue
- optional embellishments: ribbon, glitter spray, mini snowflakes or other little holiday doo-dads to decorate hat. Whatever you have on hand
That’s a wrap!
Yes, it’s a bit of a process, but in the end, your lighted glass block snowman will draw raves. And not only that. You’ll take pride in knowing that you did it all yourself. If you’ve never drilled glass before, now you have a new skill so you can do other things such as make lighted wine bottles. Yes, bottles, plates and ceramic tile await you!
If I can help in any way, just e-mail us, or use the contact form. Perhaps you’re gaining confidence for drawing simple faces and making snowman top hats. When it’s all handmade, you make all the decisions for that customized look so there’s more of you in the creation.
UPDATE: I have since learned that craft stores sell glass block with wide, pre-cut openings (SEE here at Michaels Crafts.) and a removable stopper so you can put anything inside. While you might be one of those who finds this much easier, think of how you’ll benefit by growing your crafting abilities.
Finally, why not join our little art and garden lovers community? Scroll down just a bit to sign up. In addition, you’ll receive “10 Ways to Use Art to Beautify Your Yard or Garden”. Have a wonderful holiday season, my friend and good luck with your snowman!
More jolly snowmen crafts to try:
The form you have selected does not exist.
I really like your glass block snowman! I’m imagining something like that for Halloween next year!
Thanks, Lorna! Clear Glass blocks are perfect for any occasion…I’ve seen scarecrow faces for Fall/Thanksgiving, hearts for Valentine’s Day or just left plain with colored mini lights inserted. There’s a lot of fun things that can be done with glass block- I hope you’ll try something! – Kristen/MIAG editor