

Do you live in a place where it doesn’t snow? OK, maybe it snows some years, but doesn’t stick around for more than a day or two? Regardless of whether you live in Florida or Alaska, this jolly snowman from plates may be just what you need this holiday season.
The neat thing is, it’s totally original! This is not something mass produced and you can’t get one like it at the store.
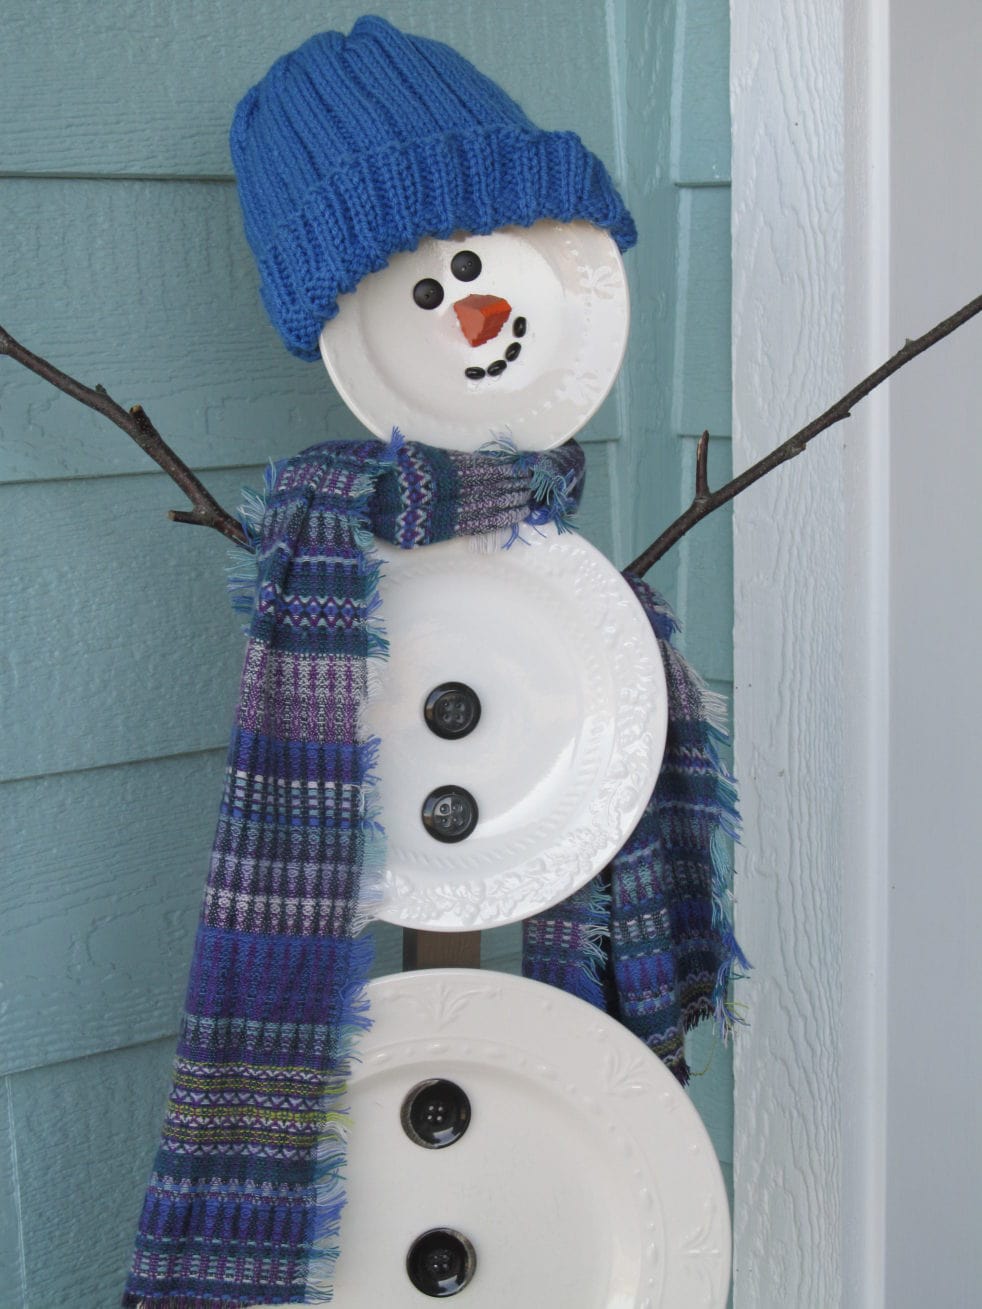
Aside from a little bit of hardware, almost everything you need can be found at the thrift store. The three white plates are super easy to find any time of the year, which means you can get started on it now before things get really busy!
Material list to make a snowman from plates
- 3 white plates consisting of 2 dinner sized plates and 1 smaller salad-sized plate for the head. They do not all have to match. In fact, it’s more fun if they don’t!
- Wooden post with pointed tip 1-1/4″ x 5ft
- wood screws (flat head) if you drill the plates, (don’t need ’em if you don’t)
- Tube of 100% Silicone if you choose to glue plates (best product for outdoors application and recommended…SEE instructions below)
- White craft paint
- Buttons
- Child-sized hat
- Scarf
- scrap wood or orange modeling clay for the nose
- 2 sticks from a tree for arms
- Planter or 5ga bucket/pail. Fill with dirt or playground sand

Instructions: how to put it together
Step 1: If you prefer, paint the post white using any standard craft paint. Let it dry completely.
Step 2: Attach the plates to the post. Two methods…you can drill the plate, or glue it with GE Silicone II for Exterior. Position the top, head plate so that the rim sits a little above the end of the post. This is so that the hat will fit over the top of the plate.
If you drill: use a drill press or diamond tip drill bit (below) and drill the plate under 1/4″ of water. Use this link to my article on how to drill a plate. “How to drill a plate for garden art”


If you Glue: Unlike some epoxy’s, Silicone is made for exterior use and will not freeze and crack in extreme cold temperatures. Silicone is a good adhesive for ceramics and bonds well to wood.
Disclaimer: these just happen to be products that I use as an artist. They are for the purpose of illustration only and not meant to be advertisements. I do not receive any benefit from the mention of them here.

Step 3: Find a couple sticks for arms and drill holes in the side of post just a little larger than the diameter of the stick. Use a regular wood drill bit.
Step 4: Make the snowman’s face and add your embellishments. If you drilled the plates, use the buttons and nose piece to cover the screws. I used a scrap piece of wood for the nose and painted it orange. But the nose can also be made from modeling clay, shaped and baked dry, and then glued to the plate.
Place the snowman in the bucket. You can cover the surface with that white Christmas tree fabric, or that fluffy stuff that looks like snow, tree ornaments, or pine cones.

Final Thoughts
I hope you’ll get a lot of compliments when friends and family come for your big, holiday get-together. The weather outside may indeed be frightful, but your decor at the door is so delightful!
Did you make the snowman from plates decoration? I’m very interested in your feedback. Please let me know in the comments below. You’re also invited to be part of our Make it a Garden community. Scroll down just a bit to sign up. You’ll receive our monthly newsletter as well my 10 best tips for using garden decor.
Thanks for stopping by!
About the artist

Kristen specializes in up-cycled crafts. She has a reputation for quality and attention to detail, and her artworks show it. She takes such joy in making things “extra special”, especially during the holidays. Her craft posts may entail a bit more description geared to those who don’t make crafts on a regular basis. Even if you do, you’ll appreciate the thoughtful insights so your projects turn out beautiful!
More unique Holiday crafts to try:
How to Make This Cute Snowman Wall Hanger
Snowman Globe Tabletop Decoration
Golf Ball Snowman for the Christmas Tree
The form you have selected does not exist.
Kris! I had a thought, how about dish plates made into a Mummy for Halloween? Plain white plates or black and white striped plates and it could be draped with paper streamers.
I do like your snowman!
Yes, Lorna, that’s a very creative idea! I really DO want readers of this blog to be inspired to come up with their own take-offs or ideas based on this craft. That’s what it’s all about! You’re right, it doesn’t have to be a snowman…it could be something else. If you make your mummy, please send me a photo and I’ll post it on the blog for all the world to see! Thanks for being a part of MIAG
Thanks for sharing our craft!