You can never go wrong with a snowman!
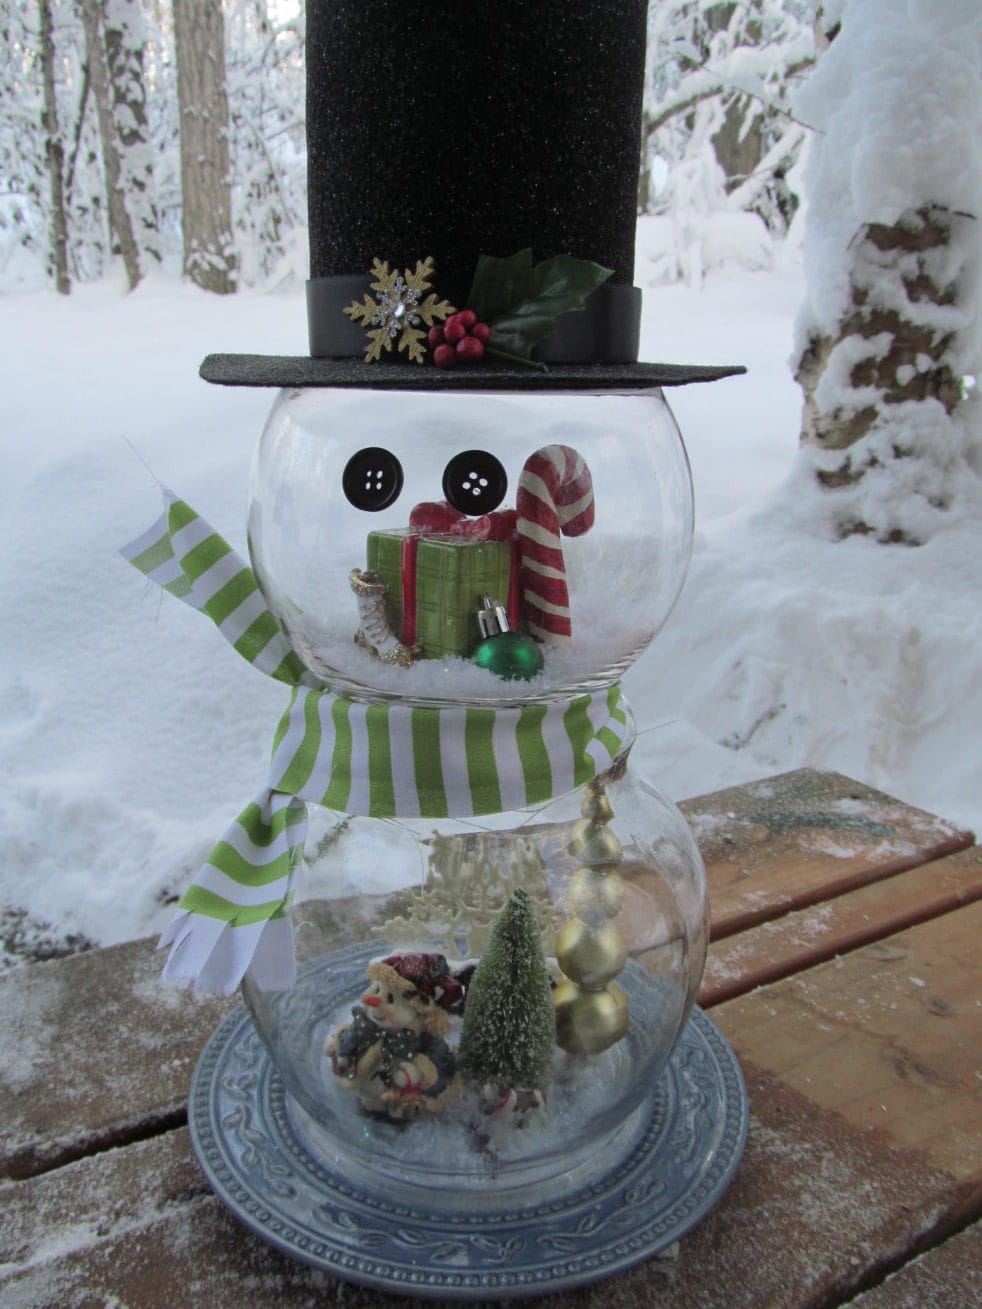
This adorable snowman globe decoration makes the season merry and bright. He’ll delight anywhere he’s on display. It’s fun to have something imaginative not commonly sold at the box stores. People will want to know where you “got” this? If you’re a crafter, this one-a-kind creation makes you stand out at a craft show. You’ll have something unique the crowds won’t see at other tables.
Make this affordable & unique
When I first saw this idea on Pinterest, I just had to make one! I create plate flowers in the summer and was looking for a holiday craft that involved dishware. But those little miniature figurines for creating the scenes inside are expensive. Even the glass globes were more than I wanted to pay…even on-line! I almost gave up before deciding to see what I could come up with at the thrift store.

Turns out those globe vases are a dime a dozen. But the thrift stores in my area tend to get only the small ones, so I ‘punted’ and used a different shaped vase for the bottom of my snowman globe decoration. You could do that, too!
Using vases with a slightly different configuration, also meant that many of those holiday miniatures found at Michaels or Jo-ann’s were too big or too tall to fit inside. Or if they did, there wasn’t enough room for other figures. So I had to create my own “scene” using whatever I could find.
Just like retail shops, thrift stores are literally overflowing with Christmas and winter-themed decor. Plus ribbon, bows and fabric. And, they’re eager to get rid of it, because they actually do have more ‘in the back’. They’ve been saving it up all year and they need it gone, which means great prices for you!
Materials list for a snowman globe decoration

Everything you see in the photos are things I found at the thrift store. But they are also things that will make your snowman globe decoration absolutely unique! Look for things that together, make a little cohesive scene.
For special tips on choosing figurines that tell a story, link to part 2 HERE
Or see what you already have at home. Things like tiny little sleds or trees or wrapped packages can easily be made by hand.
- 2 clear, globe-style vases. (or substitute with other wide glass vase) The top one smaller than bottom one
- A bottom plate for a base [note: since these are light weight and can tip or get knocked over, I like to make my snowman more secure by gluing it down to a base that provides more stability. I used a flat, metal candle base for one. But a plate works, too. Just make sure it’s white or some solid color that won’t distract from the finished piece.
- Glue: clear craft glue for glass. (something like E-6000). Regular craft glue/hot glue gun is fine for the rest.
- 1 bag of “snow” (the small/fine granular stuff)
- black buttons for eyes
- Wide ribbon or other material for scarf
- Ribbon for hat brim
- Hat option: Make one from dishware by combining a saucer and small baking dish (SEE below) I just happen to have found two blue ones, but you can use spray paint to make them match. OR make a fabric top hat from a thick/stiff piece of felt.

Collect odds & ends to create your Christmas/Winter scene: single snowflake, artificial greenery, miniature tree ornaments/balls, pine cones, Christmas/Winter figurines. Using the best looking, prettiest and cutest items you can find improve the finished product.
Look for seasonal jewelry, too! Pins or earrings are a great way to find small items: the gold-trimmed lady’s figure skate in one of my snowman globes was a pin (75 cents). The sparkly silver snowflake on one of my hats was also a pin. I hope you’re beginning to see how unique and original your snowman will be!
How to put it all together

TIP: A diorama tells a story. So make your snowman globe decoration extra special by creating a little story around the scene inside. Imagination and attention to detail will also ensure there’s more to see in Mr. Snowman than meets the eye! SEE Tips HERE
Instructions
STEP 1: Hand-wash the glass globes and dry with a cotton towel. If you have it on hand, use Isopropyl alcohol on a cloth and wipe the inside so glass is smudge free and sparkly.
STEP 2 Decide how your vases best fit together. It may depend on their shape. In both of my snowmen, the bottom vase is glued face down to the surface of the plate. This is because the mouth of the vase was the widest at the top and allowed the most room for my scene and fit easily over the top of the figurines.
If you have a matched set, you can glue the bottom vase to the plate top-up and place the figurines down inside.
STEP 3 BOTTOM Vase/Globe Create your winter scene using the items you collected. Glue them down to the surface. You don’t want them loose on the inside. Add snow. You do not have to glue down the snow. If it gets tipped, the snow will settle back down to the bottom. Glue vase to surface of plate using a clear craft glue for glass.
STEP 4 TOP Globe Top globe is face up. Create your winter scene using the items you collected. Glue them down to the surface. Add snow. Glue the top globe on top of the bottom globe so they are stacked one on top of the other. Use a clear craft glue for glass such as E6000.
STEP 5 black buttons for “two eyes made out of coal” as the song goes… You can add nose and mouth, too if you wish. I personally liked the look without them. Up to you!
STEP 6 TOP HAT You can make a hat by gluing two ceramic dishes together (saucer/small baking dish) OR make a top hat from scratch with thick/stiff felt.


How to Make A Felt Top Hat
- Use the top globe to measure for the diameter of the hat rim. Make a round cardboard cut-out for the hat rim. Test first, by placing over the globe to see if it’s the size you like for the rim. Then, cut the piece of felt just a bit wider than the cardboard so it overlaps just enough to hide the cardboard edge and glue it. Glue cardboard hat rim to the edge of the vase. This is the bottom of your top hat. TIP: Be careful not to let the glue drip and run down on the inside of the glass. You may wish to apply glue to the edge with a toothpick. You don’t need a lot for the hat rim to stick.
- Measure for the height you want for the hat. Cut a long, horizontal piece of the thick/stiff felt. Bend it into a cylinder stove-pipe shape and glue the two edges together. Wait to dry completely, make sure it doesn’t come apart and it glued securely. When dry, glue the cylinder to the rim. Next, cut out a round piece of the felt to make the top of the hat and glue it to the top of the cylinder piece. Your hat is complete.
- Decorate the hat. Use a ribbon as a hat band. Spritz with glitter. Add a snowflake, some plastic holly or mistletoe etc.
What’s the story in this happy scene?

Here’s one example:
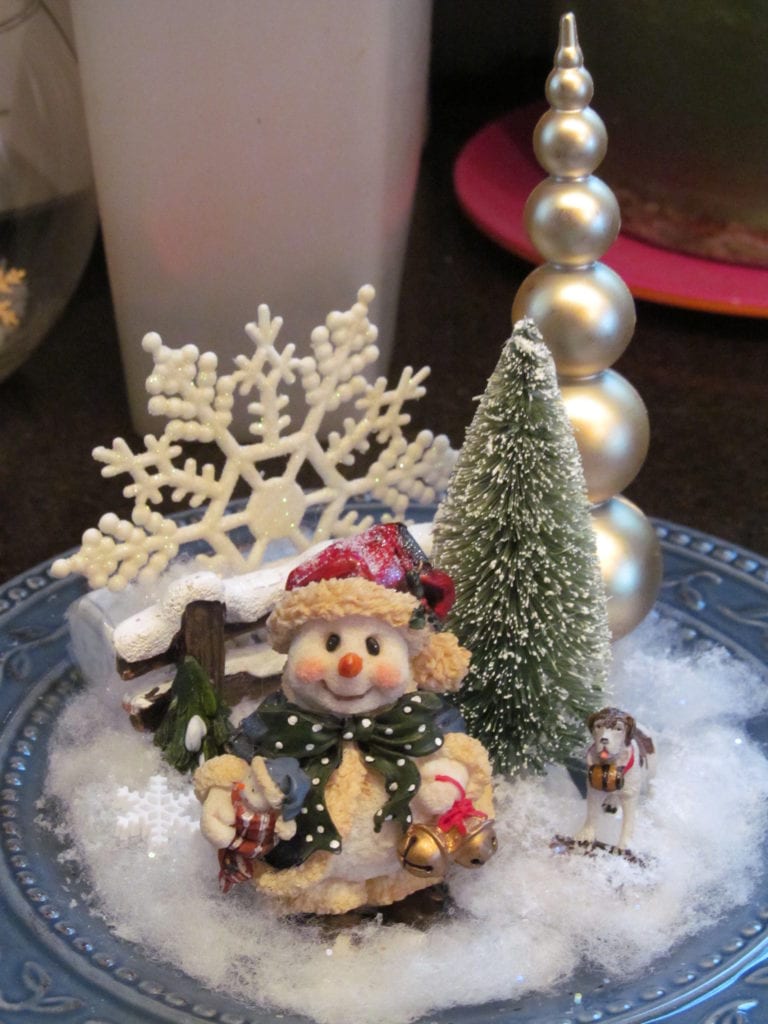
In my diorama above, the snowman figurine is carrying presents and dressed warmly for the weather. I decided that he was on his way thru the woods to deliver those gifts to a friend. Why the bells, you ask? In case he gets lost? To scare away bears? Nope! Bears are hibernating this time of year. Maybe the bells can be heard from a distance so his friend will know he’ll be arriving very soon. I like that one better, don’t you? Besides, he’s got his faithful dog at his side to keep him safe and for companionship along the way.
Do you have a little story to go with your snowman globe decoration? Maybe the kids (or grand kids) will have some ideas!
DON’T FORGET YOUR FREEBIE! Scroll below to receive your special garden decor tips and be part of the Make it a Garden Community!

Final Thoughts
At the most wonderful time of the year, it’s especially worth the effort to make something creative and unique. If you wove a fascinating little story on the inside, you’ve got an instant conversation starter. Everyone loves a snowman and this table top decoration is sure to make the season bright!
I’m very interested in your feedback. If you make the snowman globe, please let me know in the comments below. You’re also invited to be a Make it a Garden insider when you sign up for our newsletter. Thanks for stopping by!

About the artist:
Kristen specializes in up-cycled crafts. She has a reputation for quality and attention to detail, and her artworks show it. She takes such joy in making things “extra special”, especially during the holidays. Her craft posts may entail a bit more description geared to those who don’t make crafts on a regular basis. Even if you do, you’ll appreciate the thoughtful insights so your projects turn out beautiful!
Other Unique holiday crafts to try
Front Porch Snowman Decor with Plates
Golf Ball Christmas Tree Ornament
The form you have selected does not exist.


Your plate snowman is so cute !
Everyone one would be so special and unique with all the different plates.
Love it !!
Awe, thanks Kathleen! I just enjoy playing around with different ideas and seeing what I can come up. And you’re right…LOTS of possibilities.